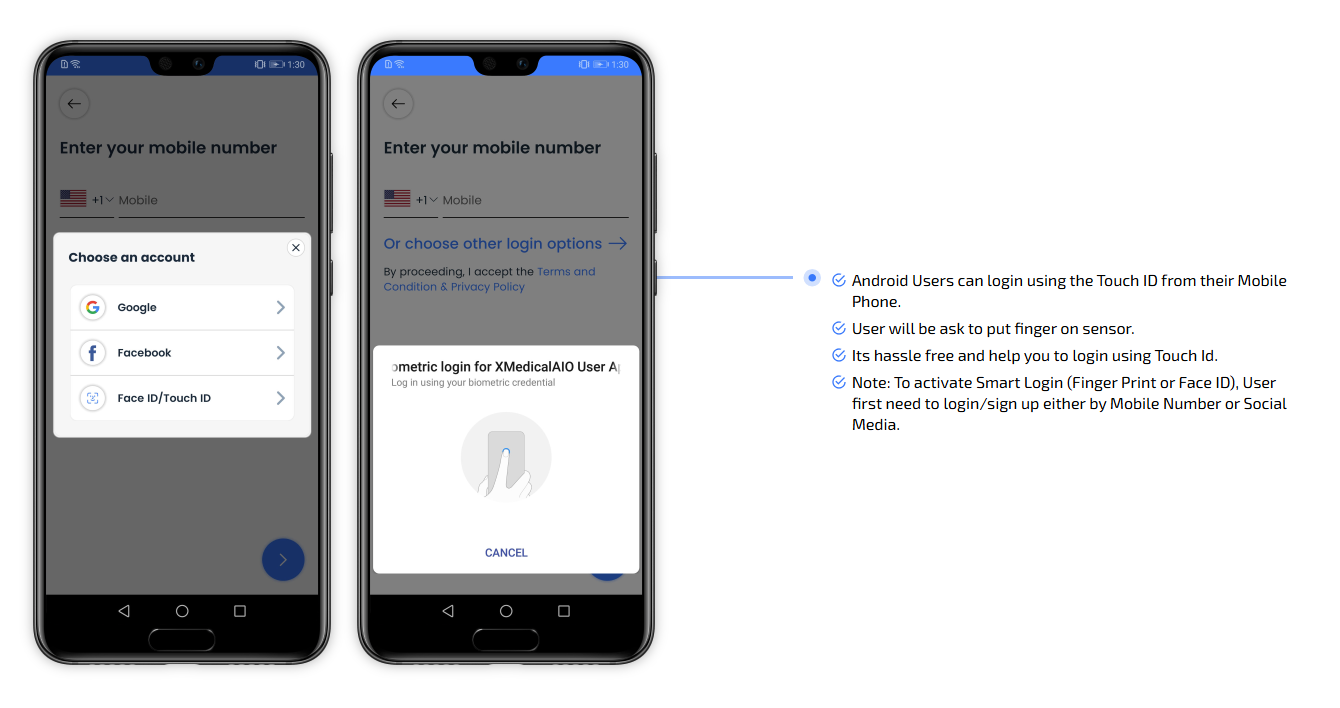
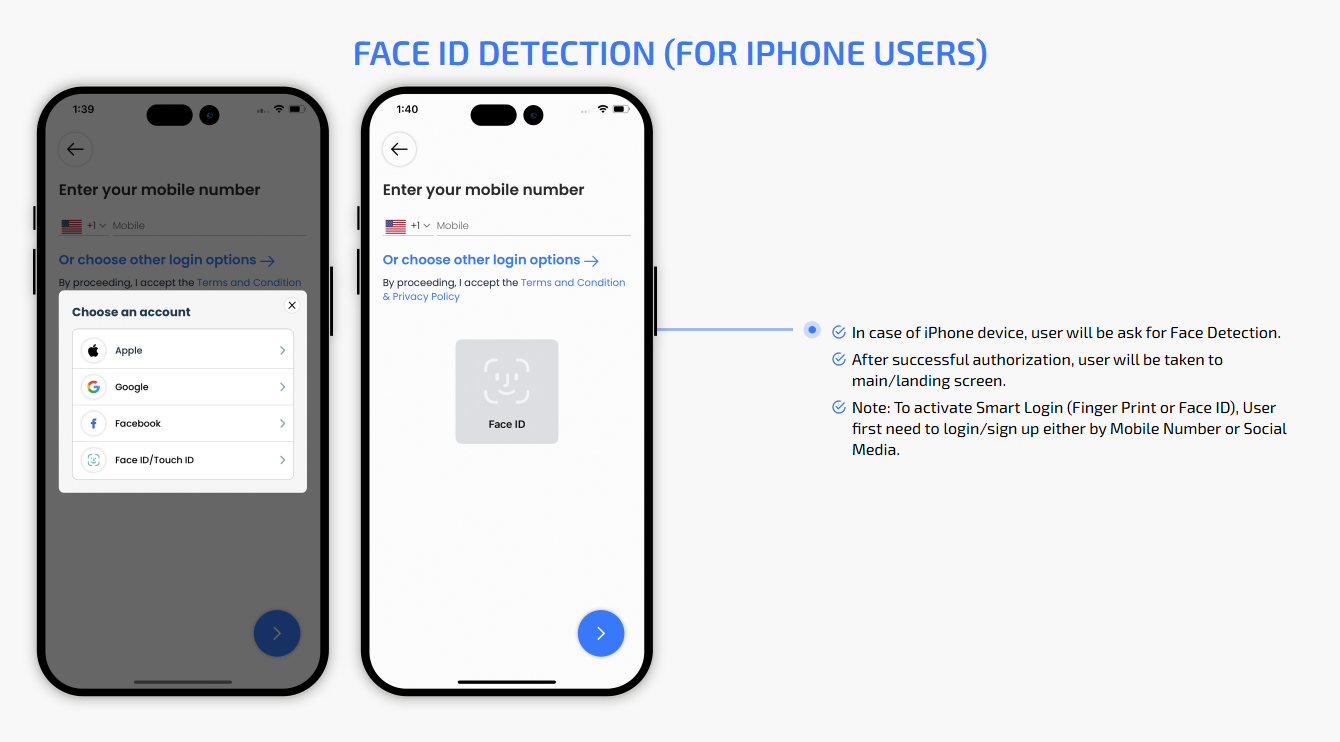
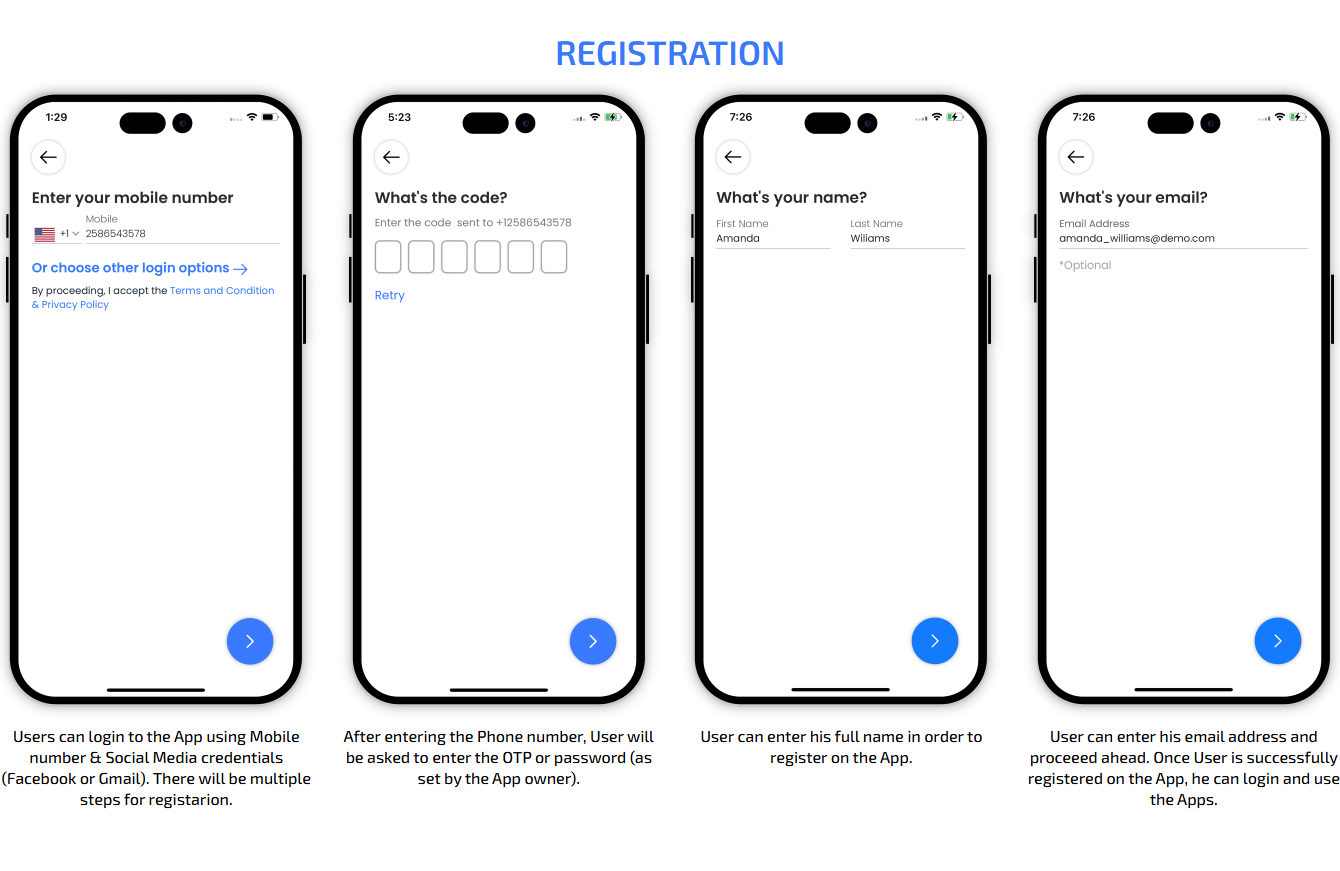
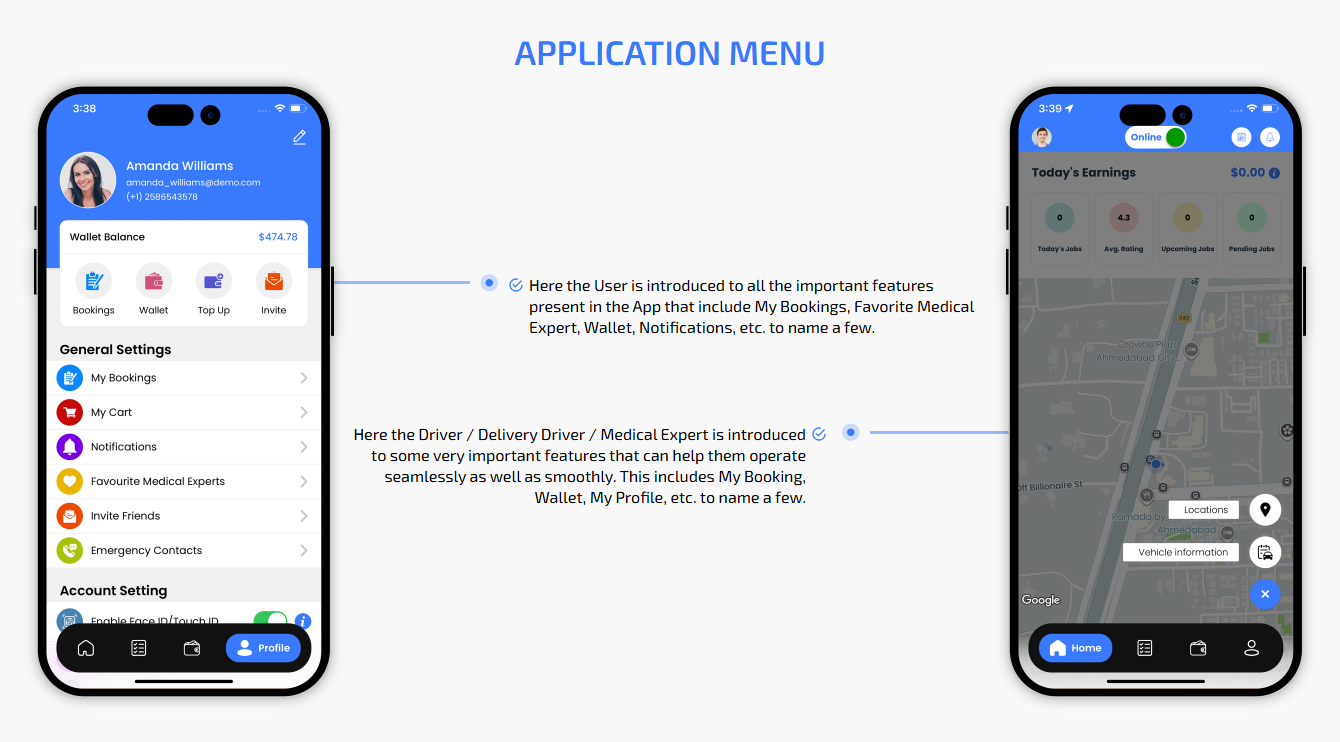
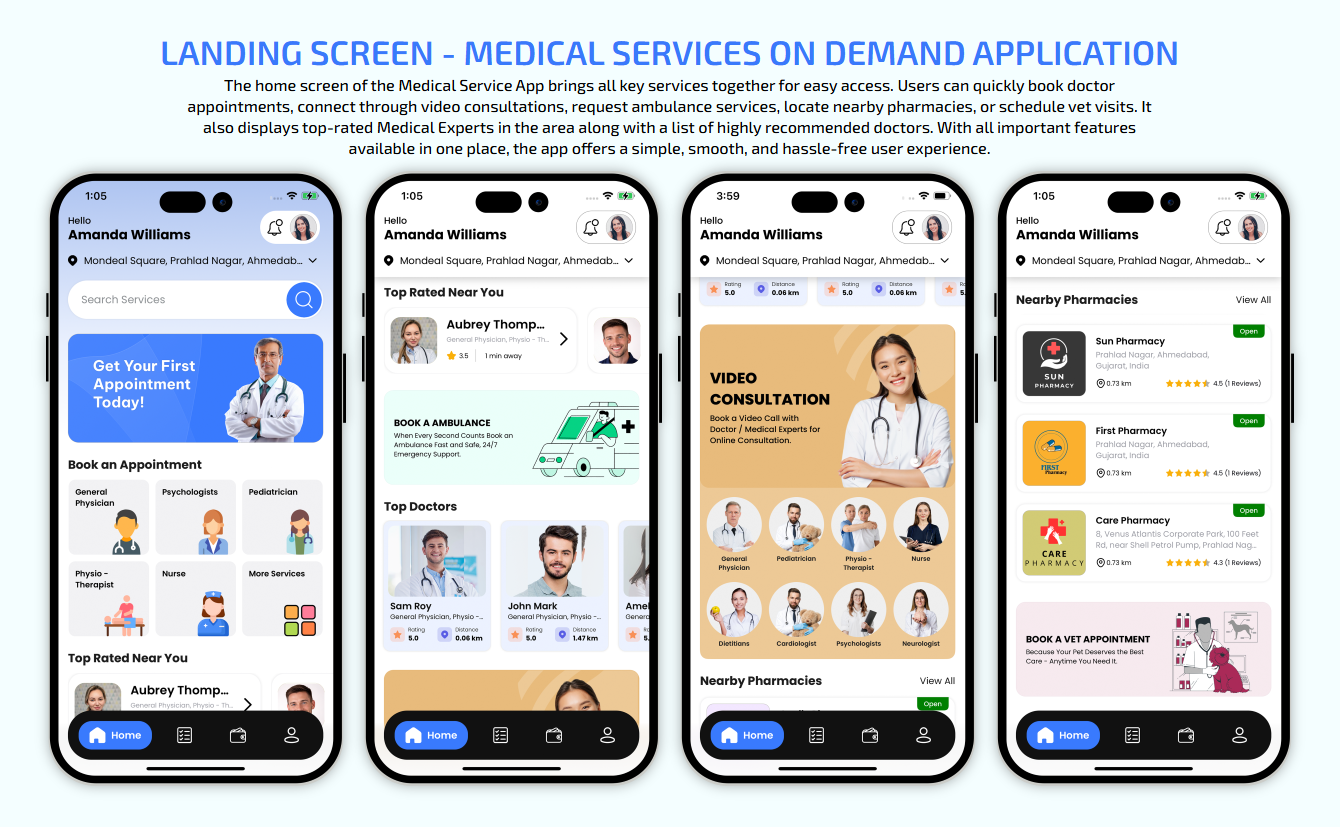
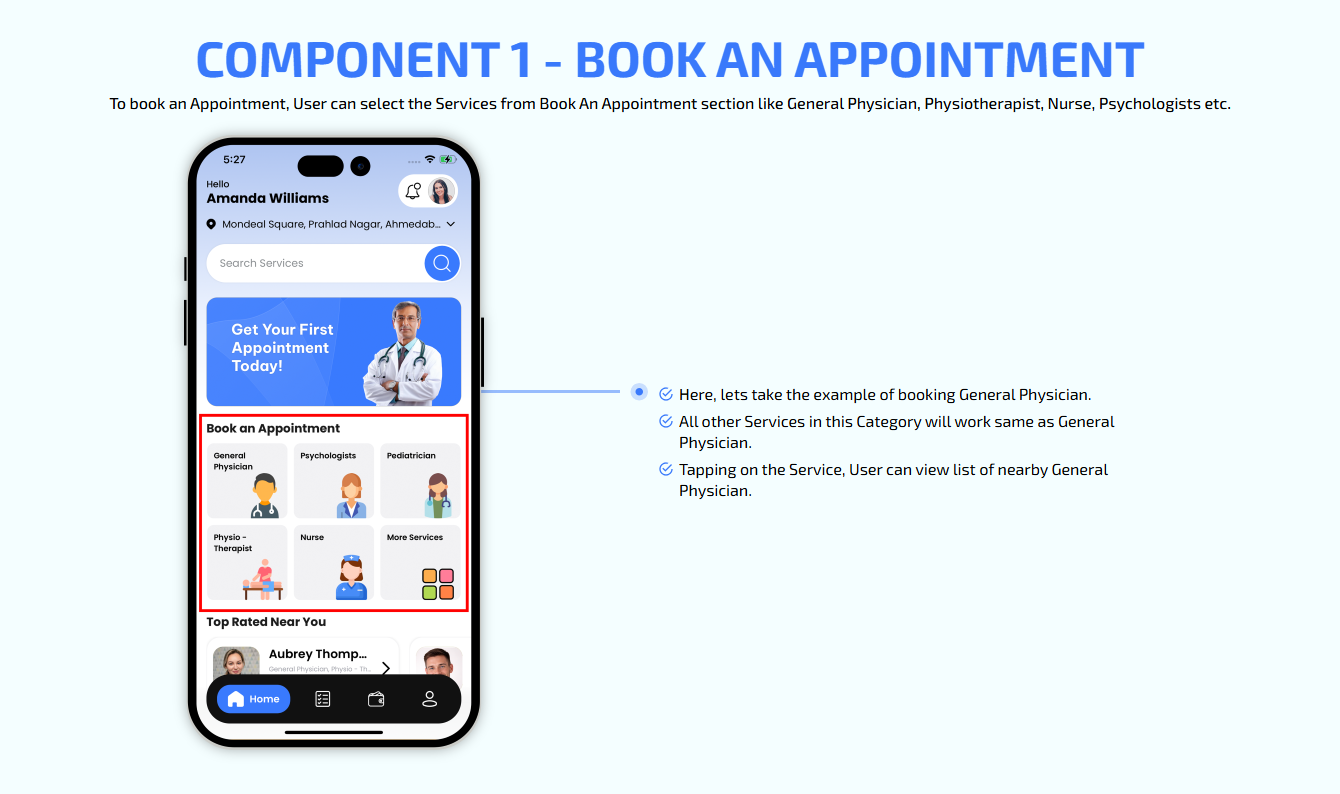
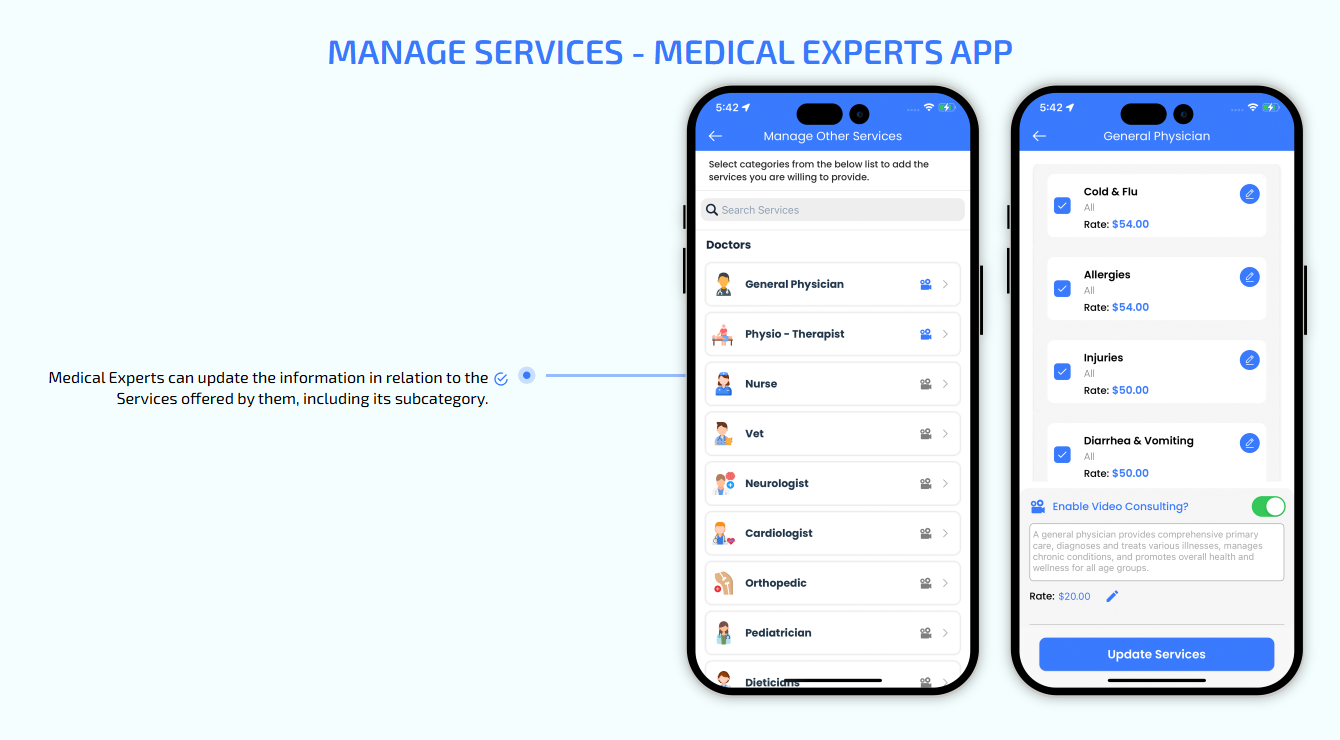
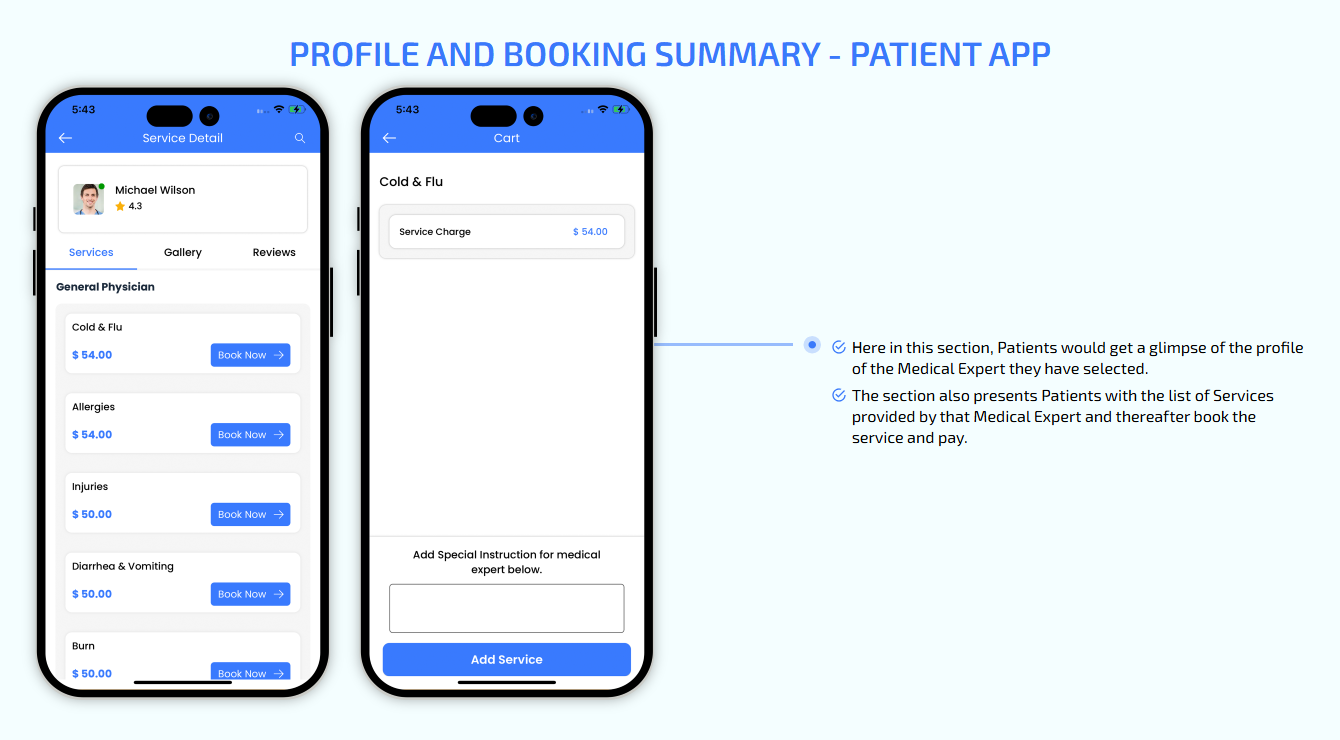
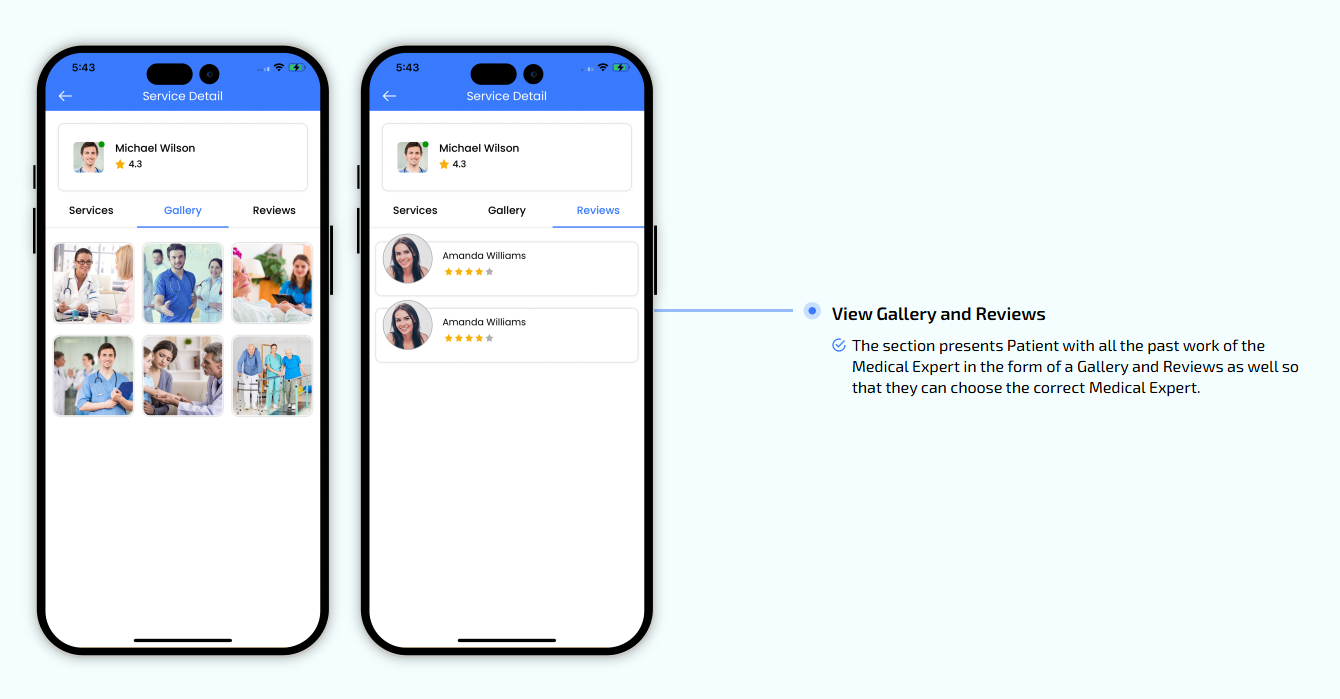
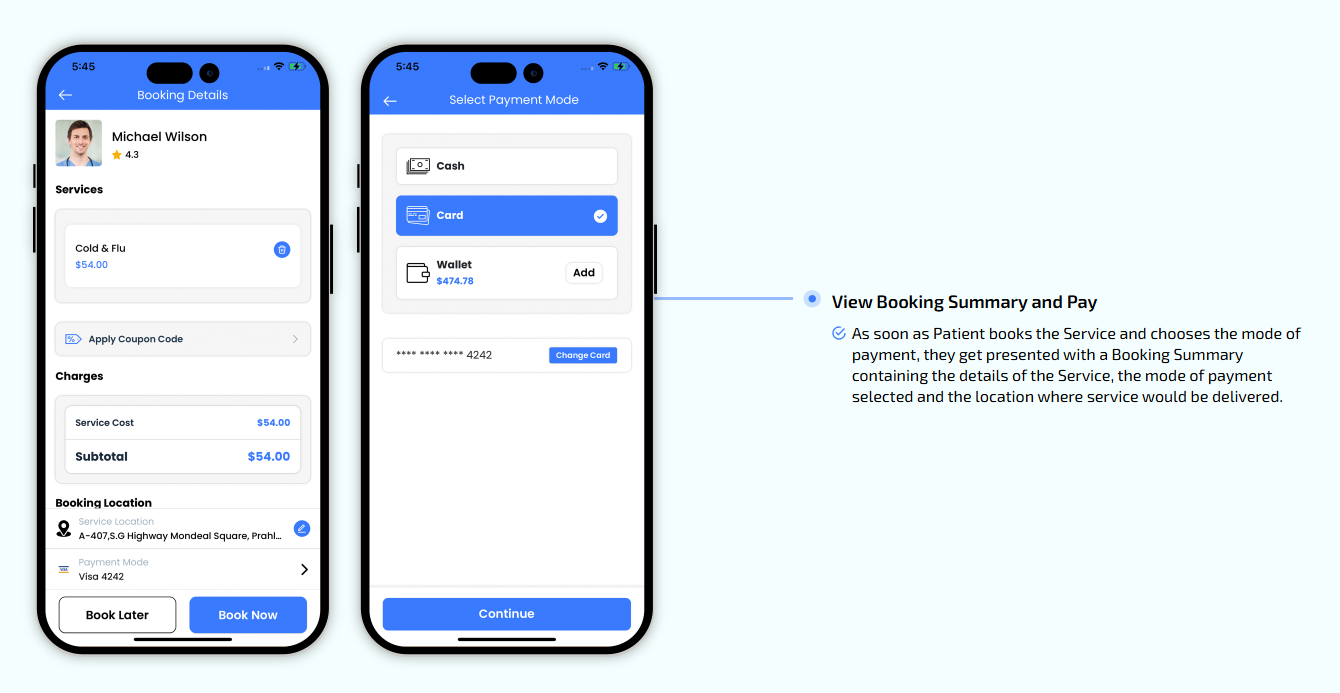
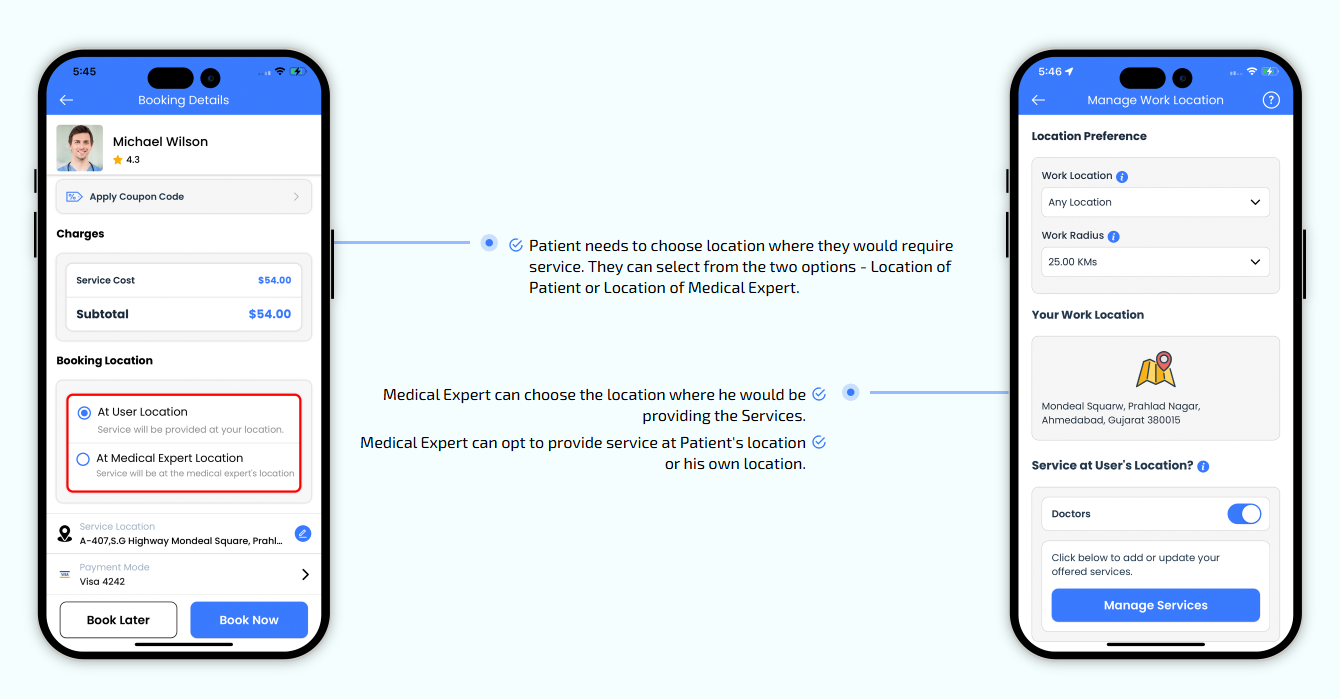
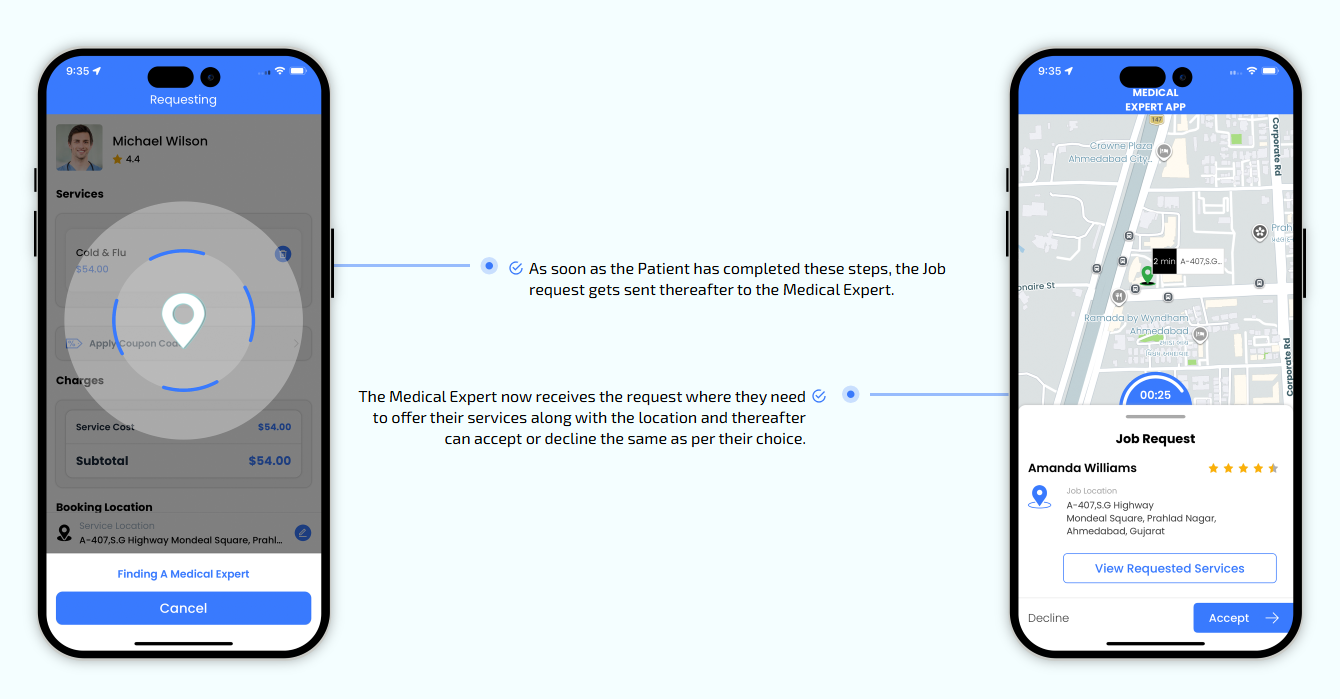
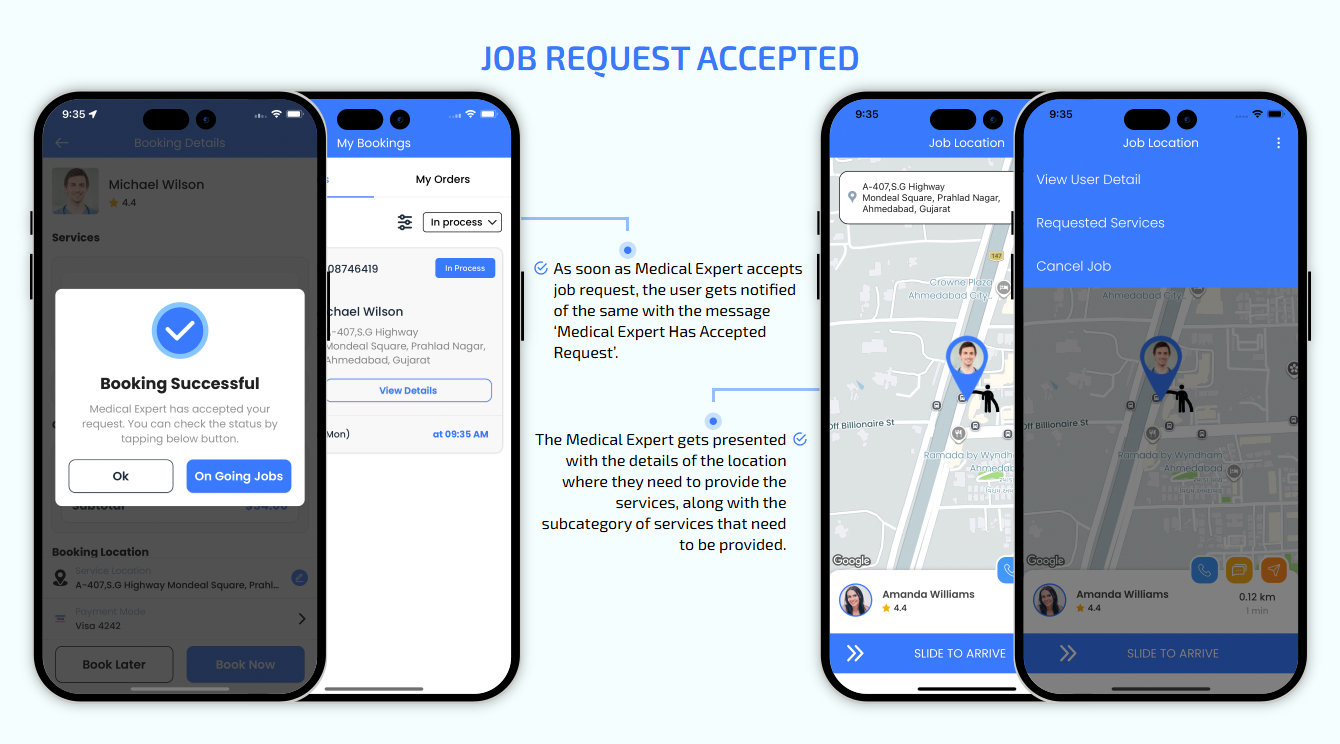
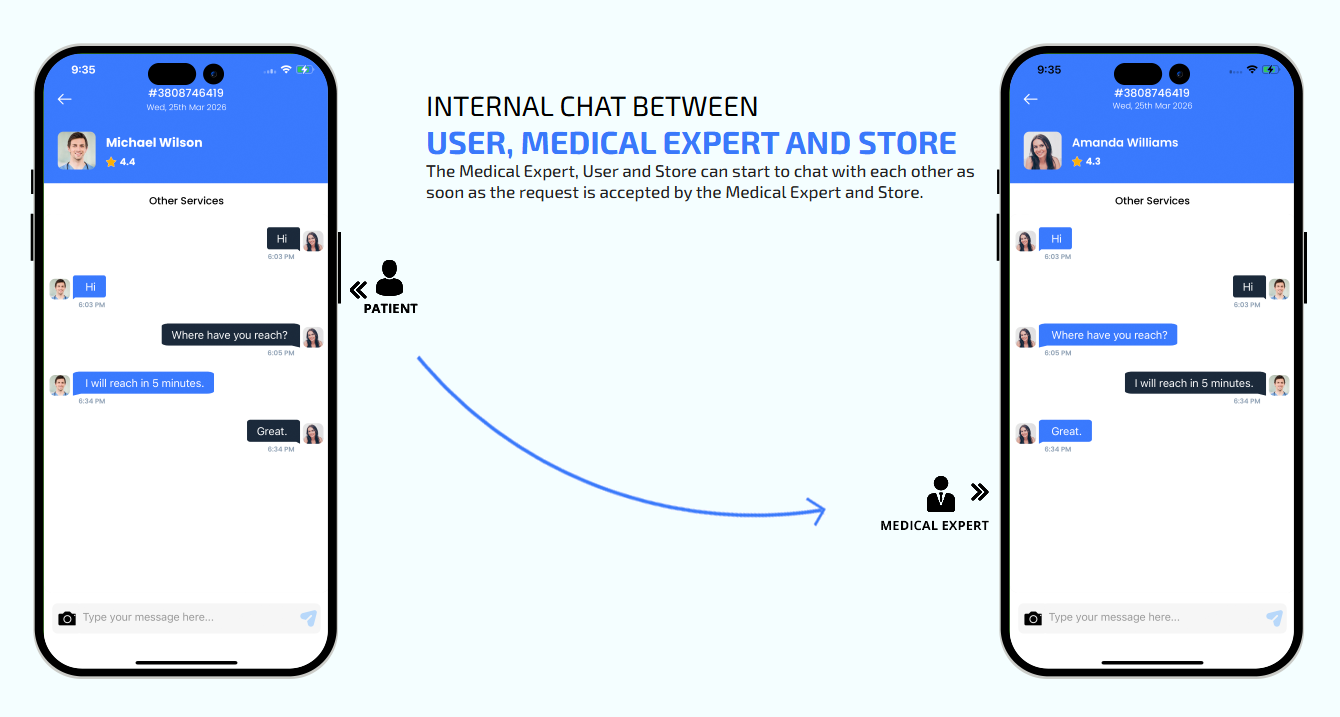
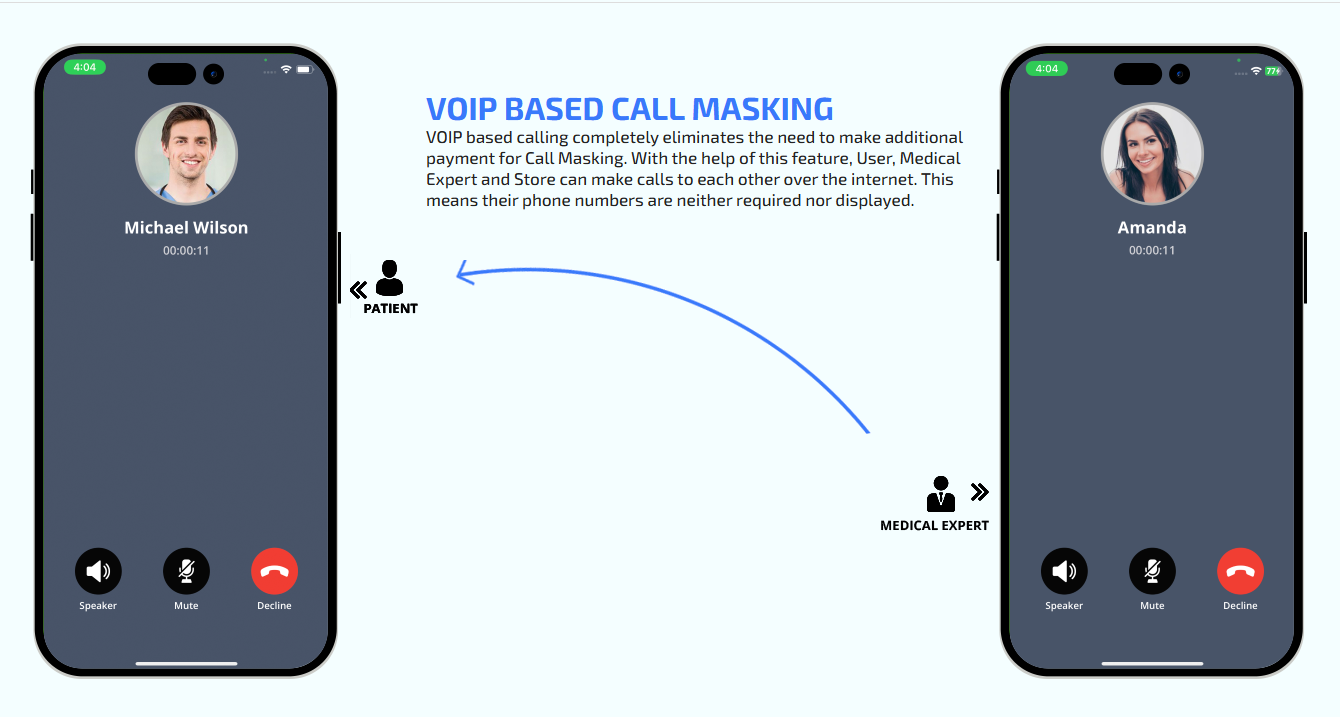
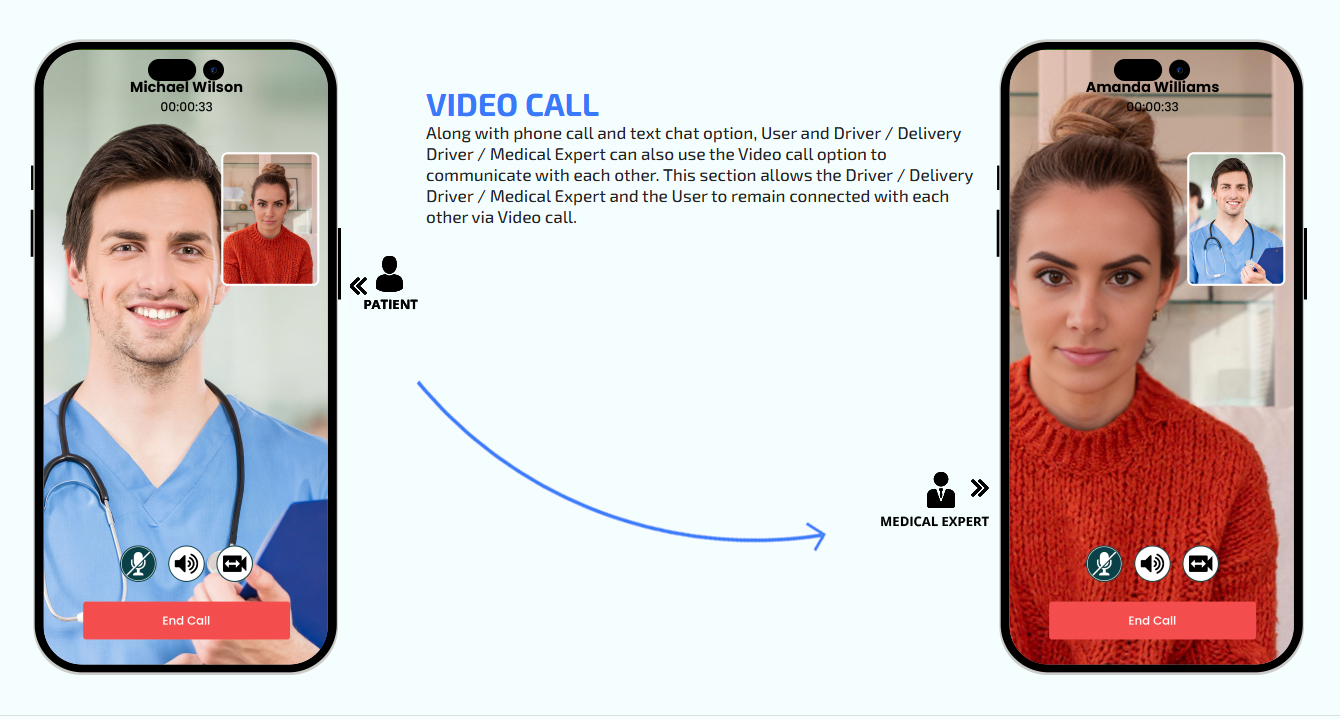
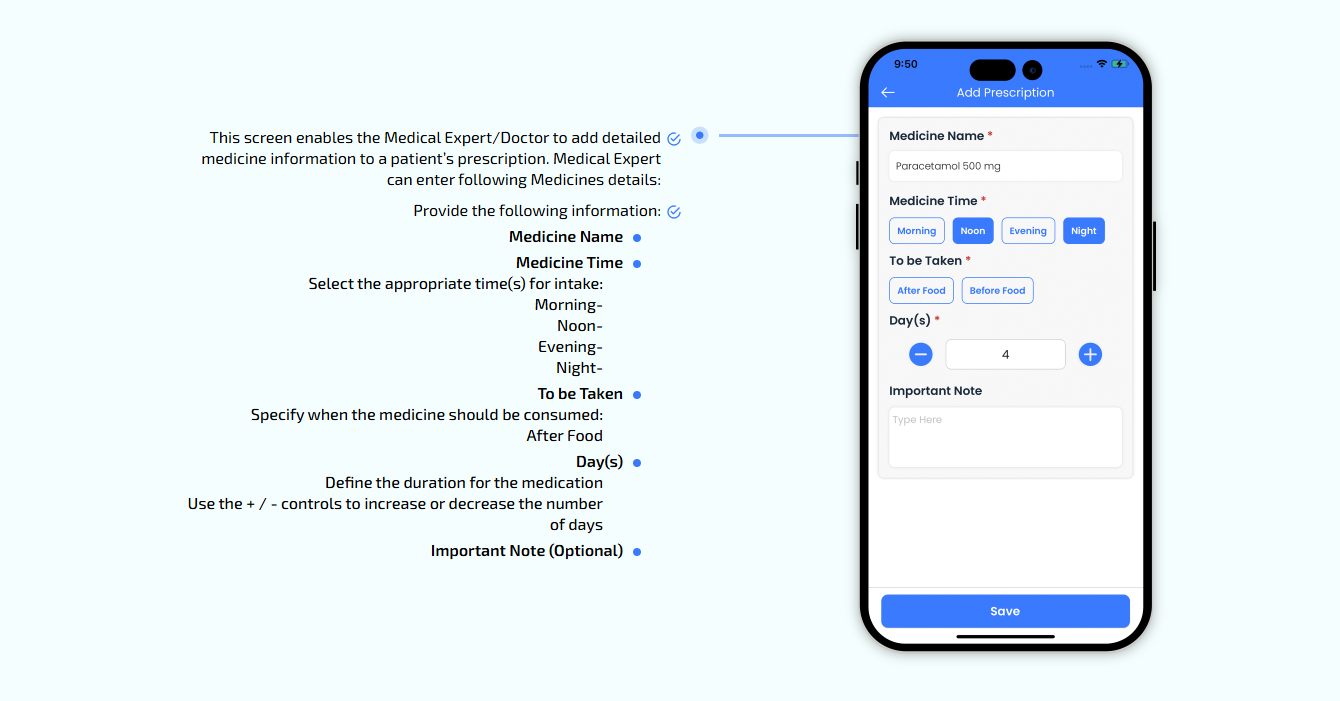
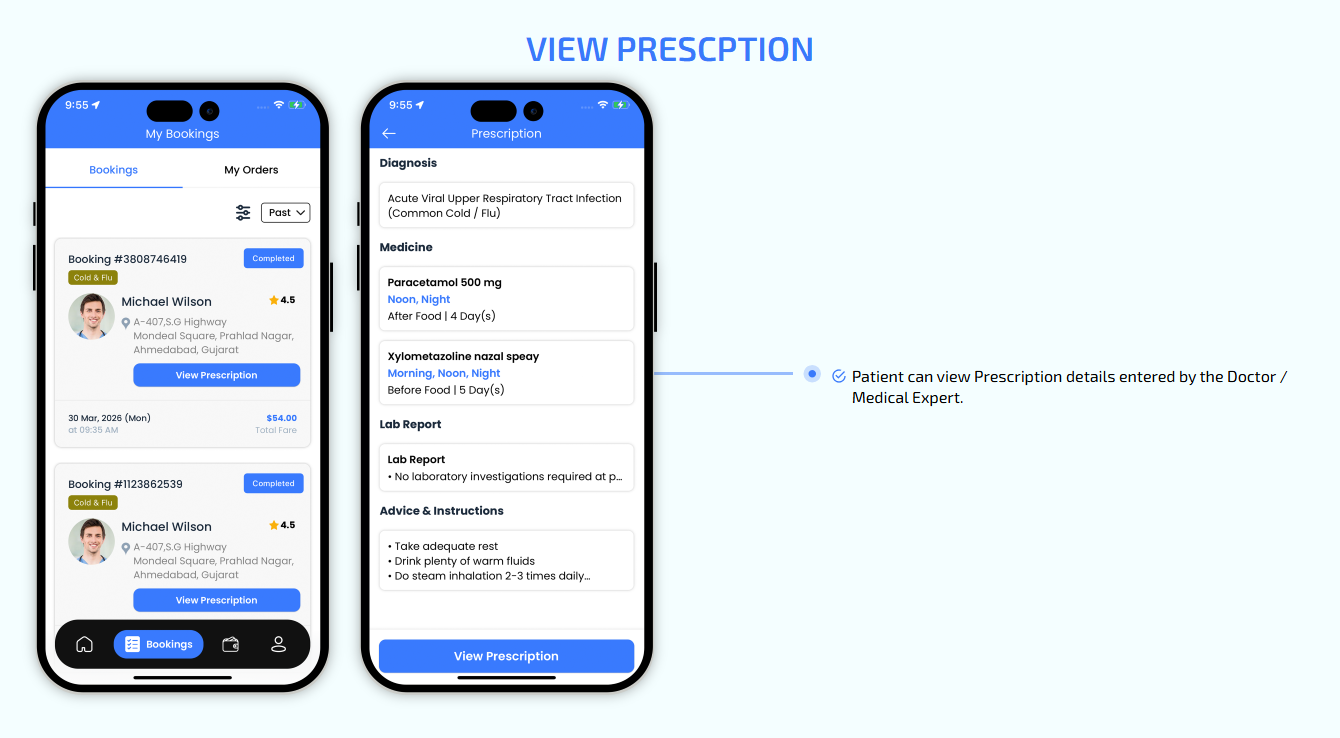
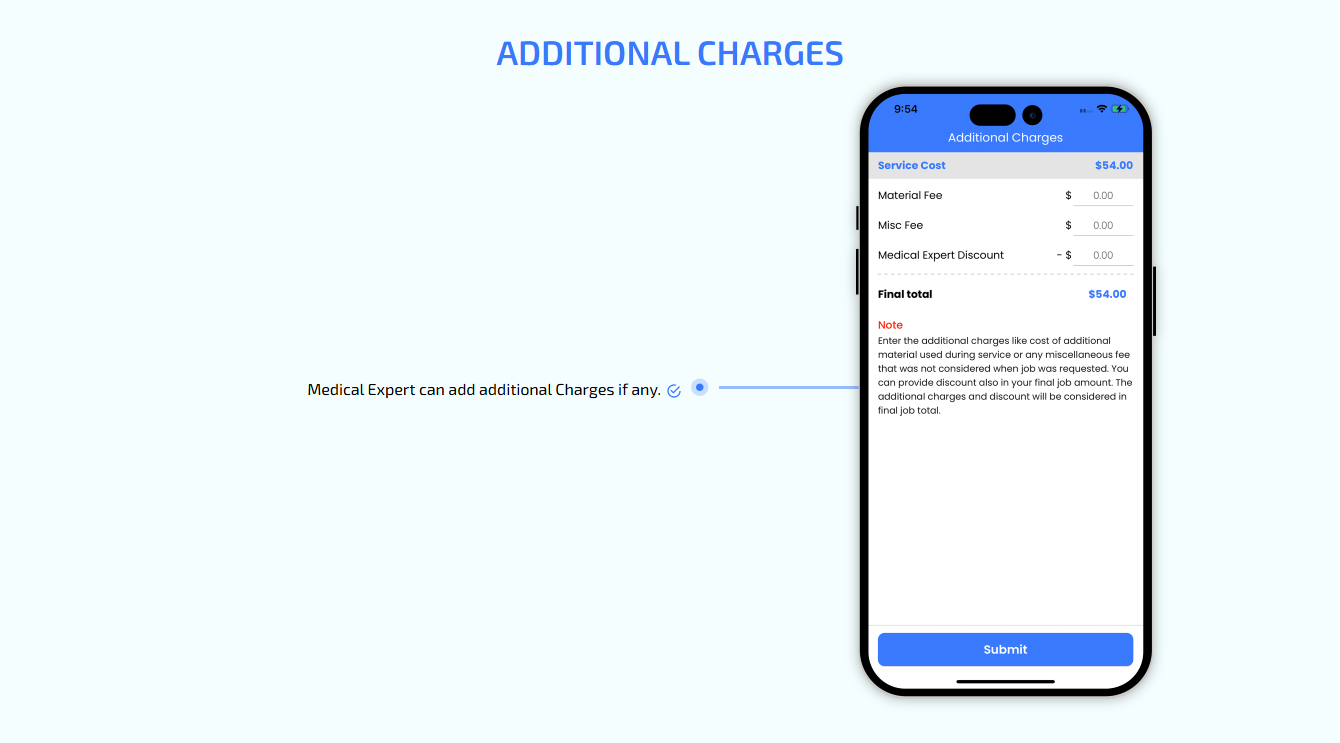
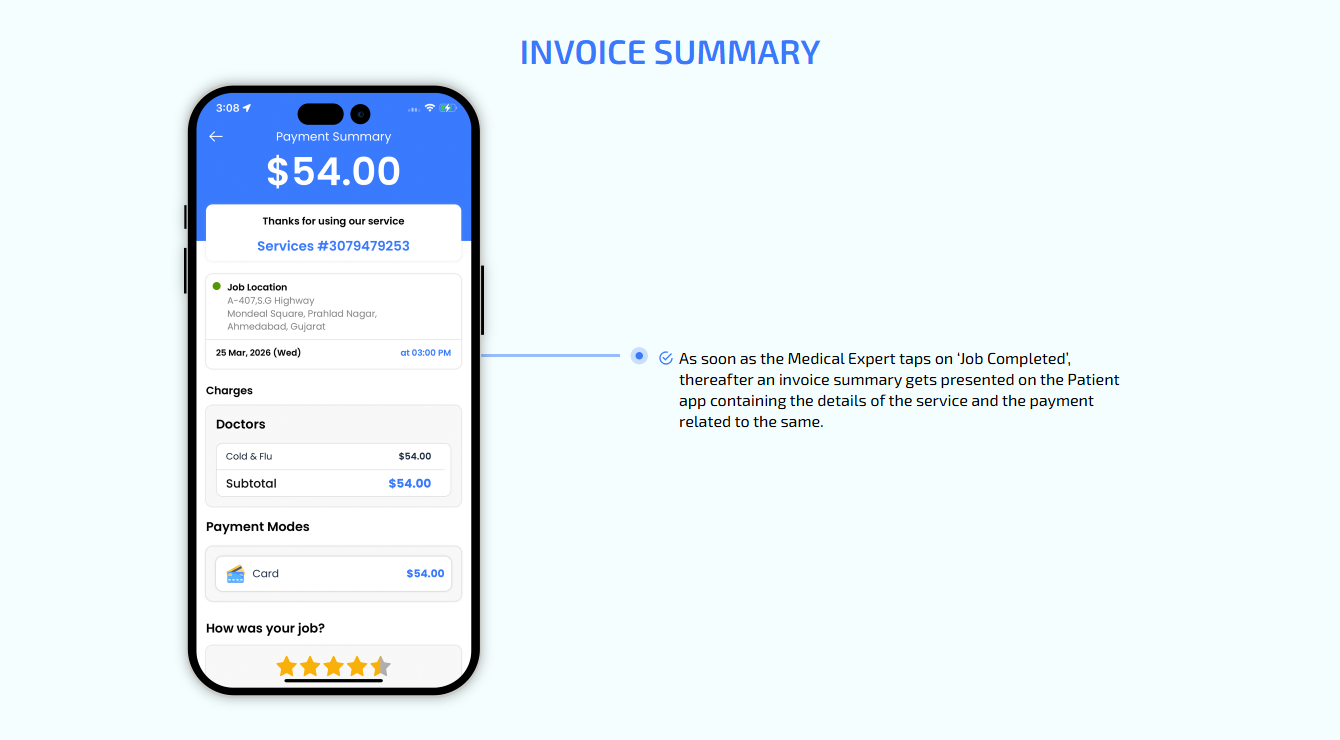
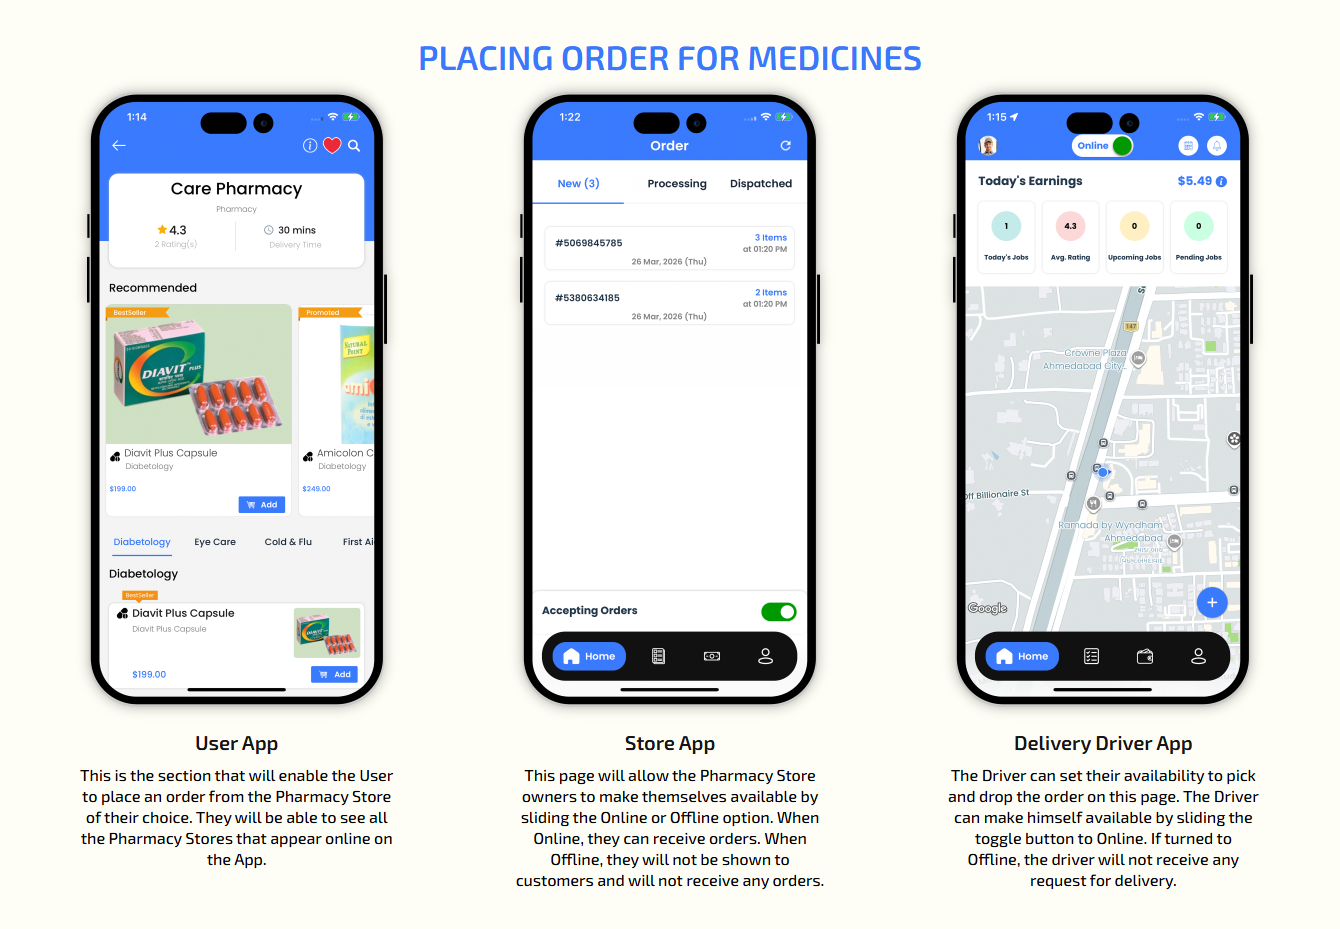
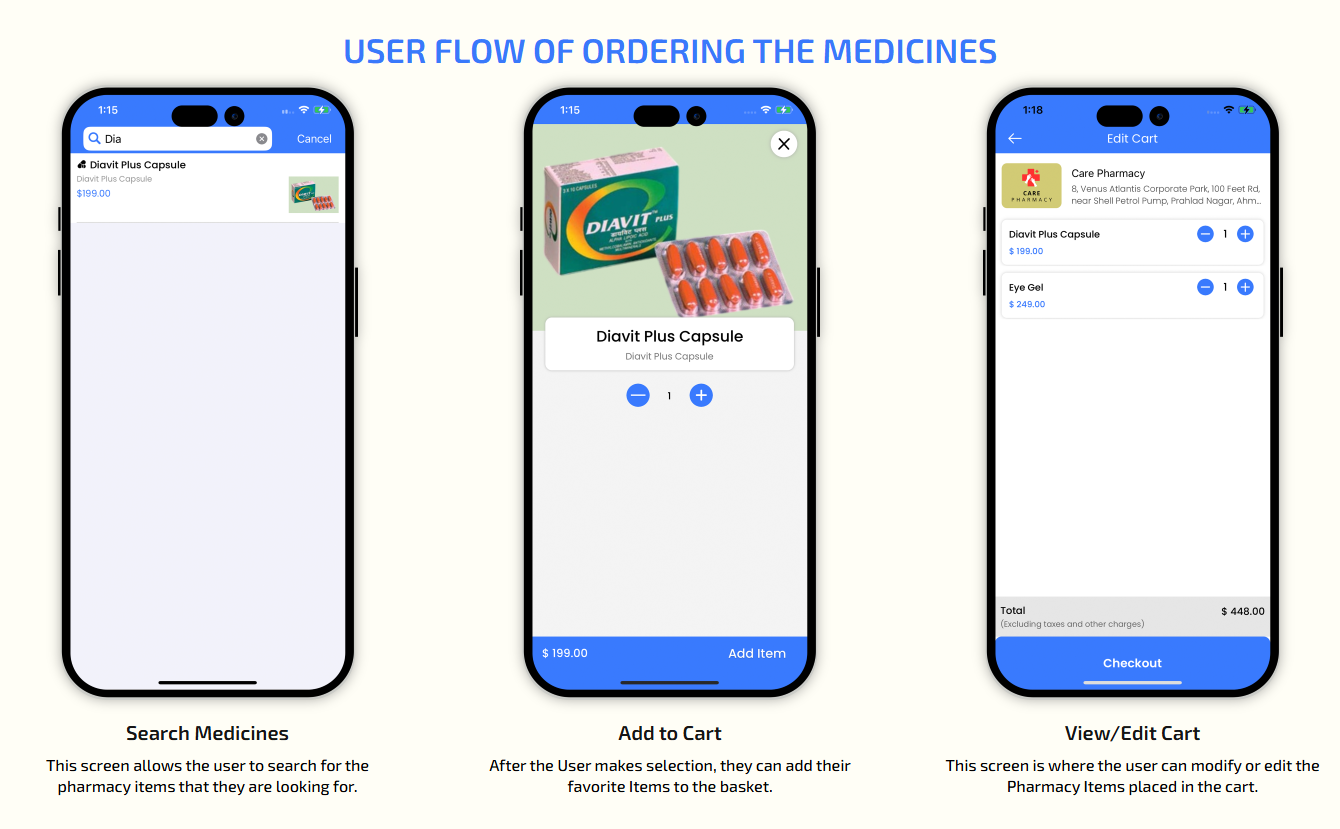
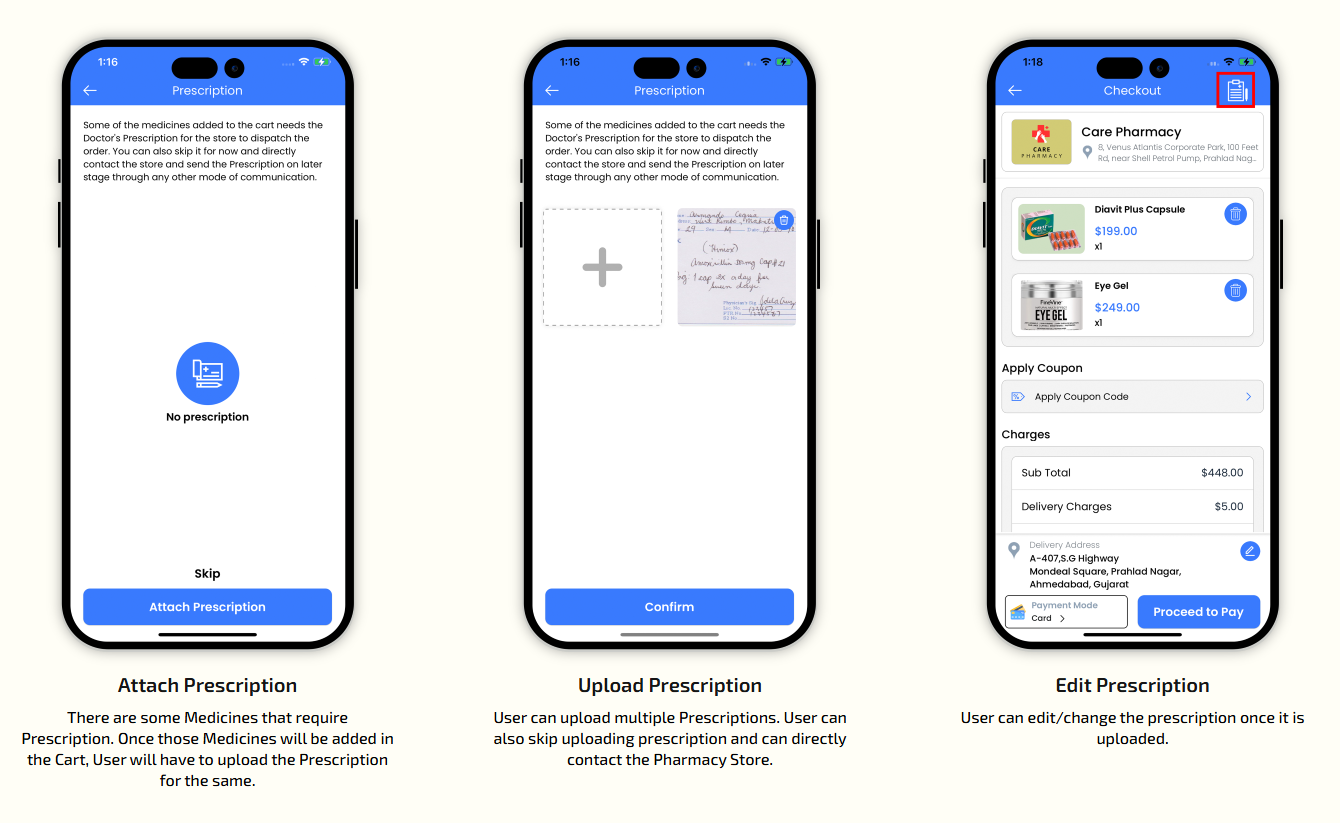
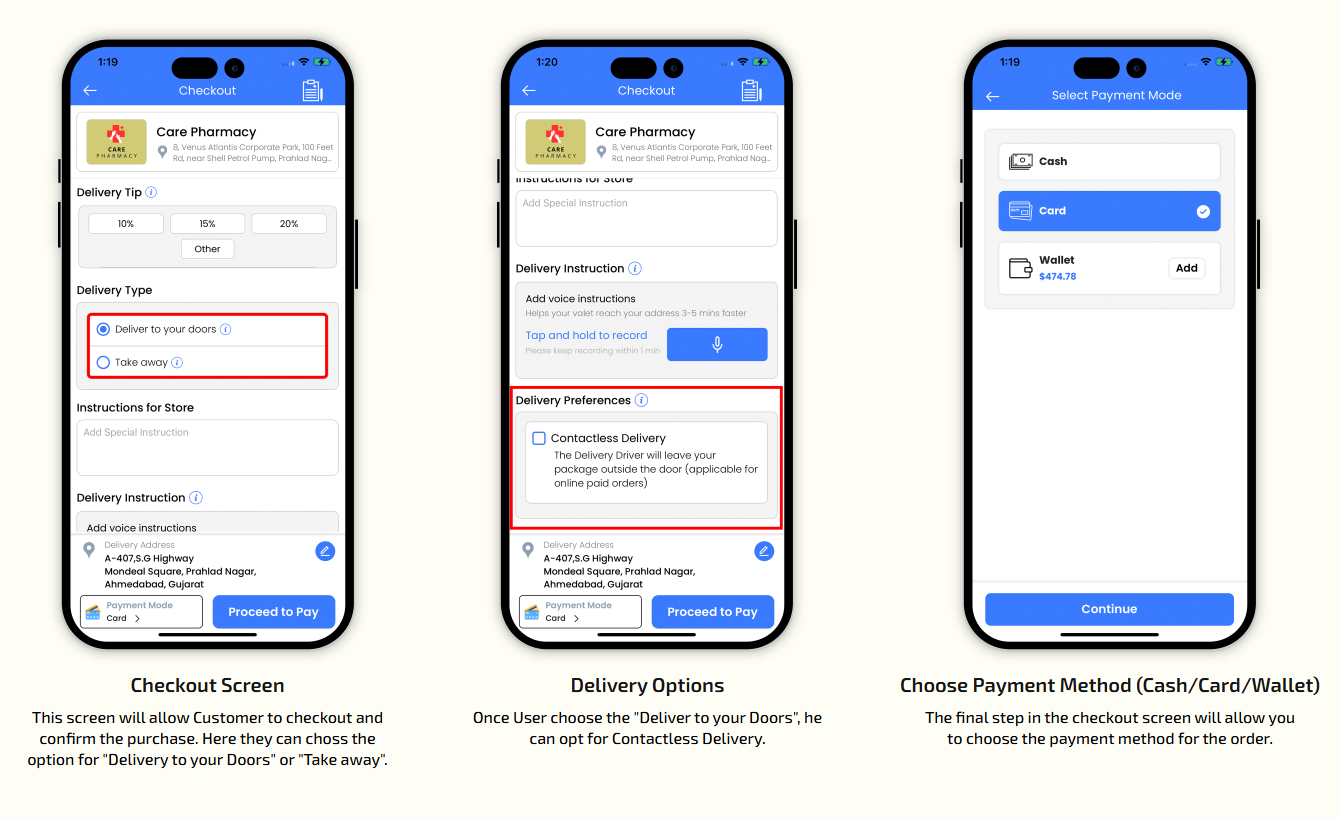
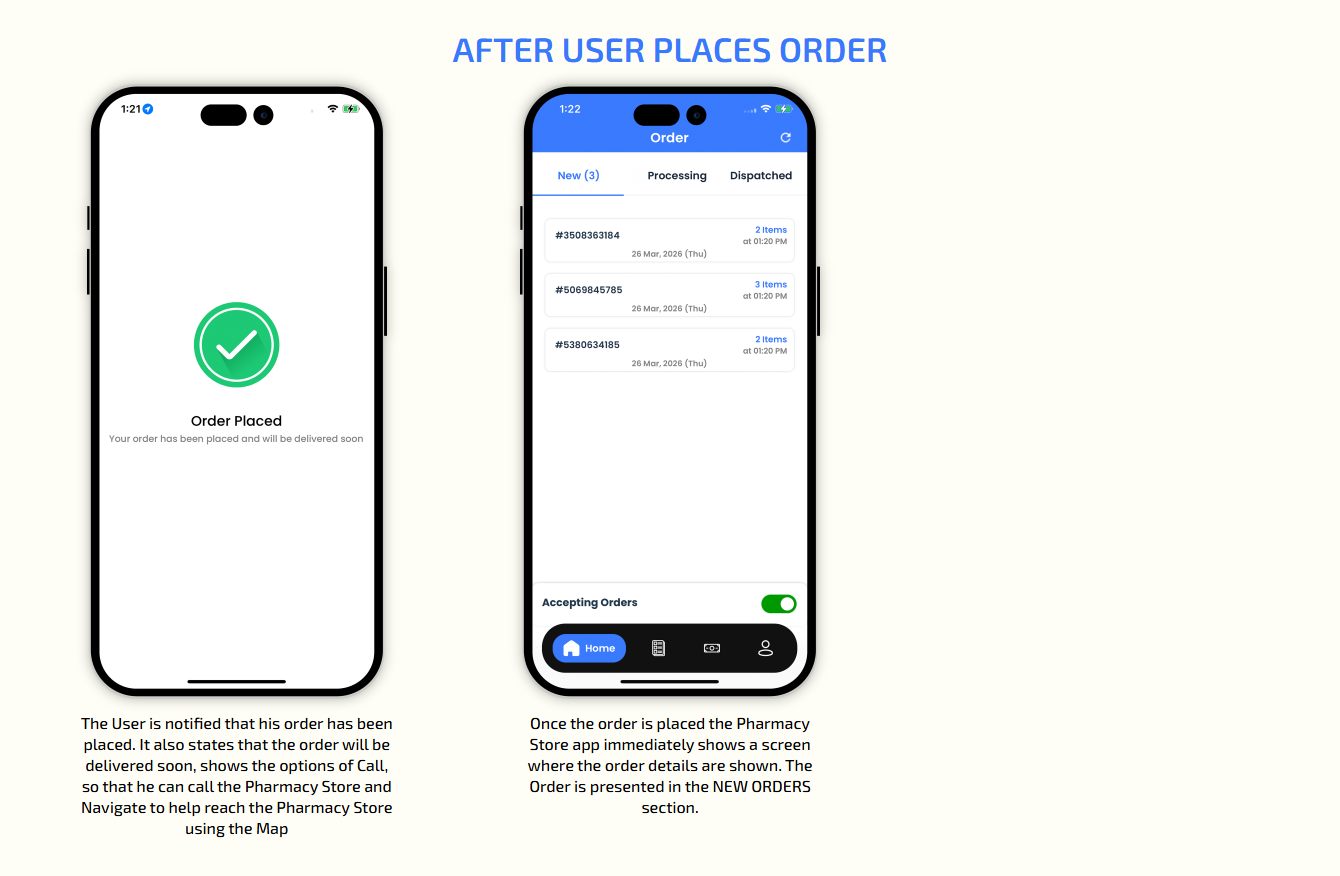
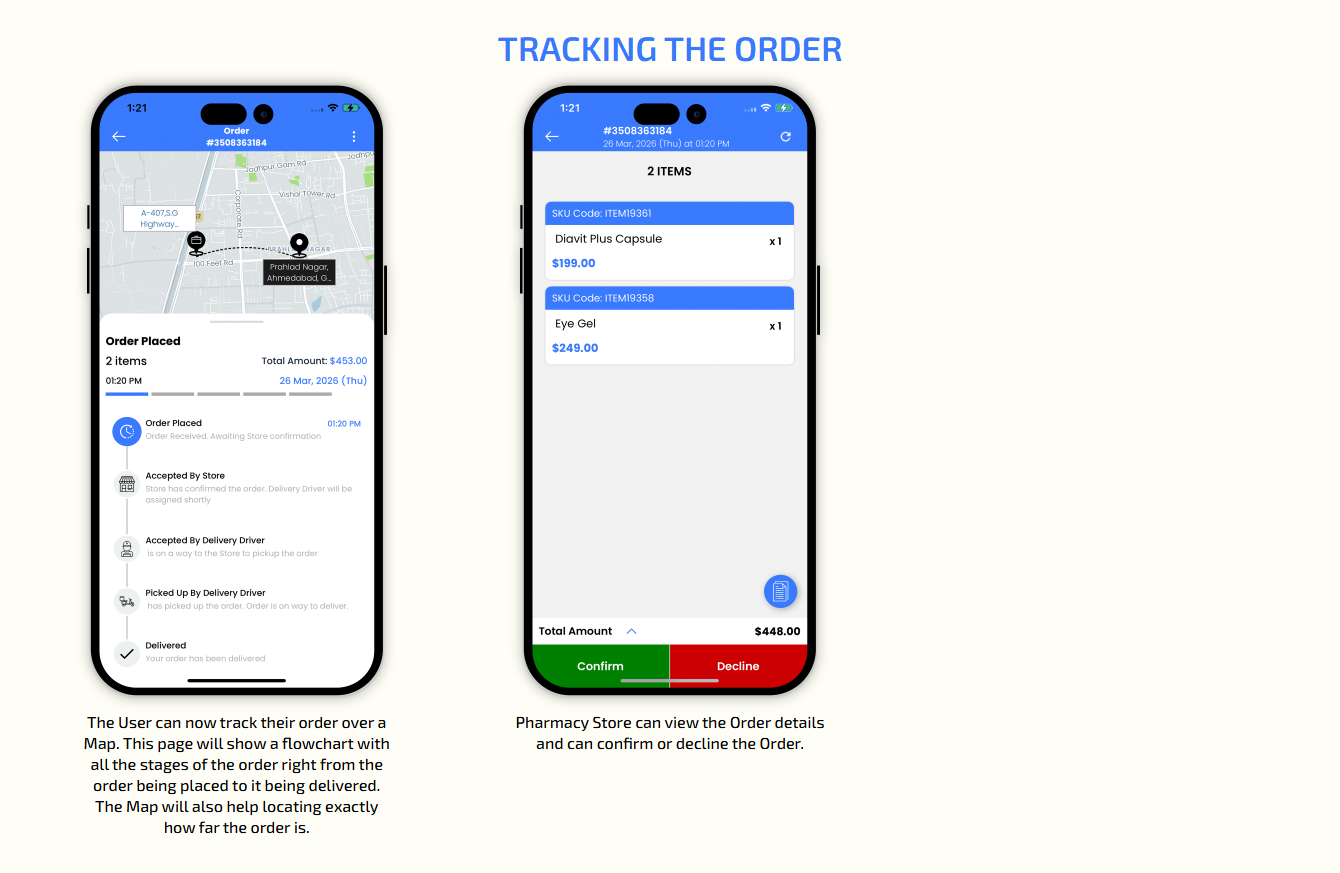
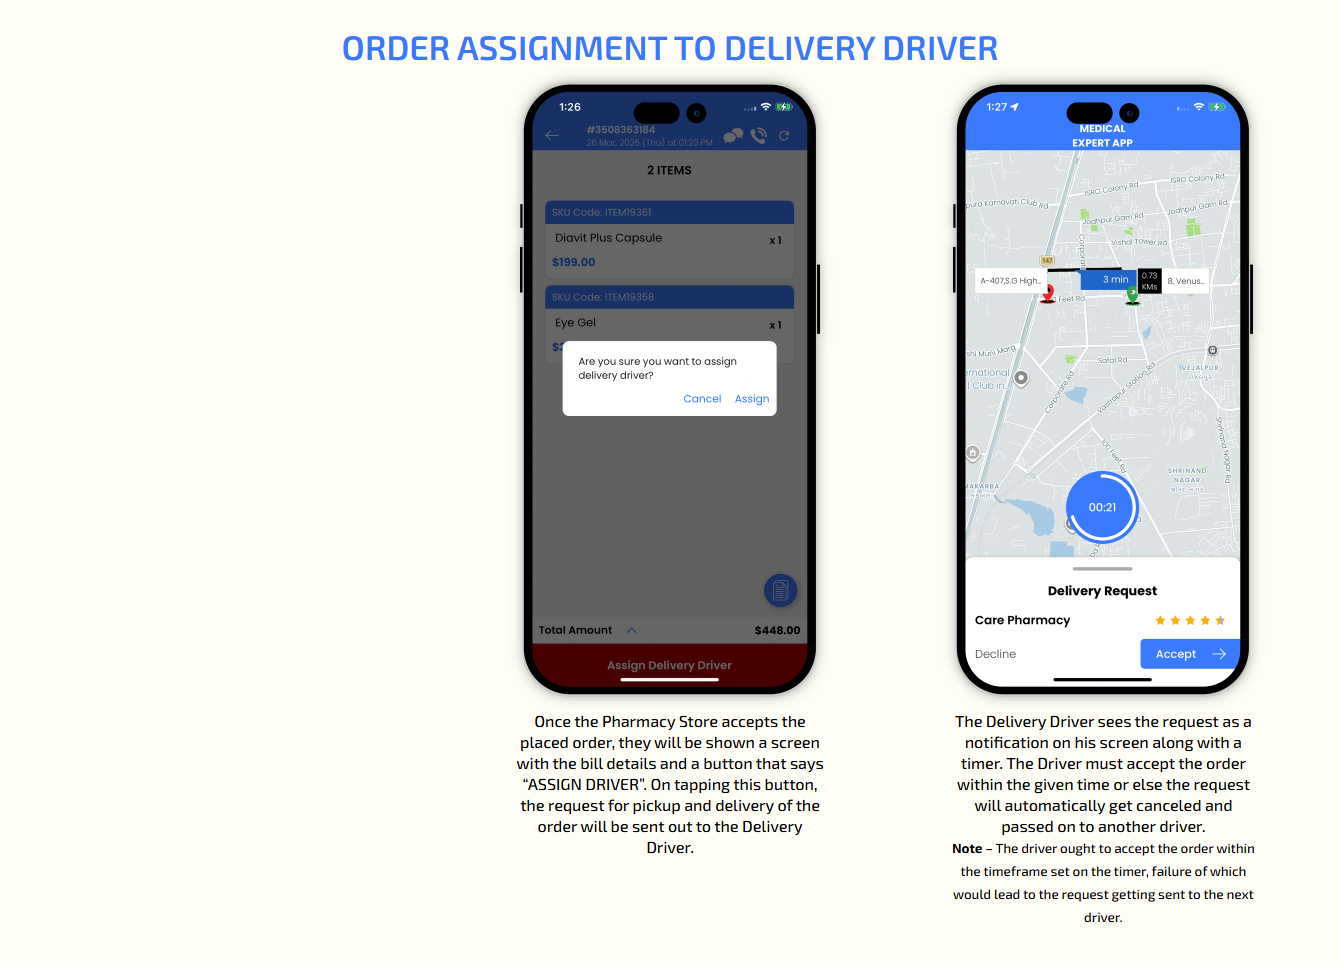
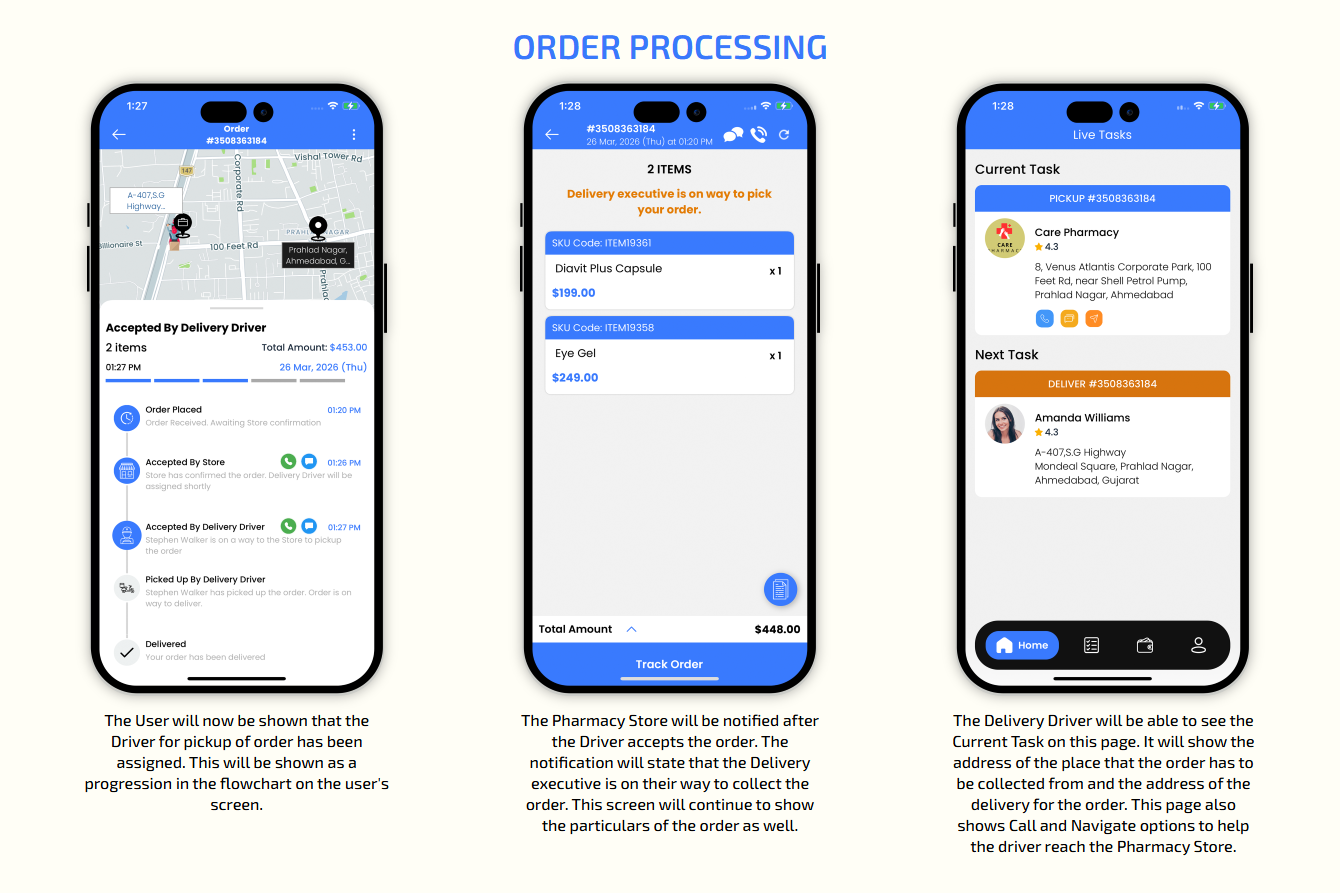
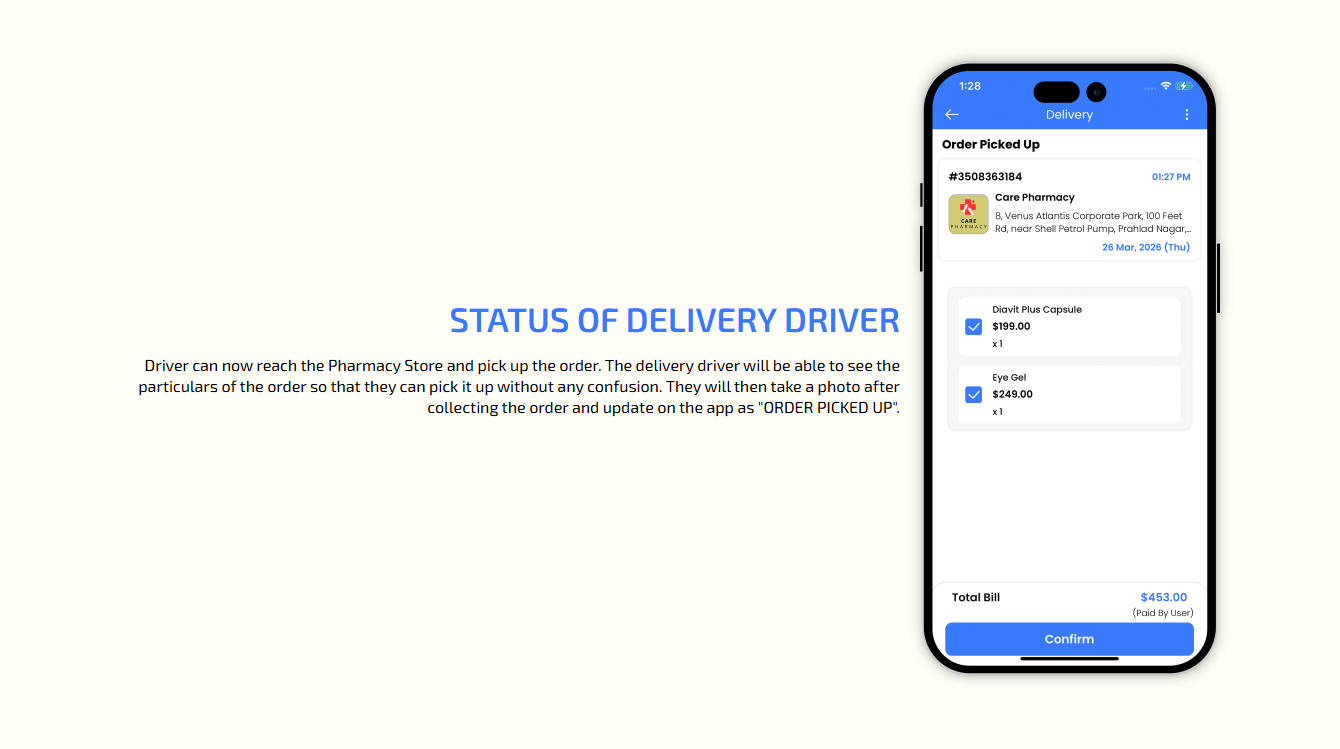
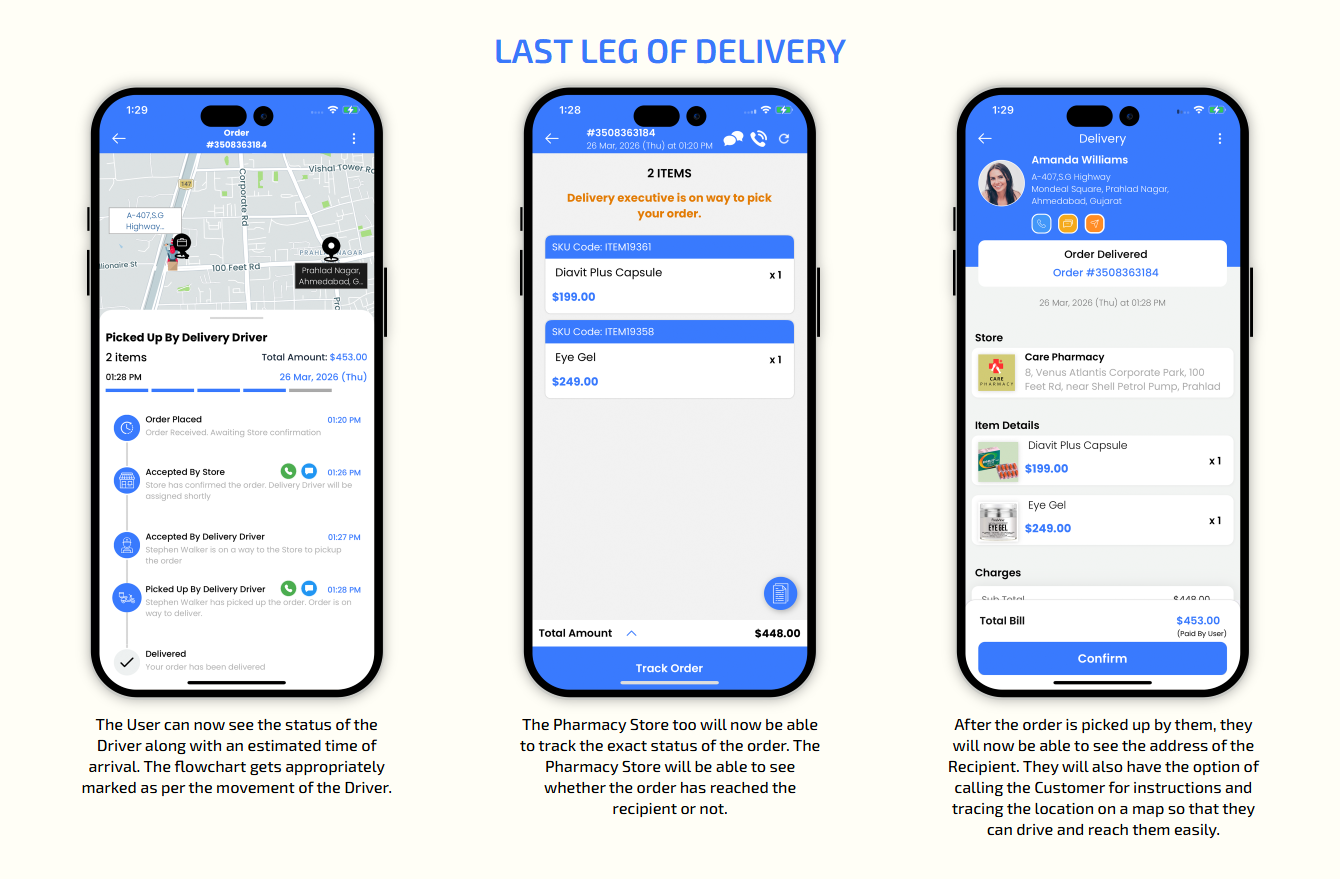
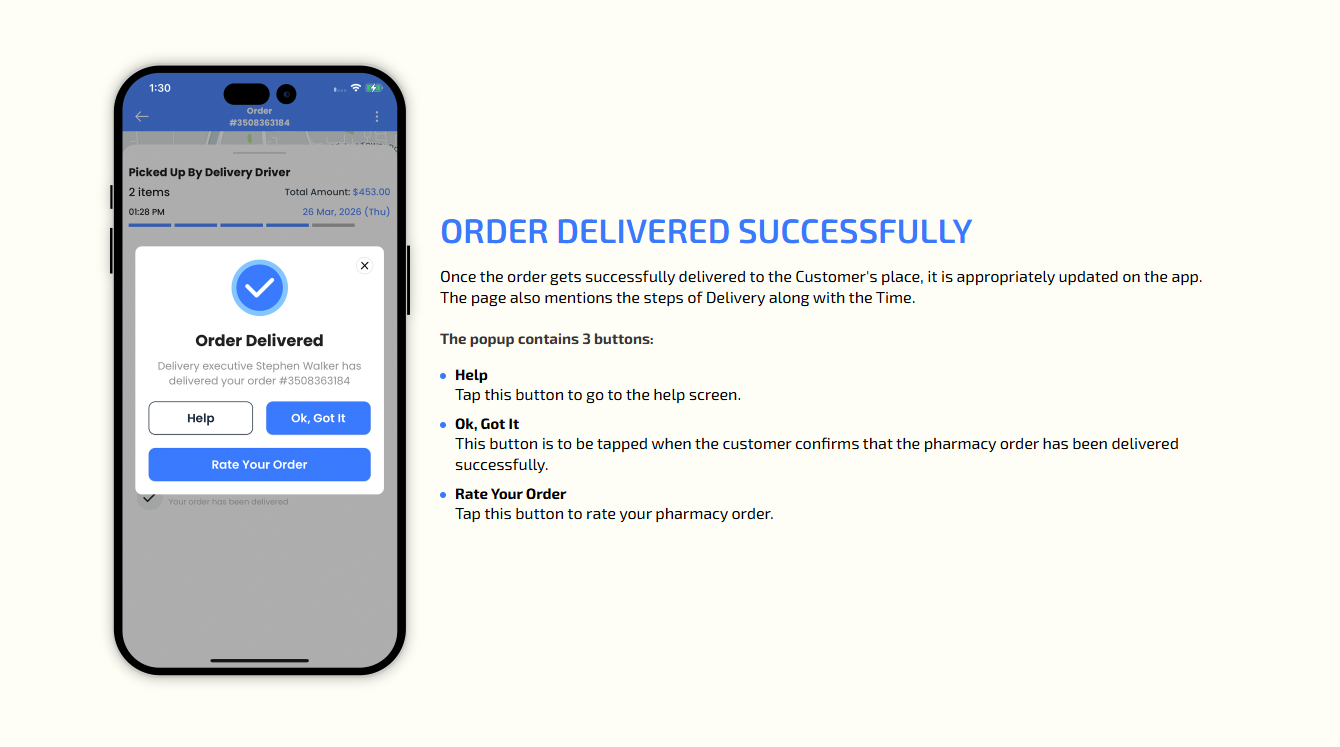
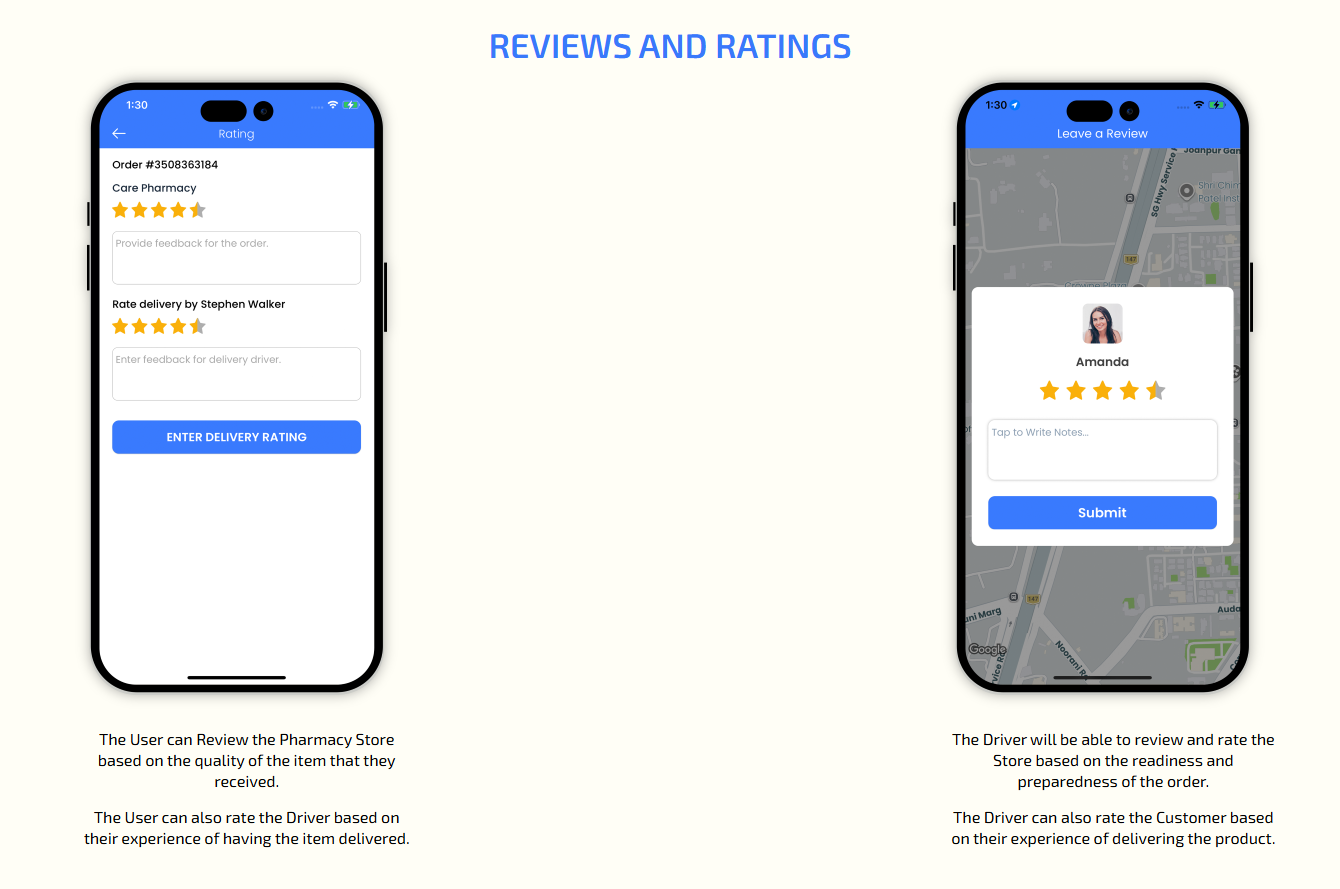
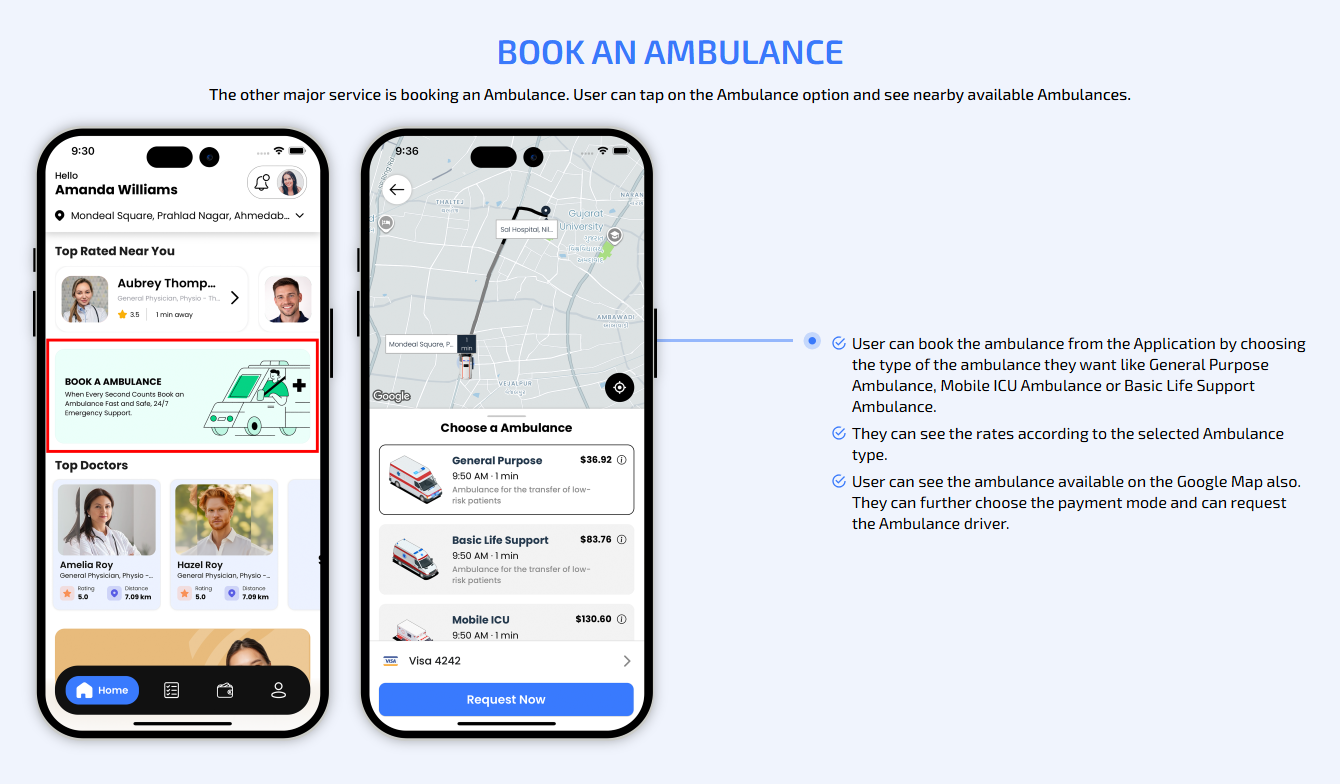
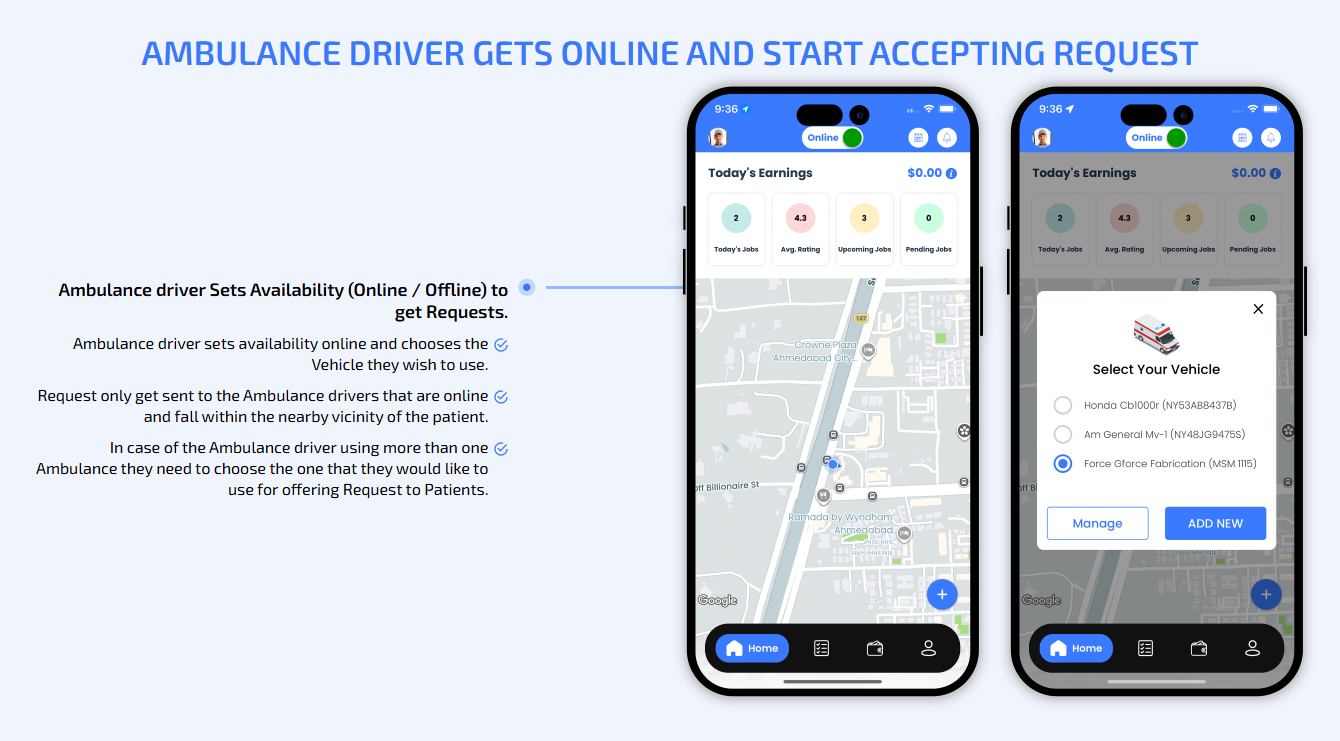
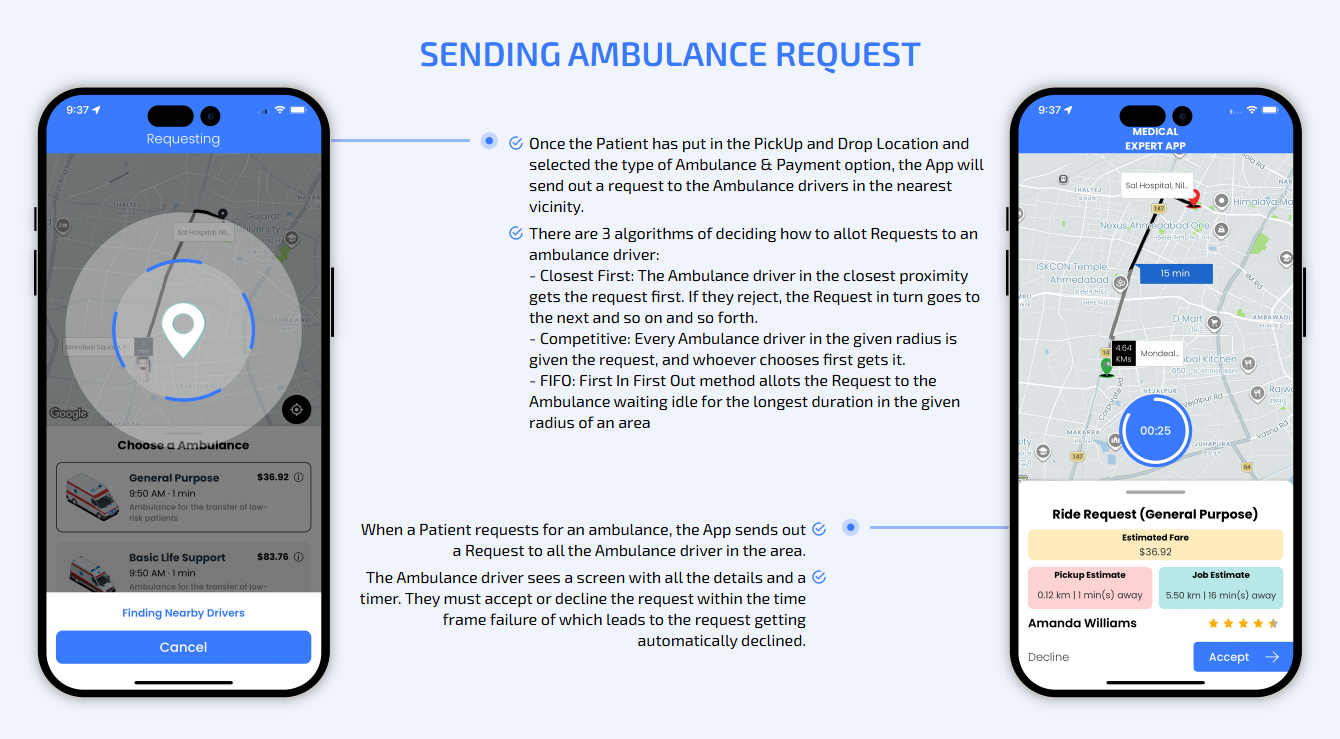
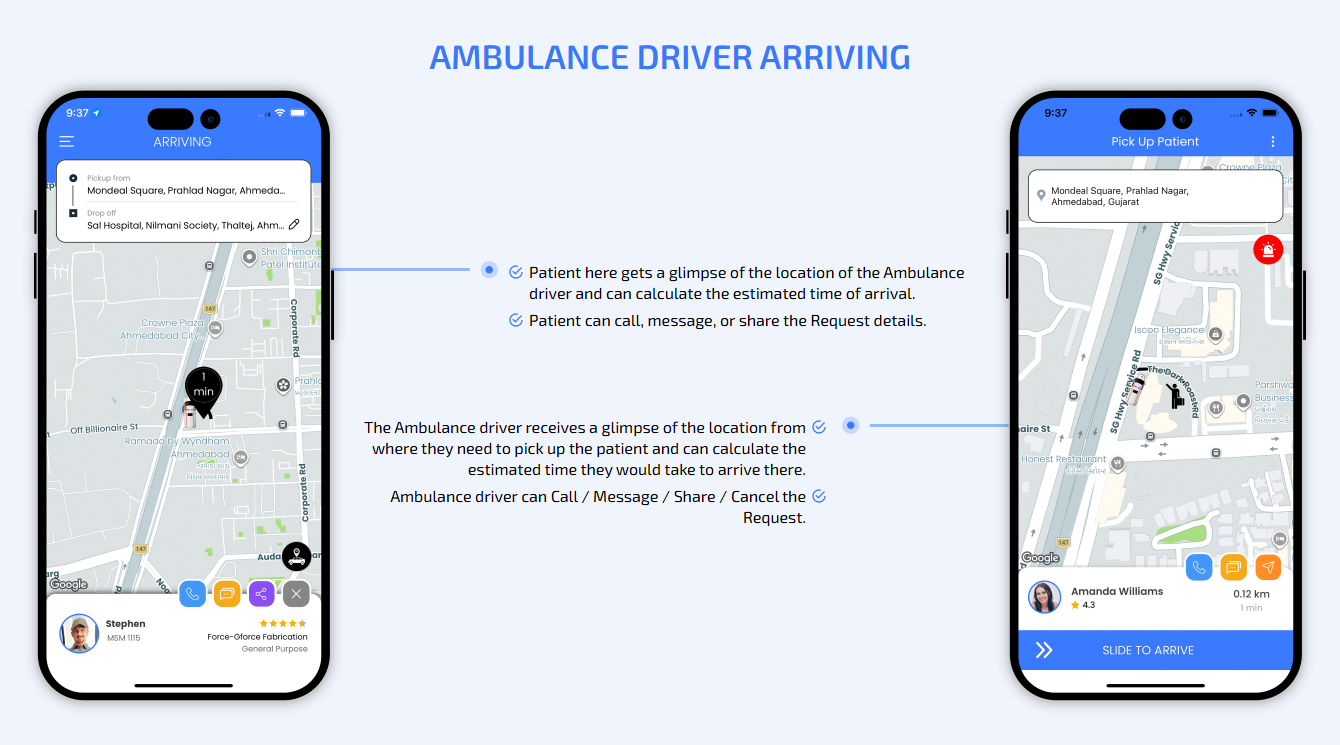
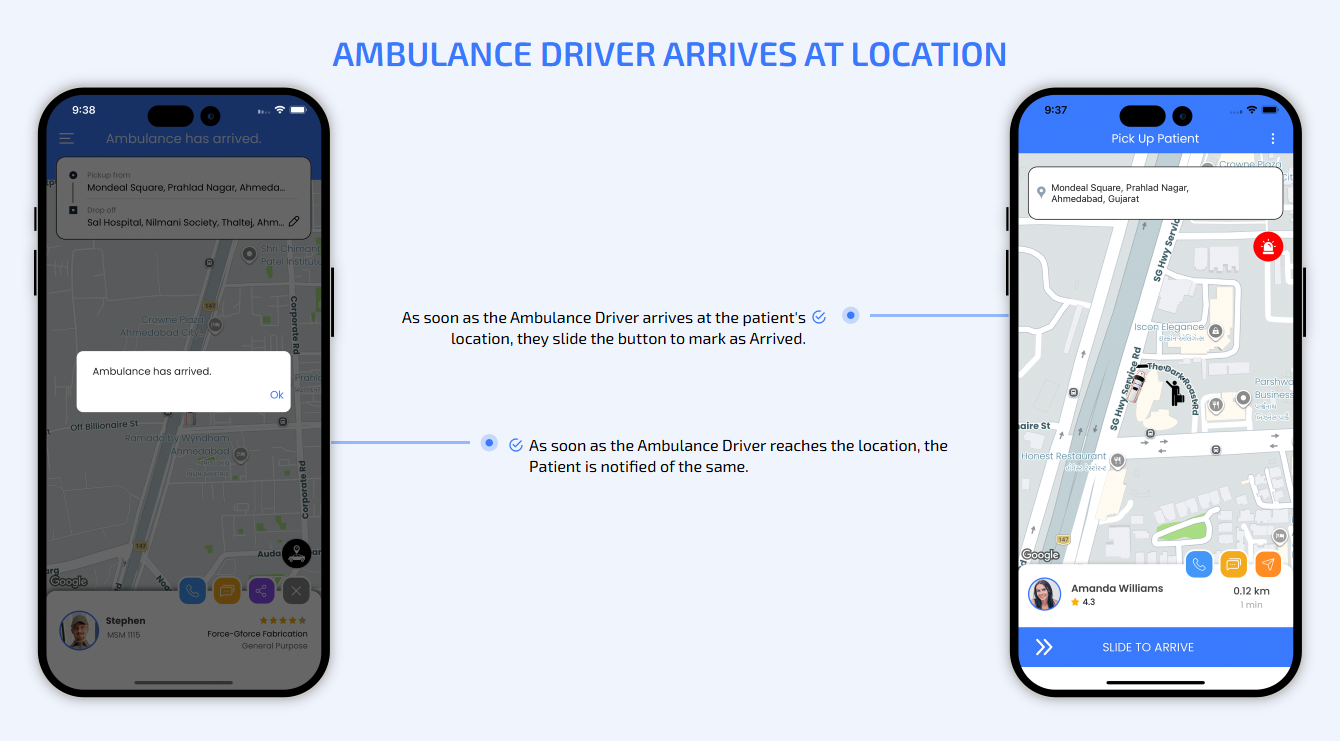
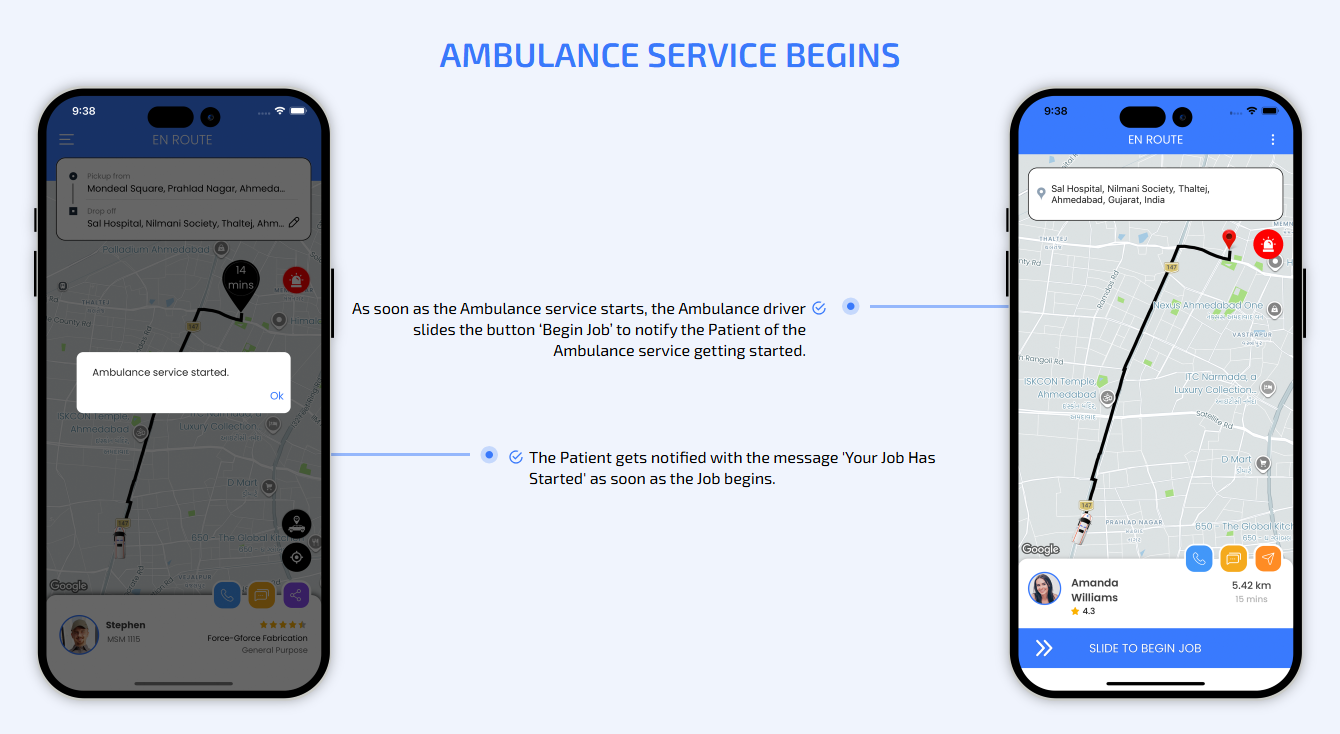
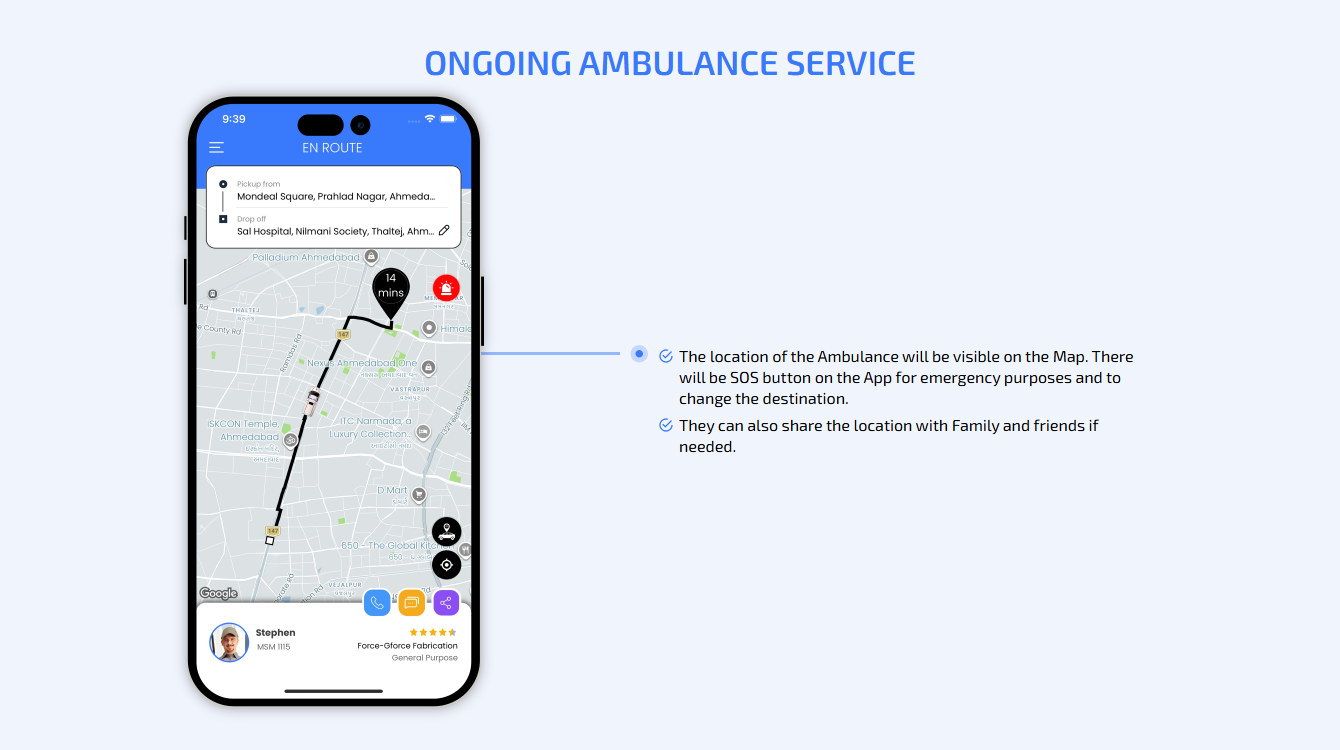
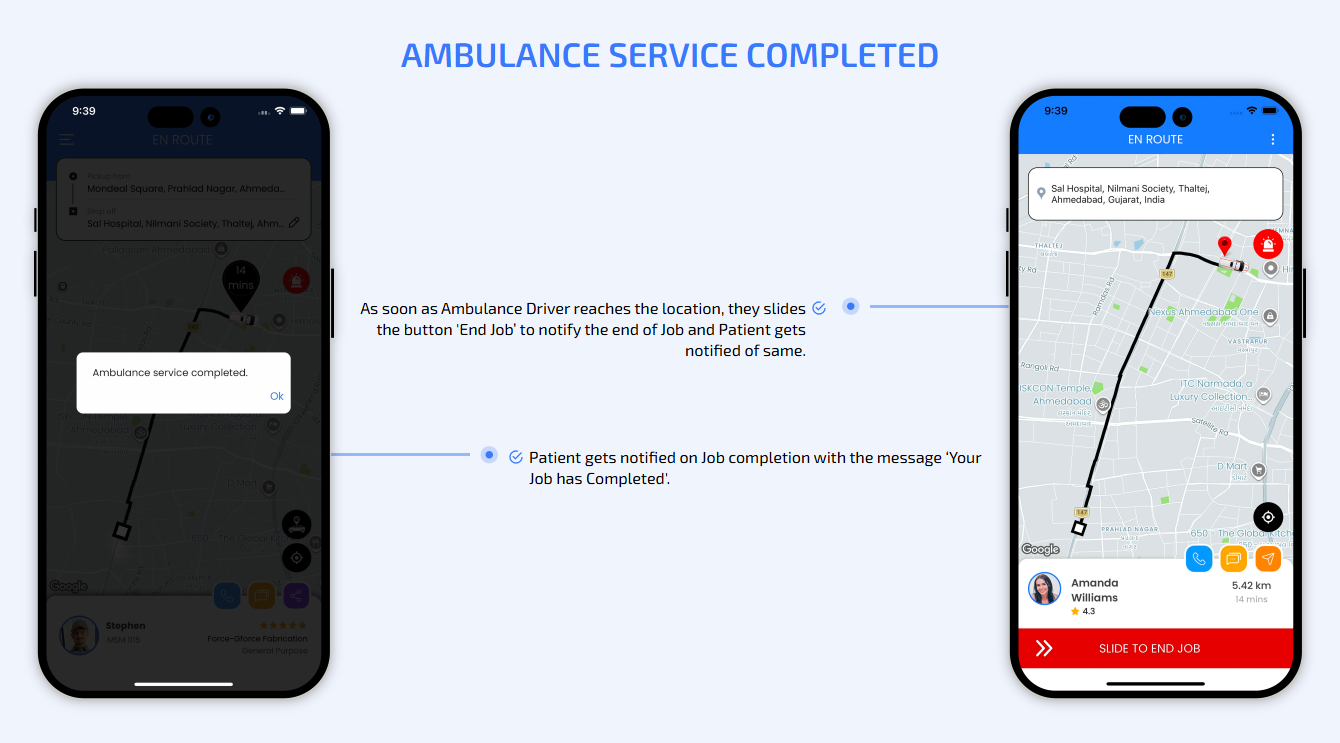
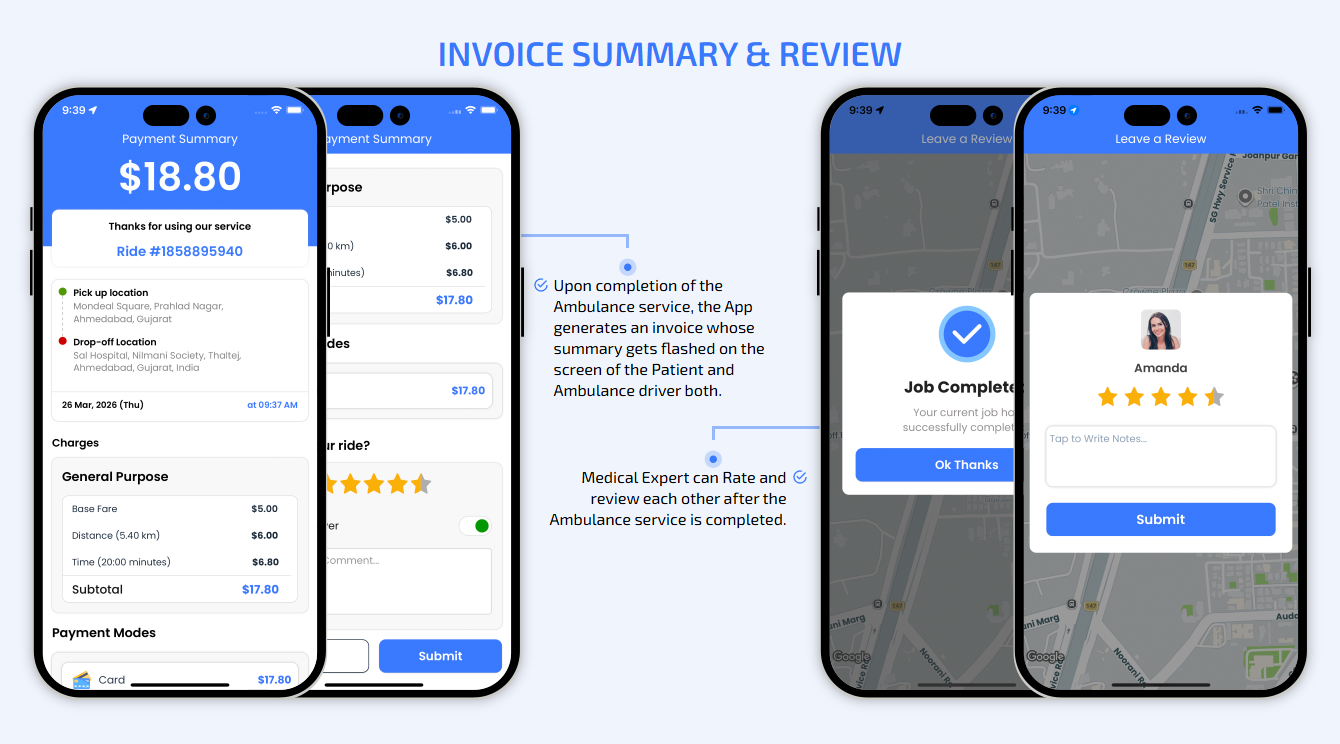
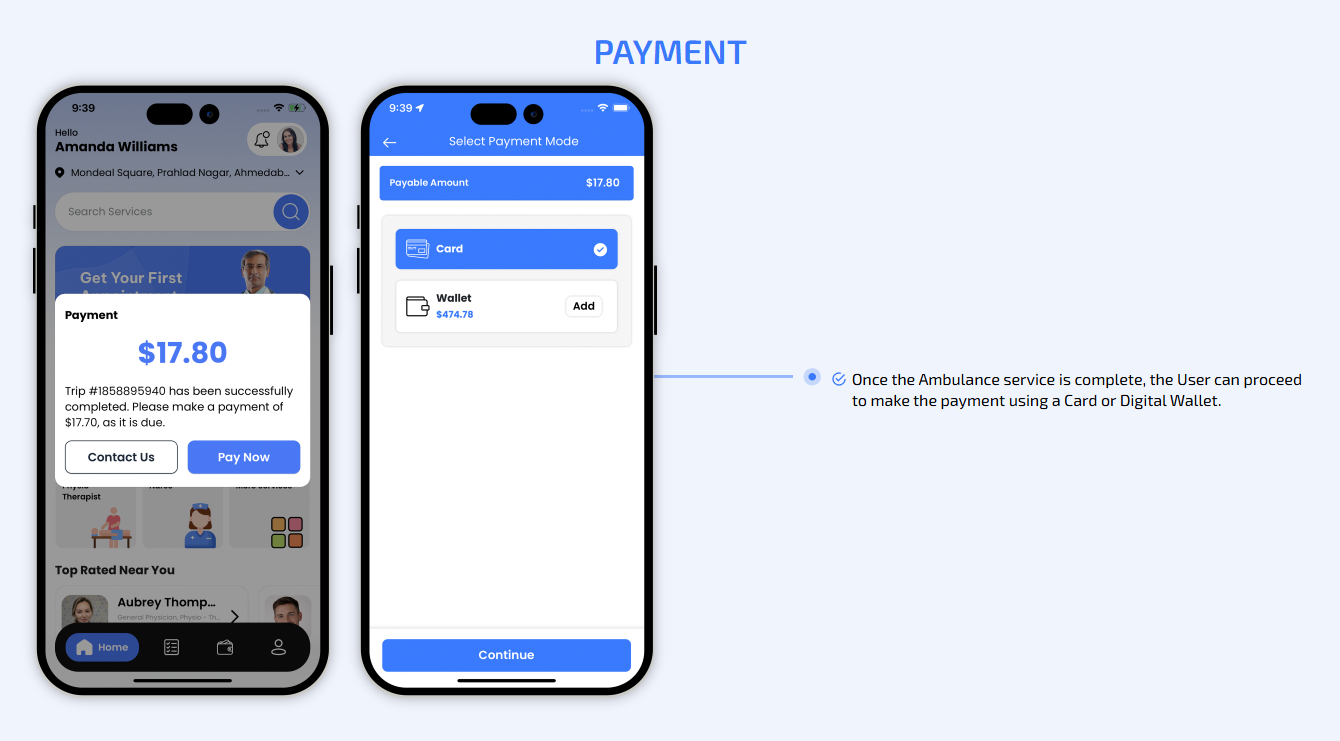
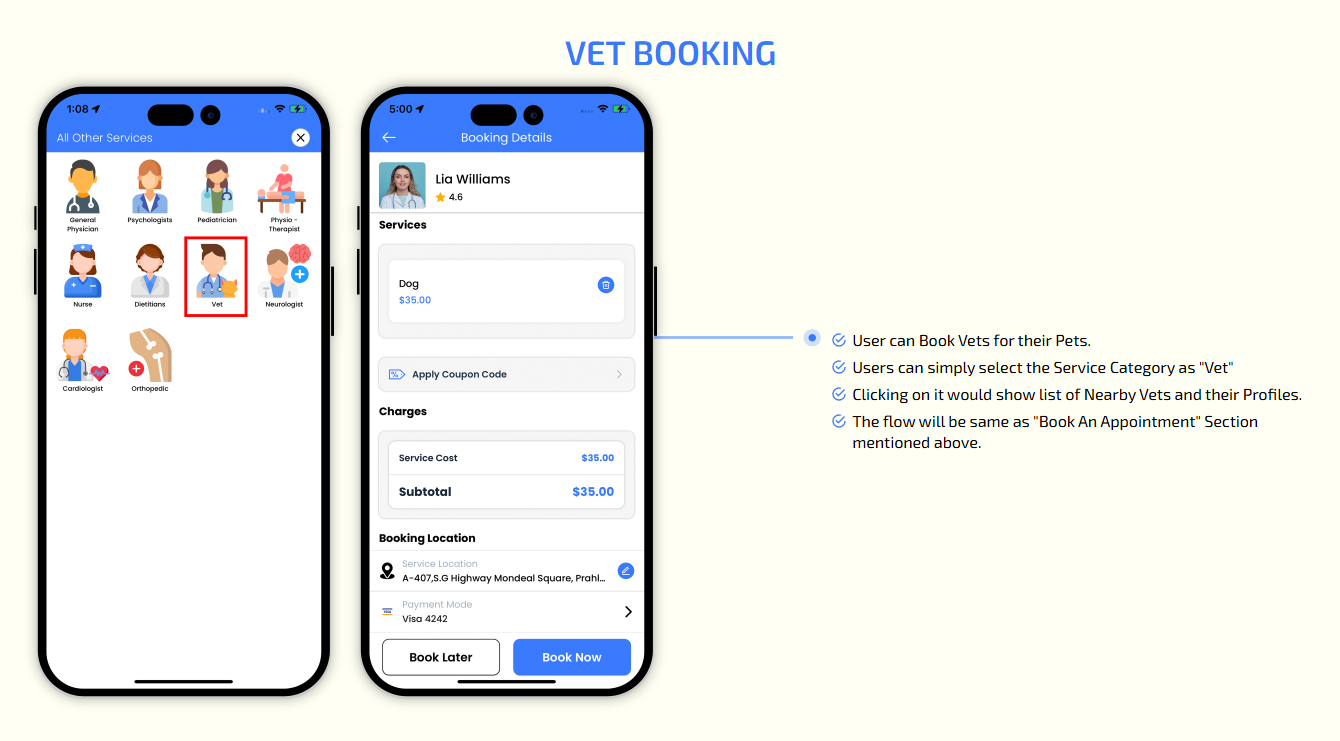
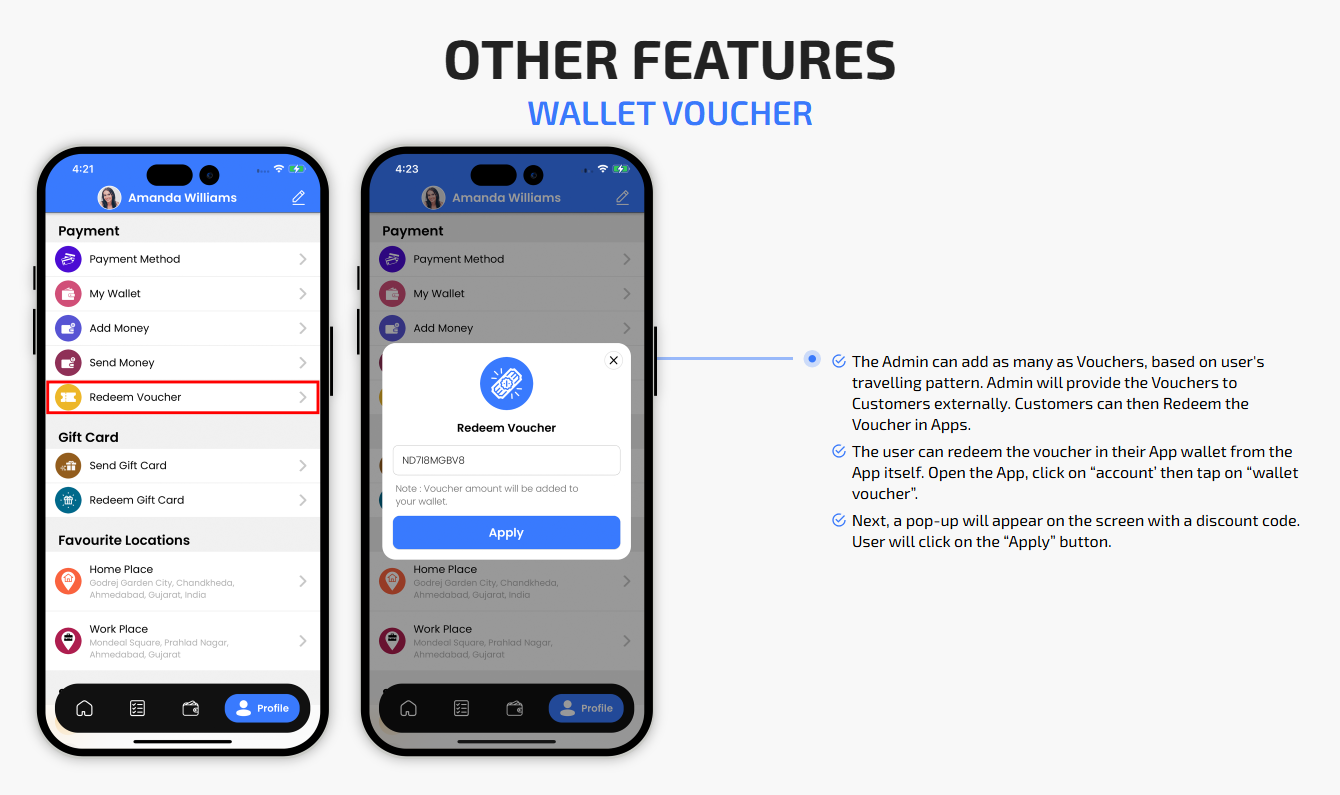
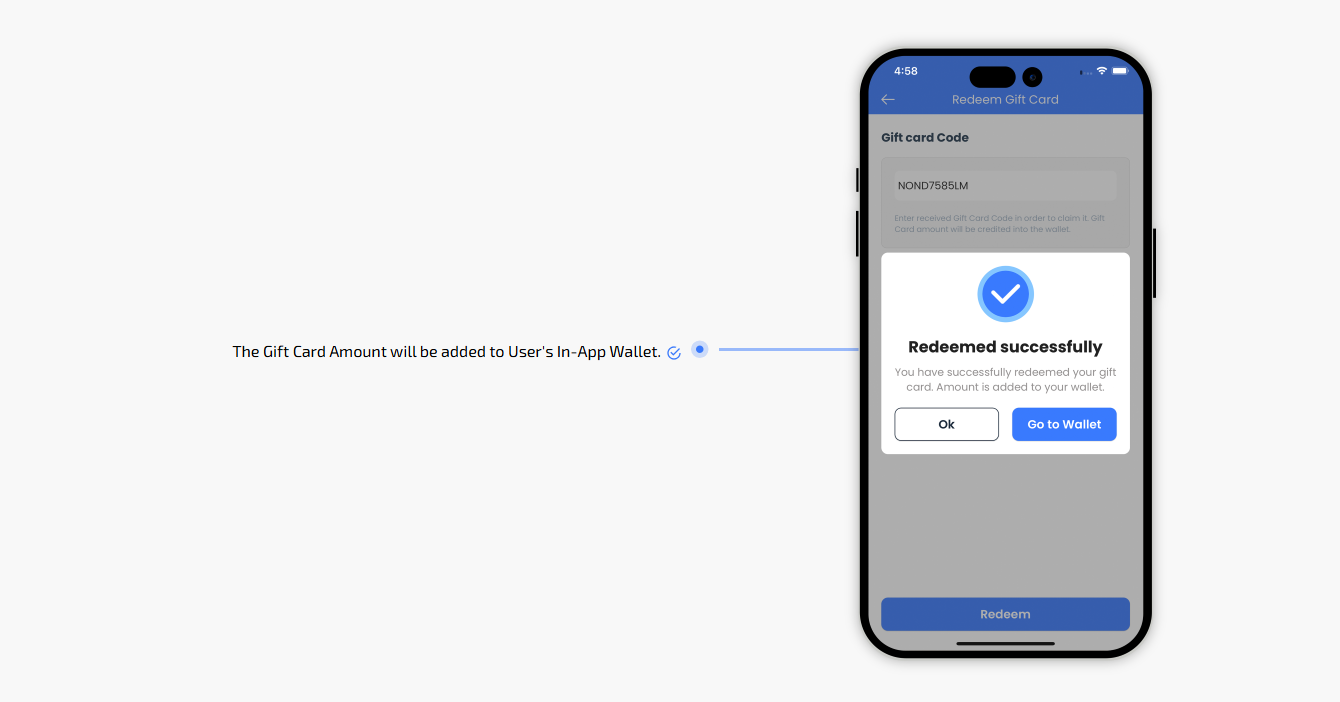
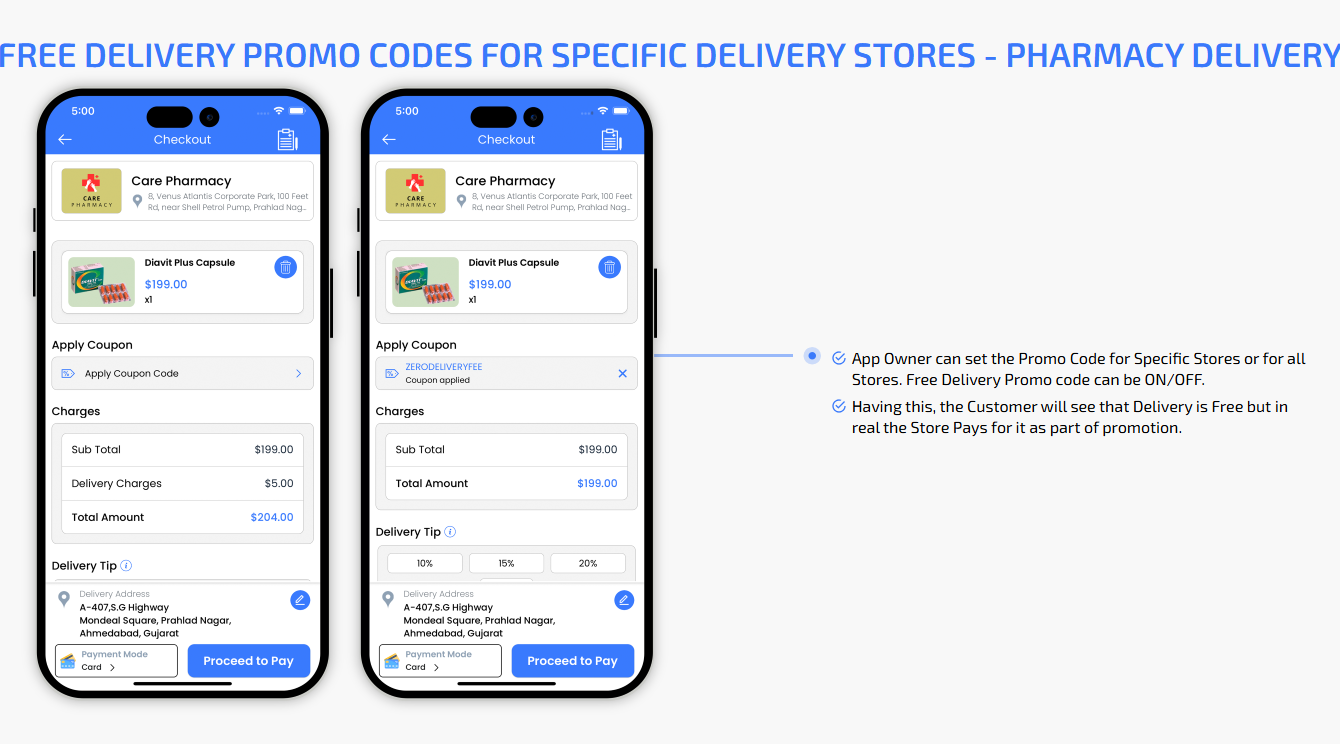
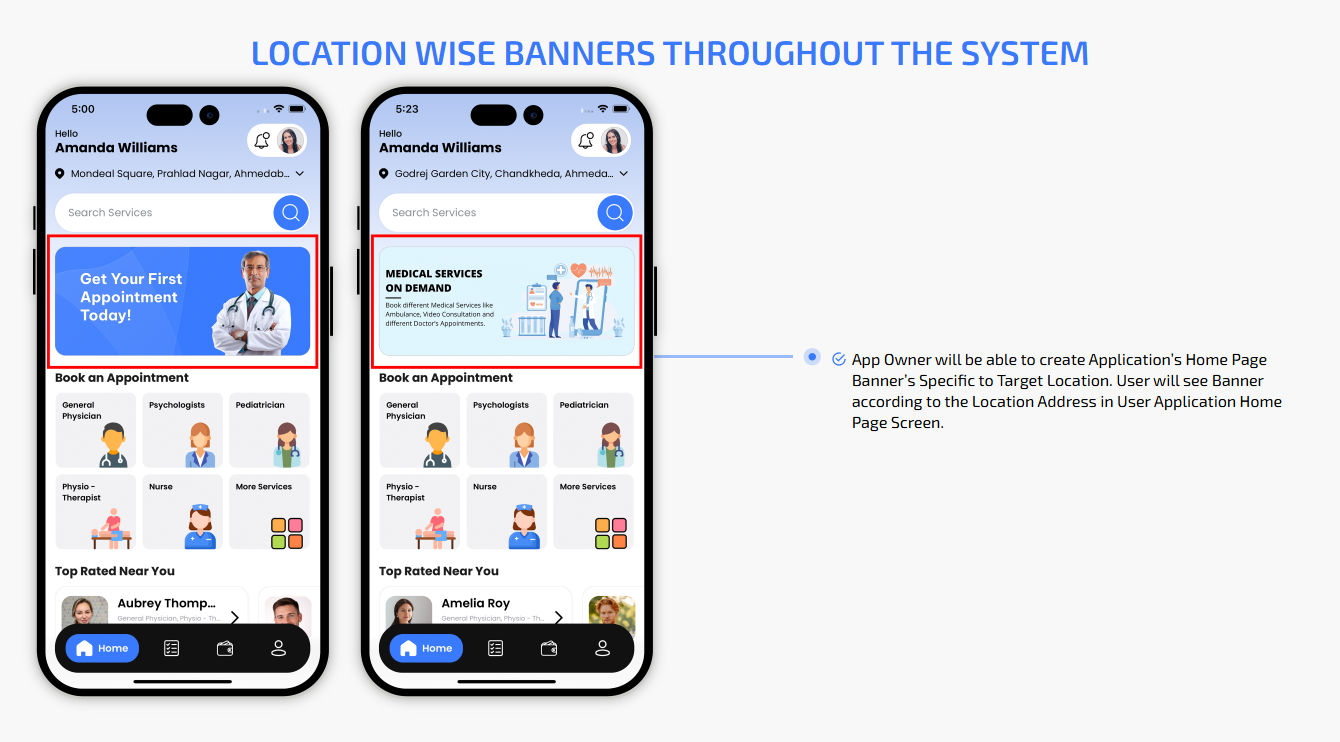
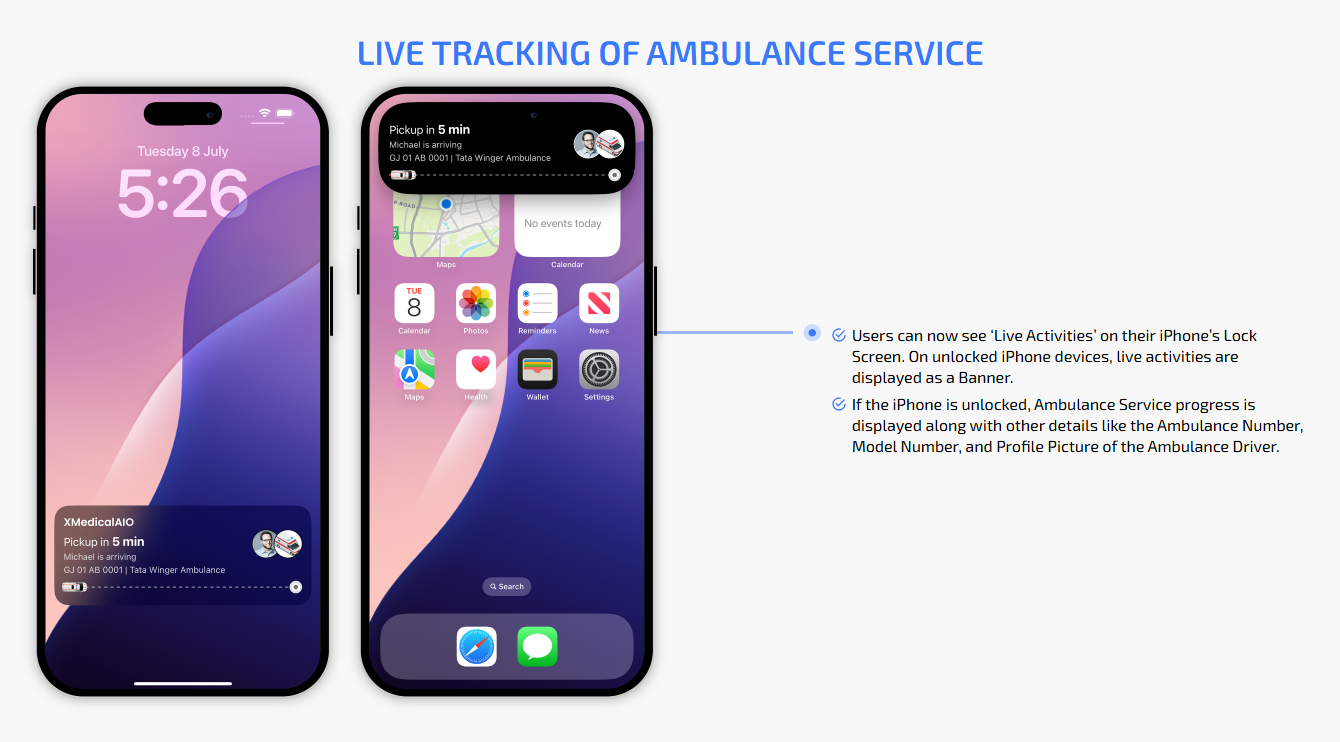
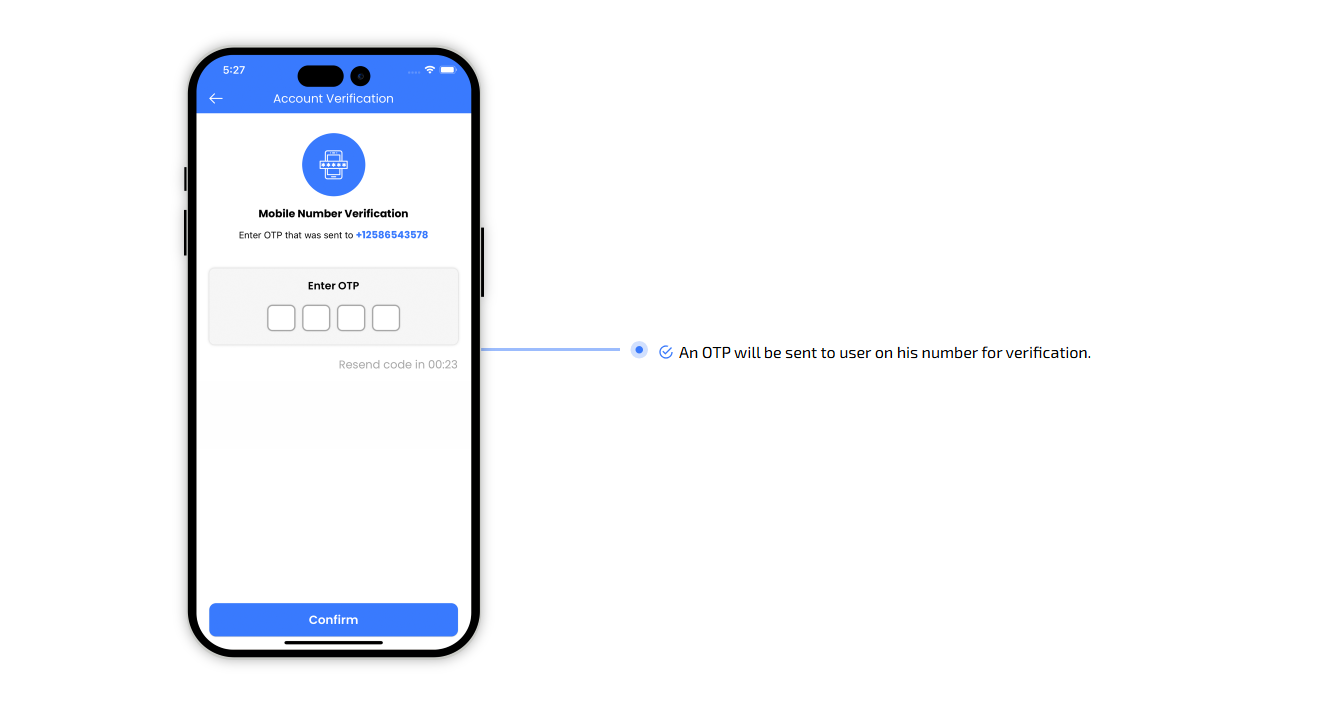
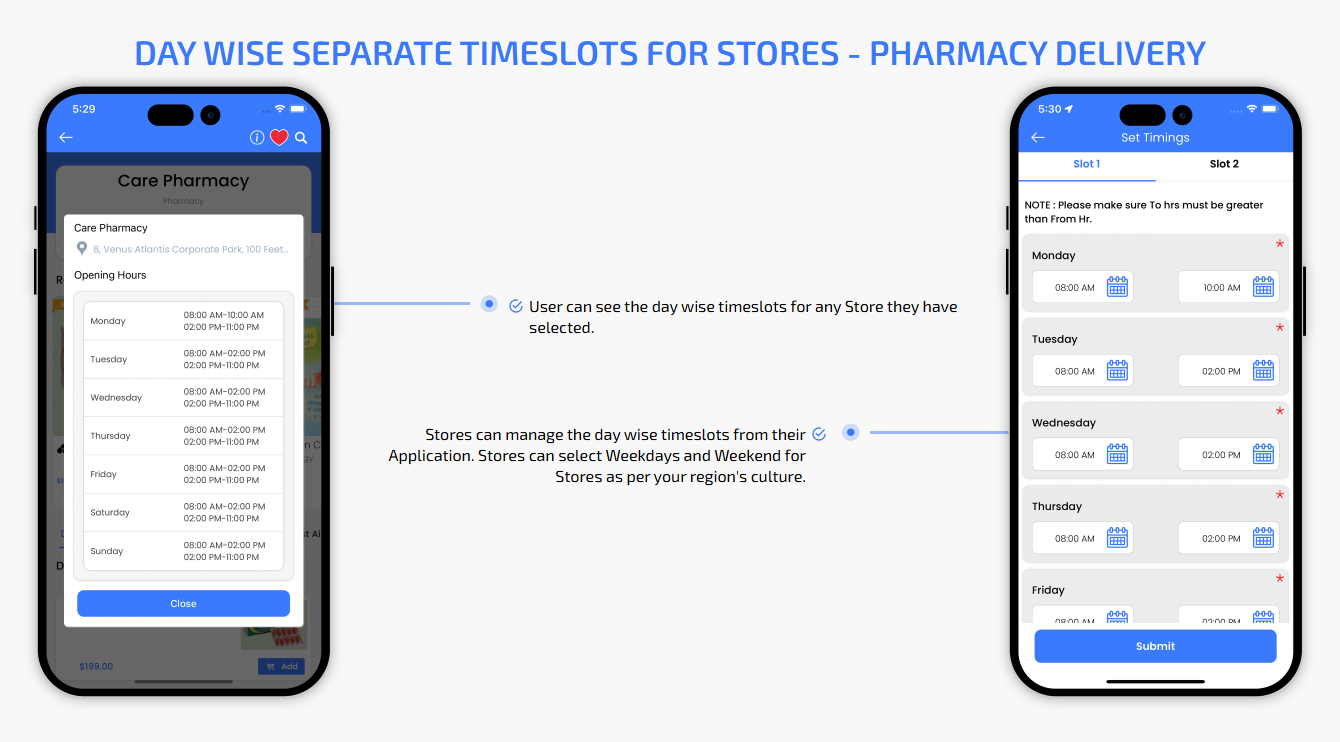
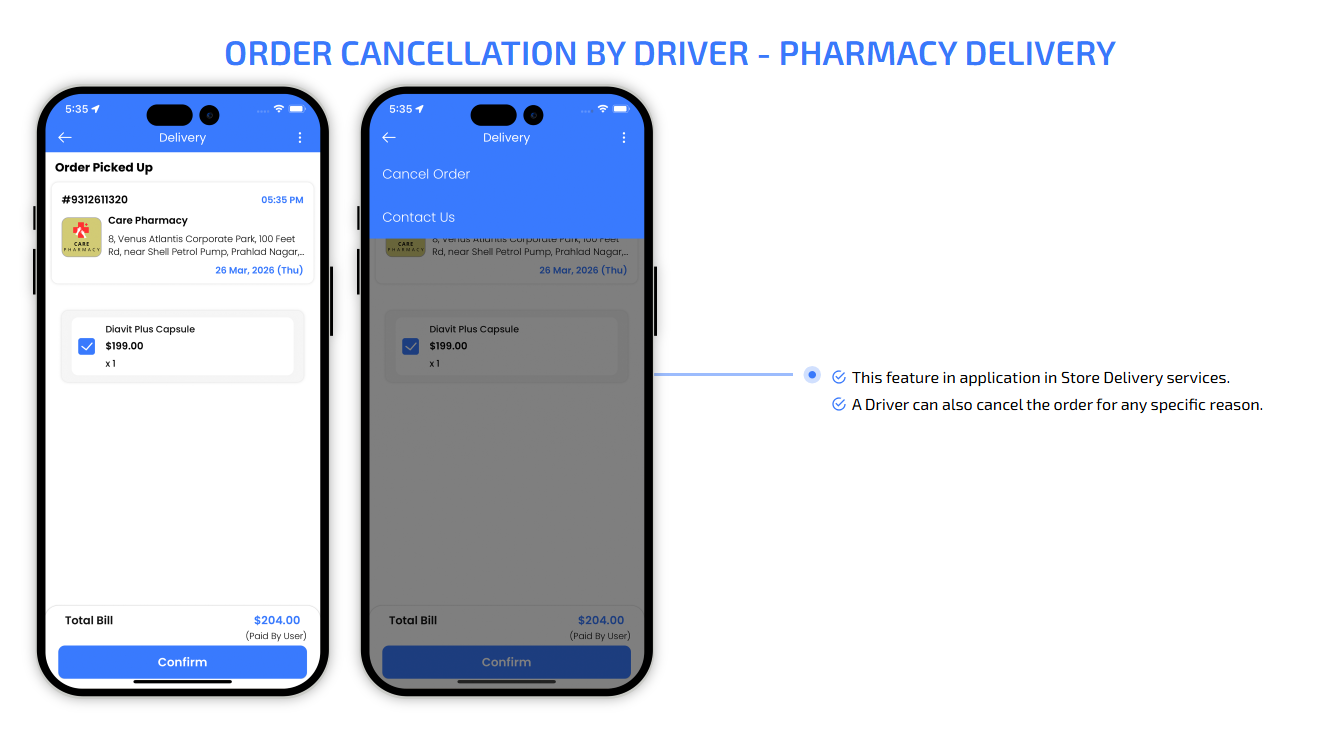
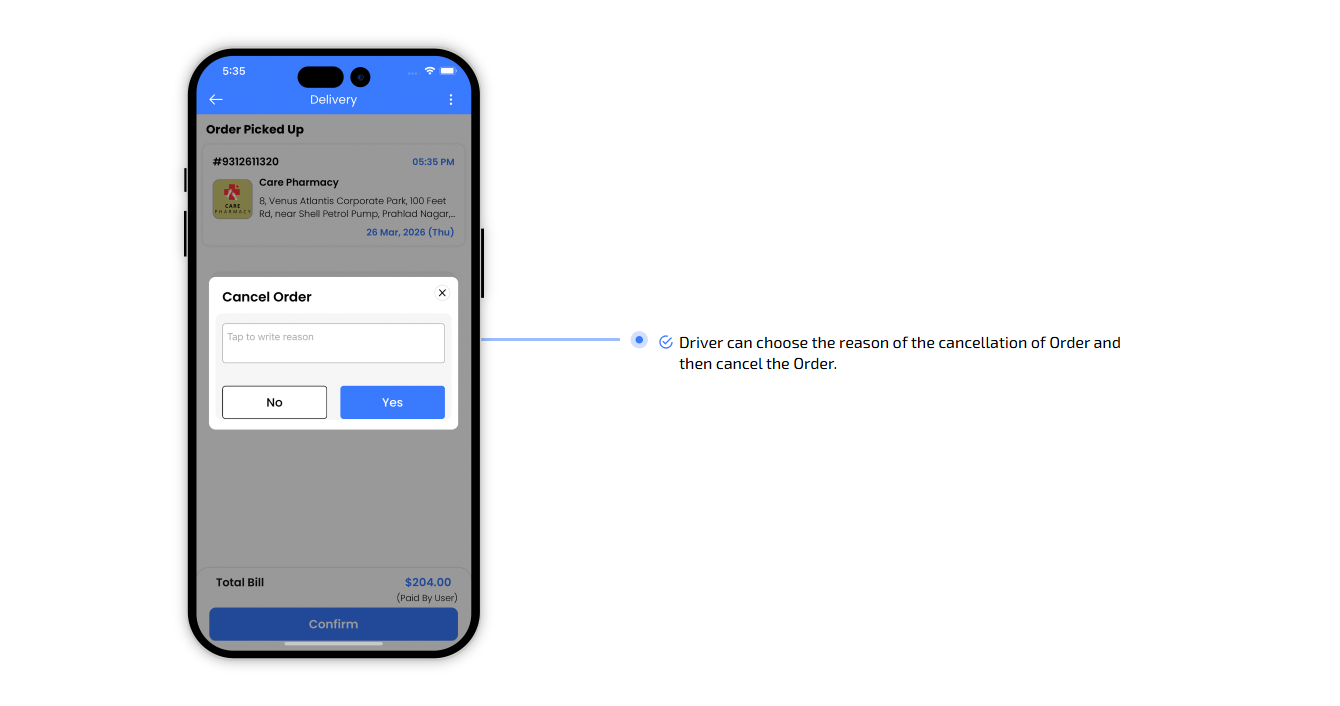
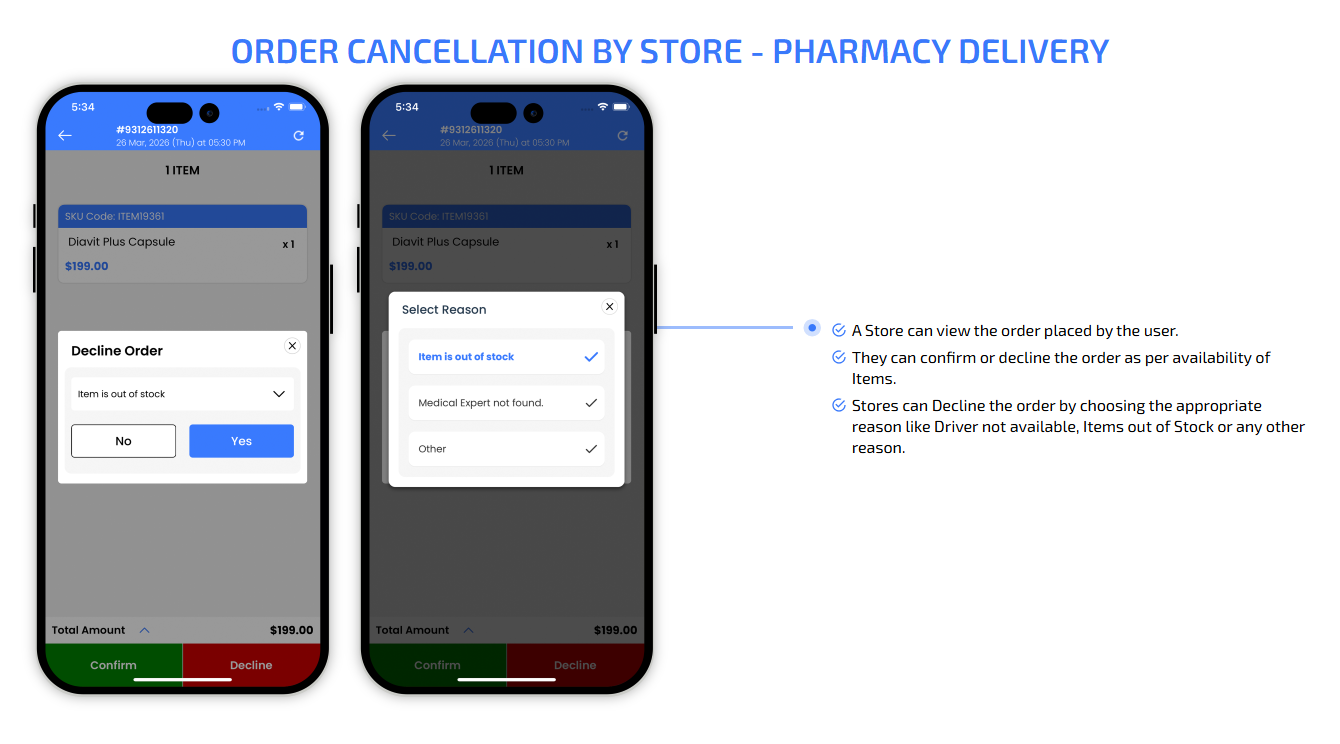
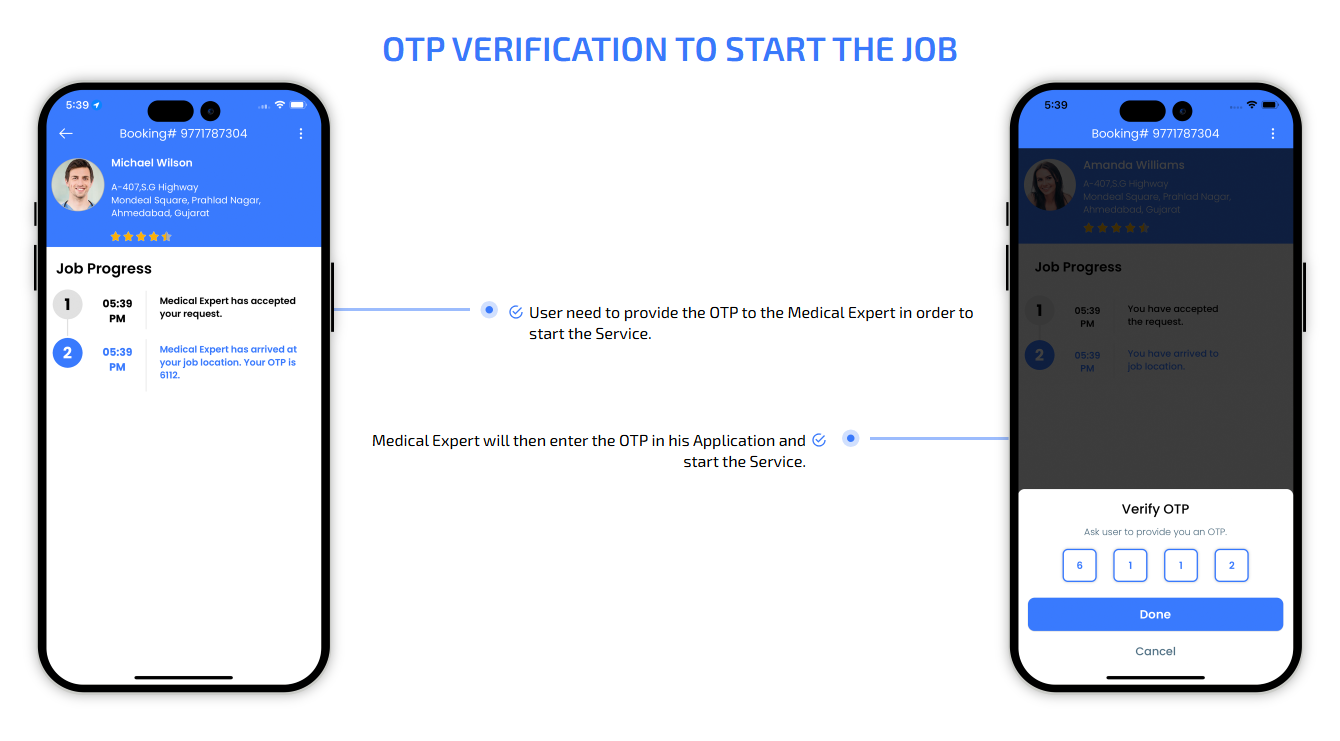
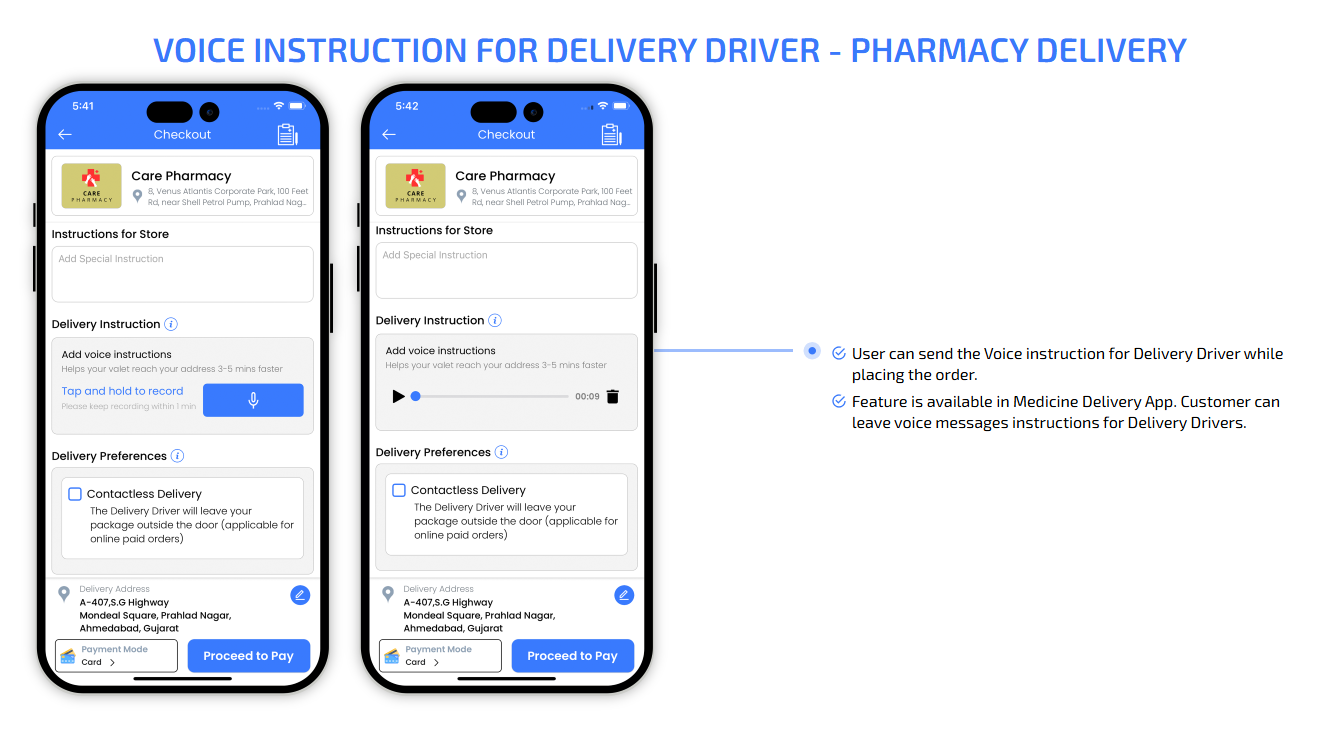
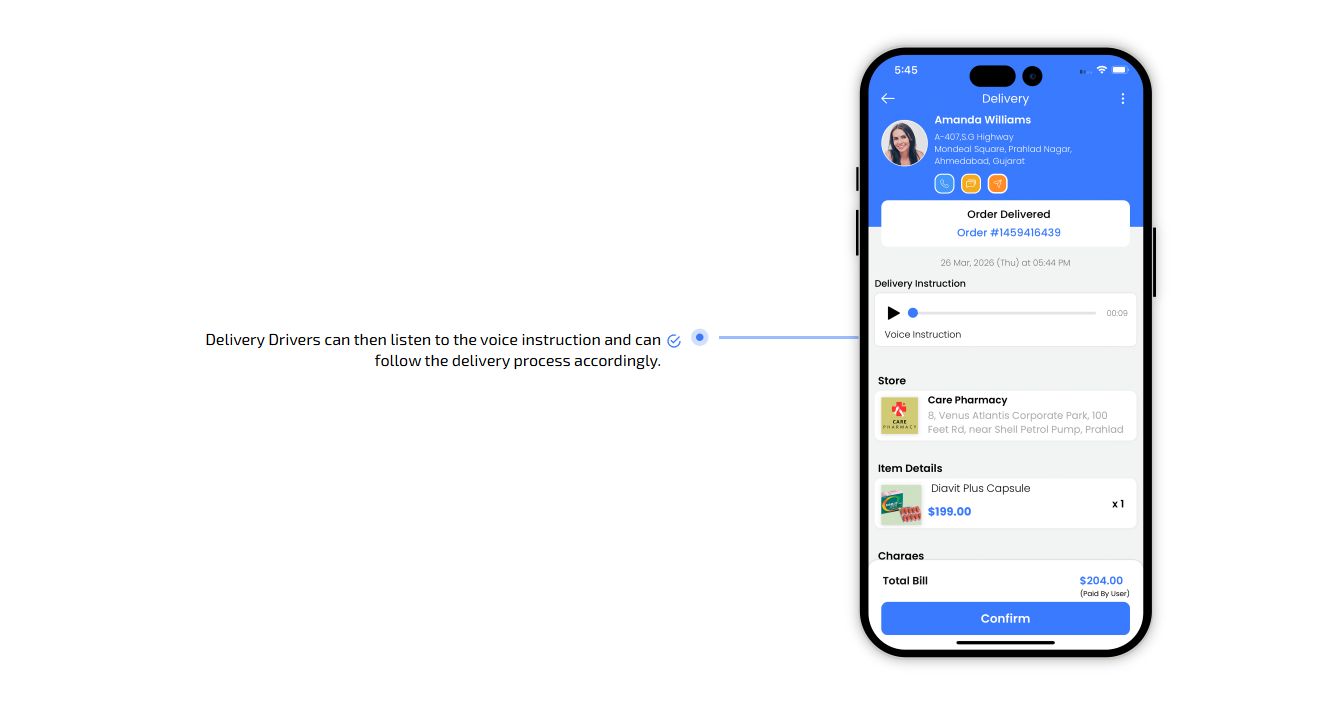
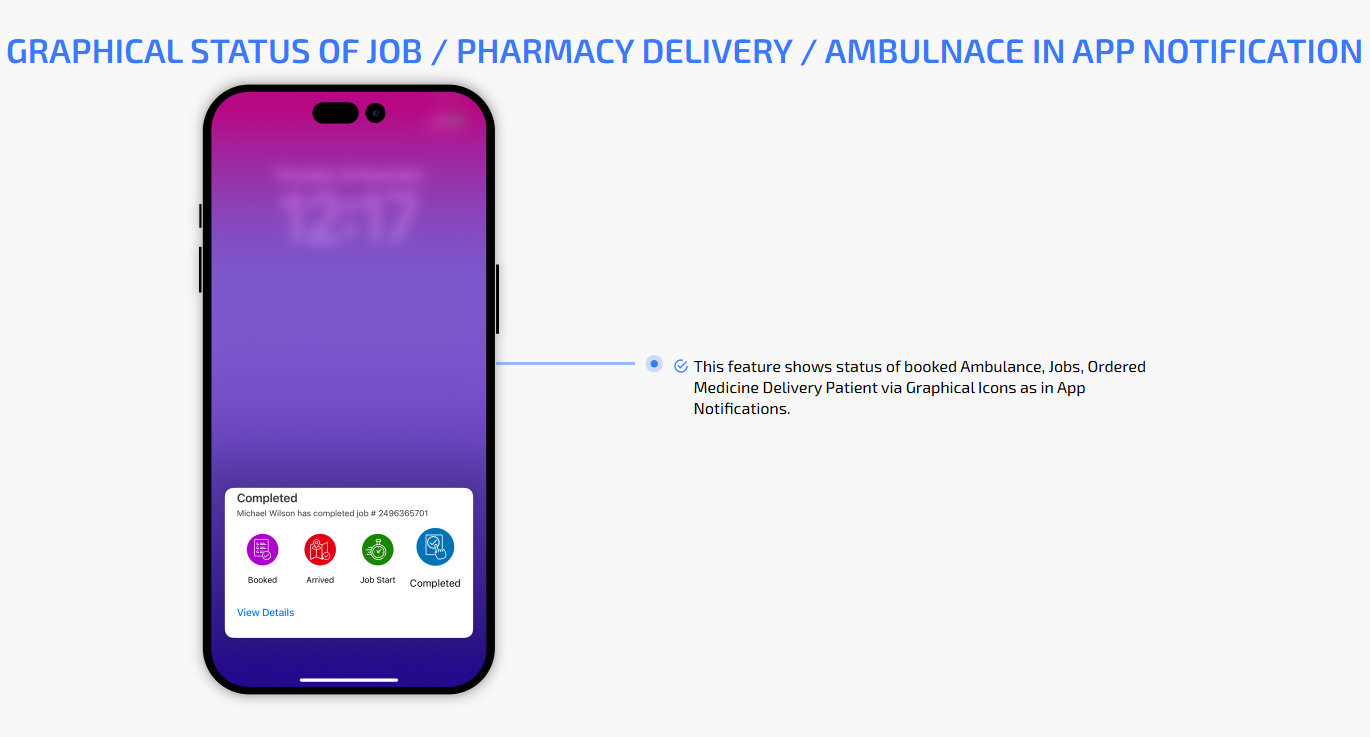
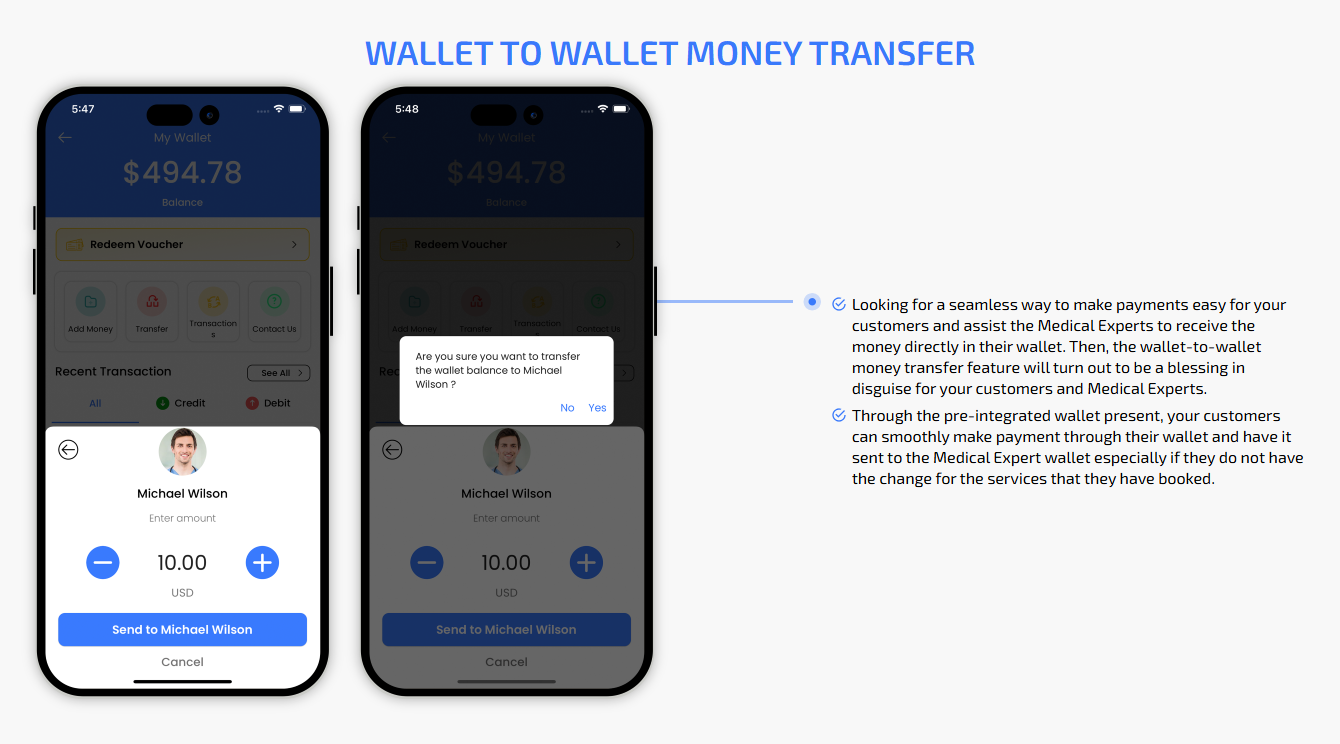
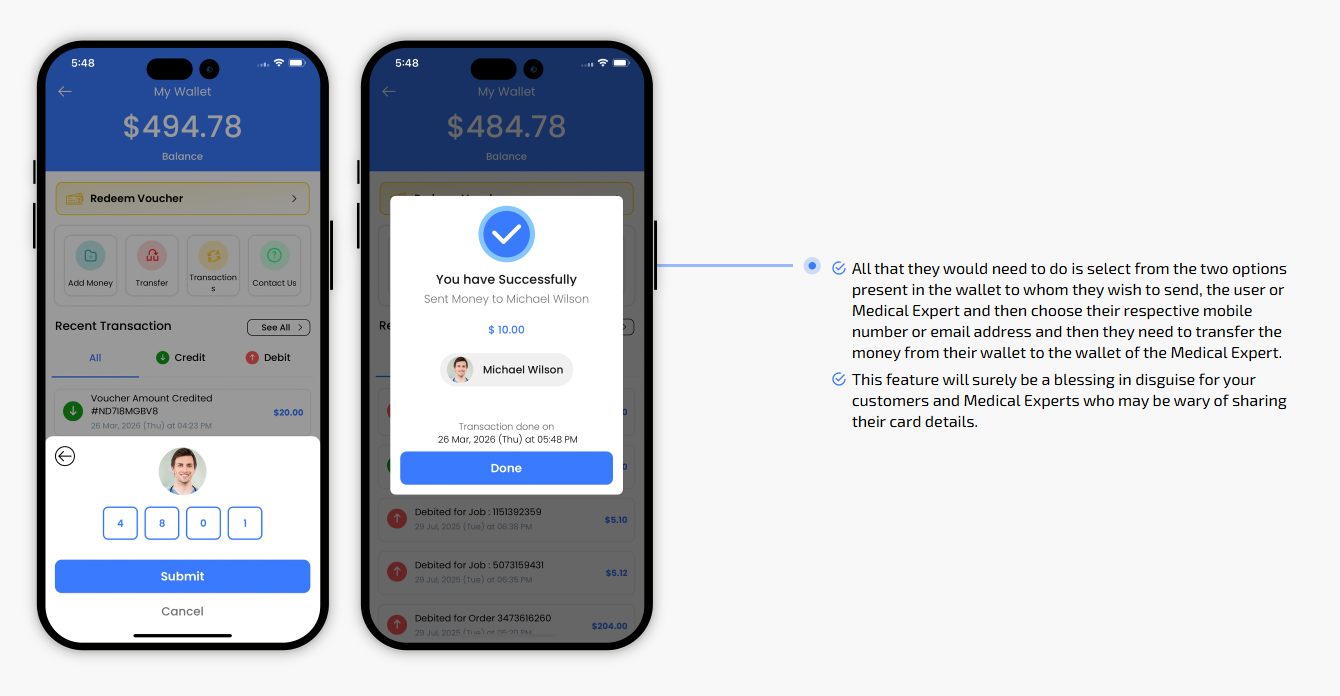
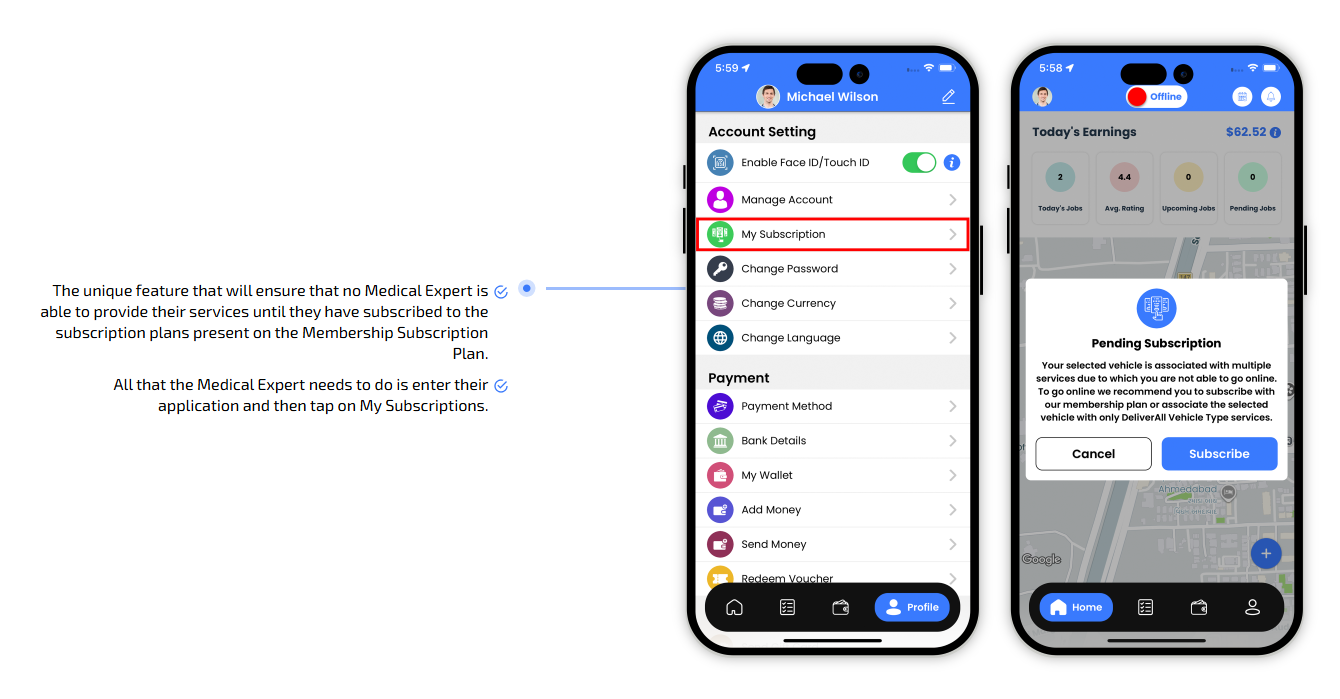
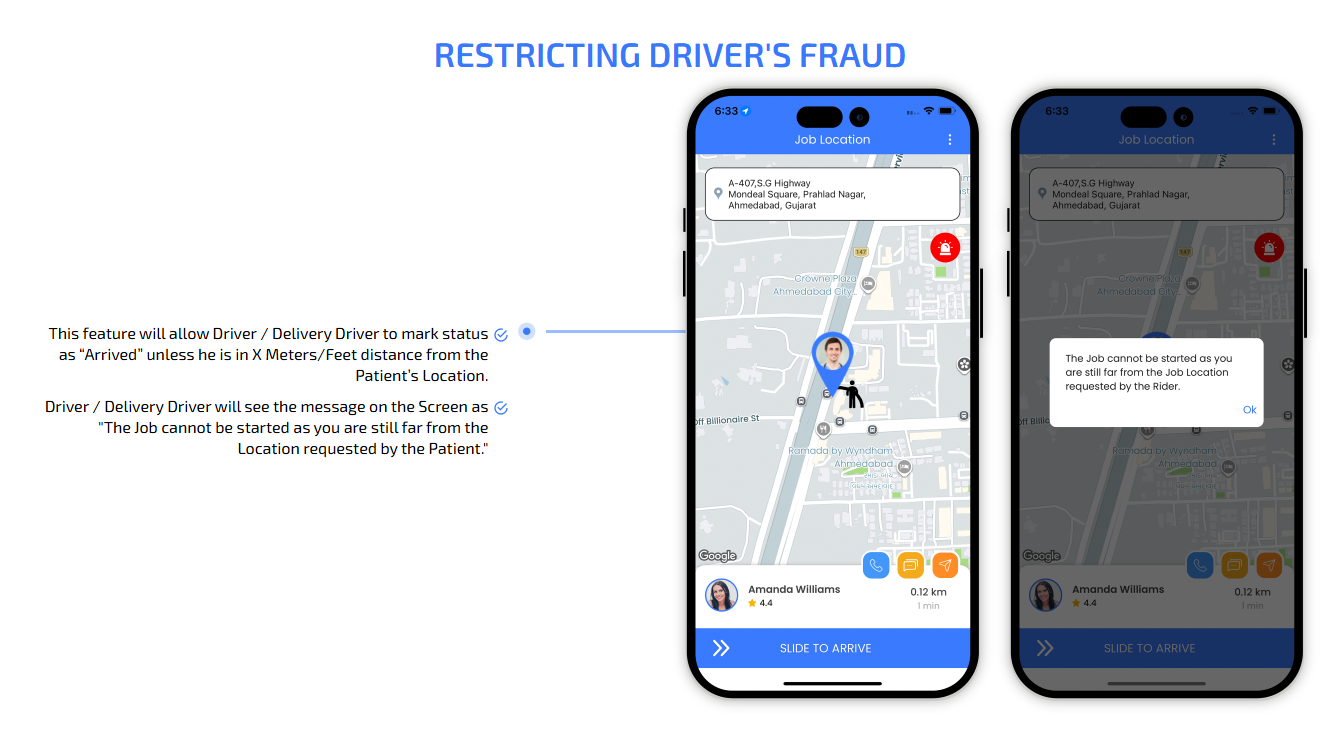
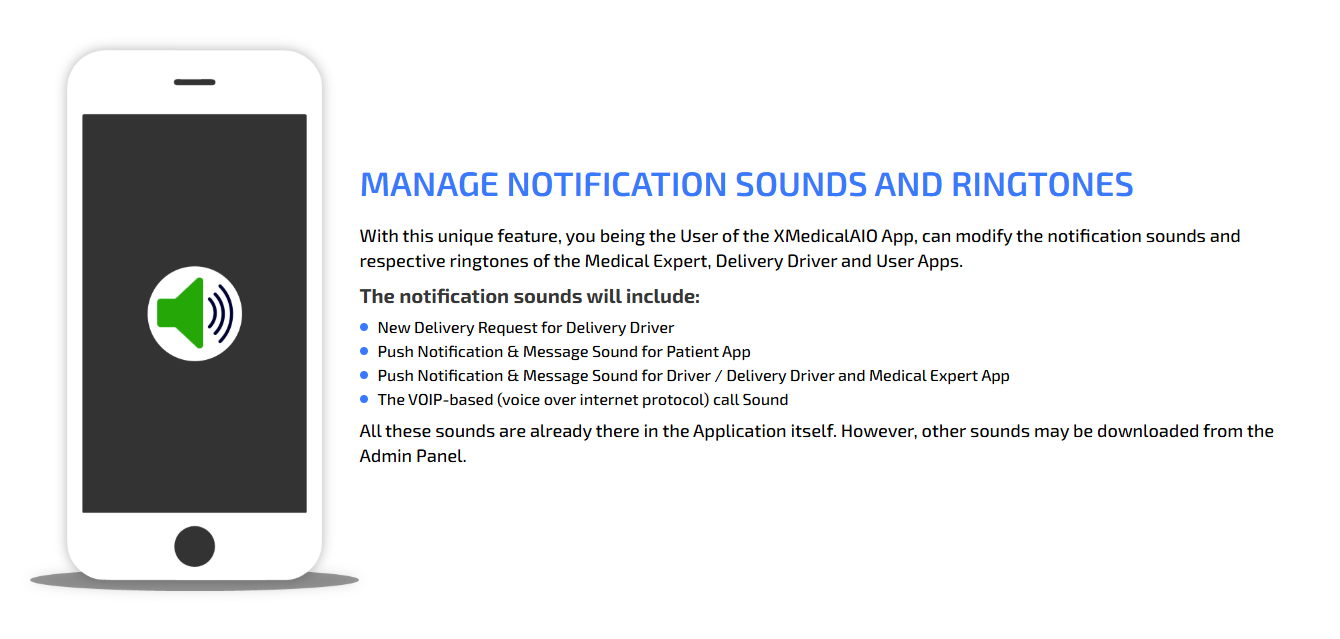
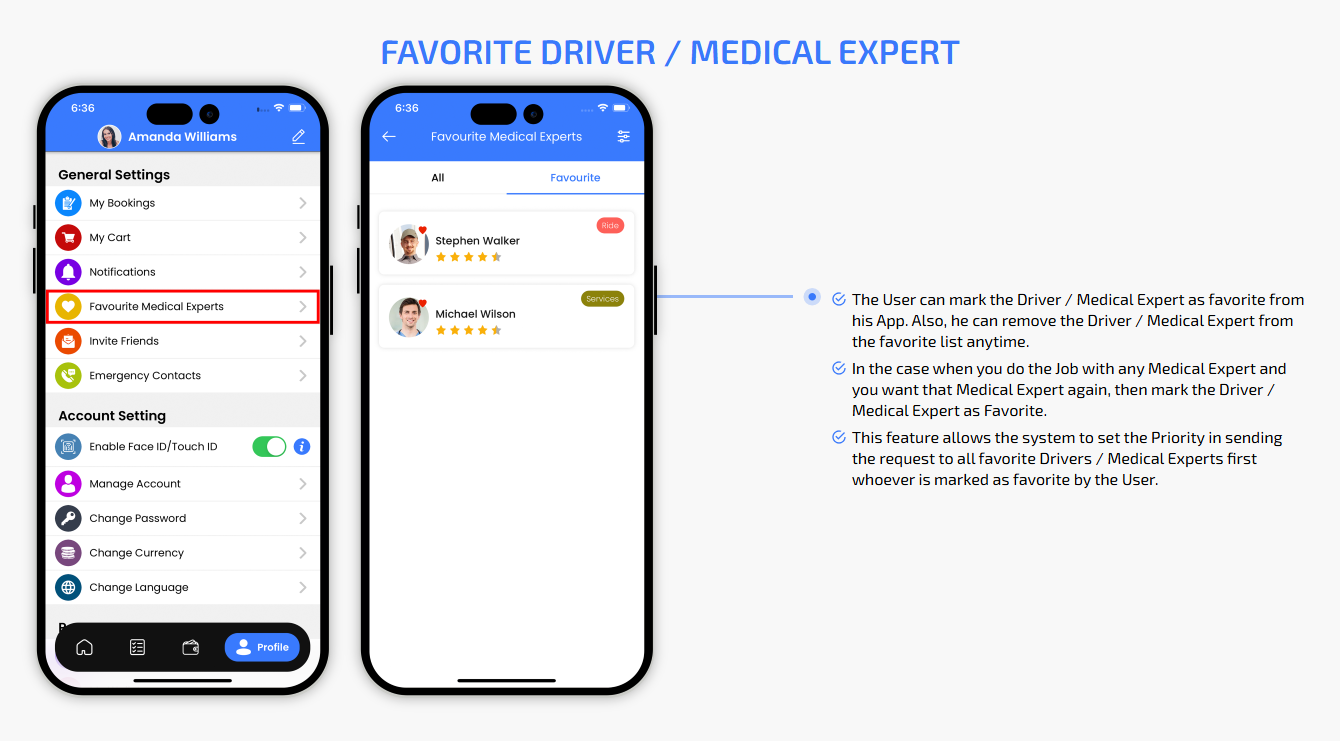
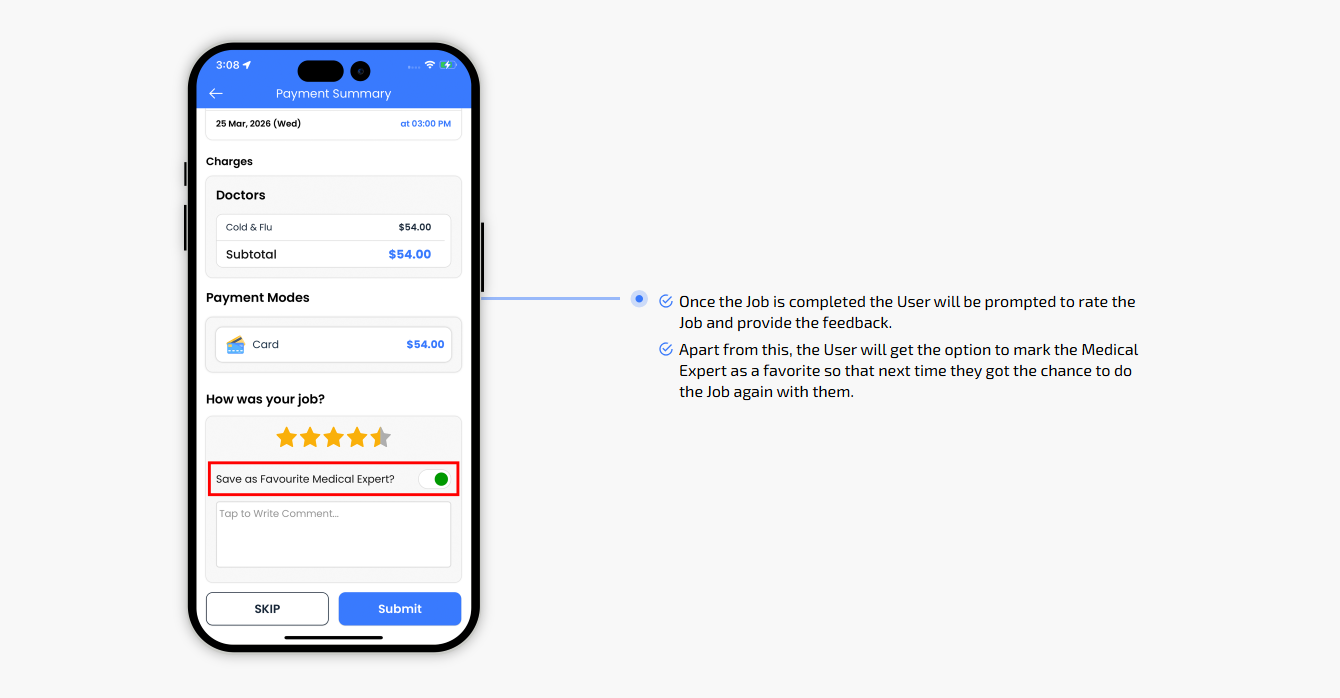
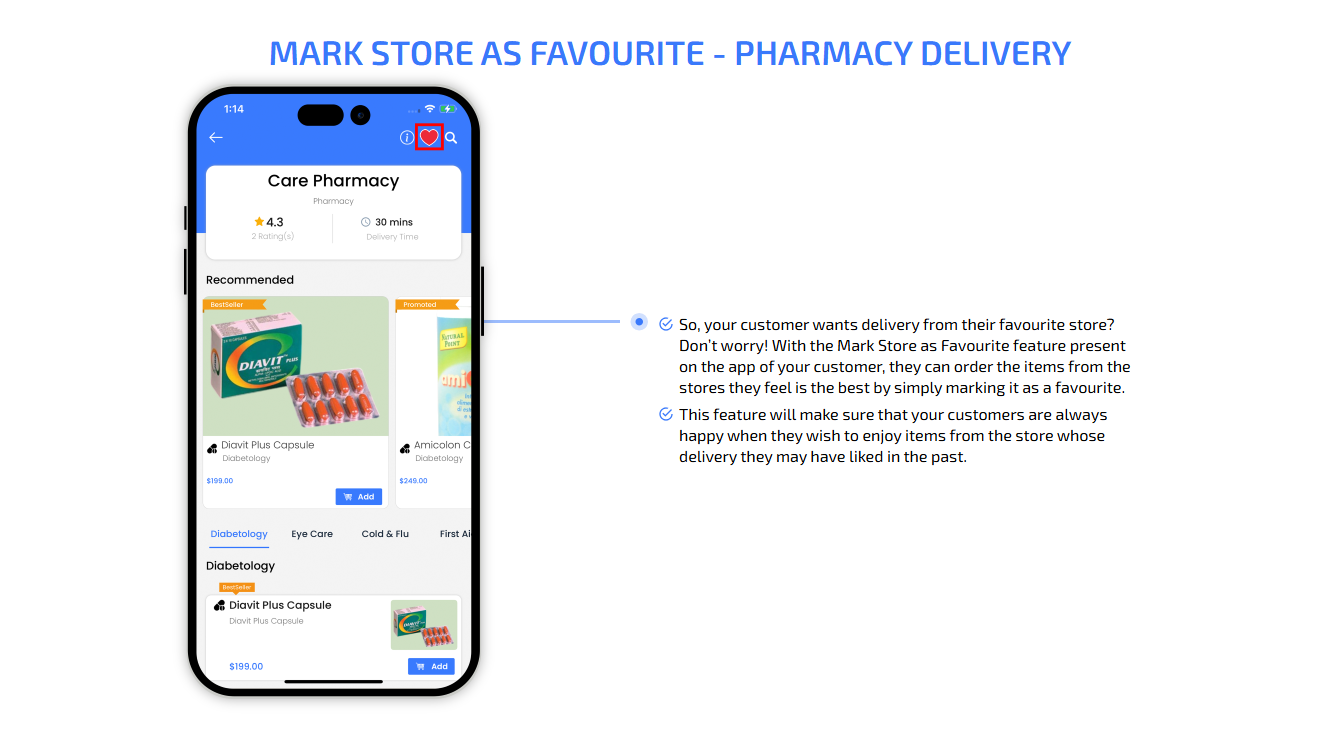
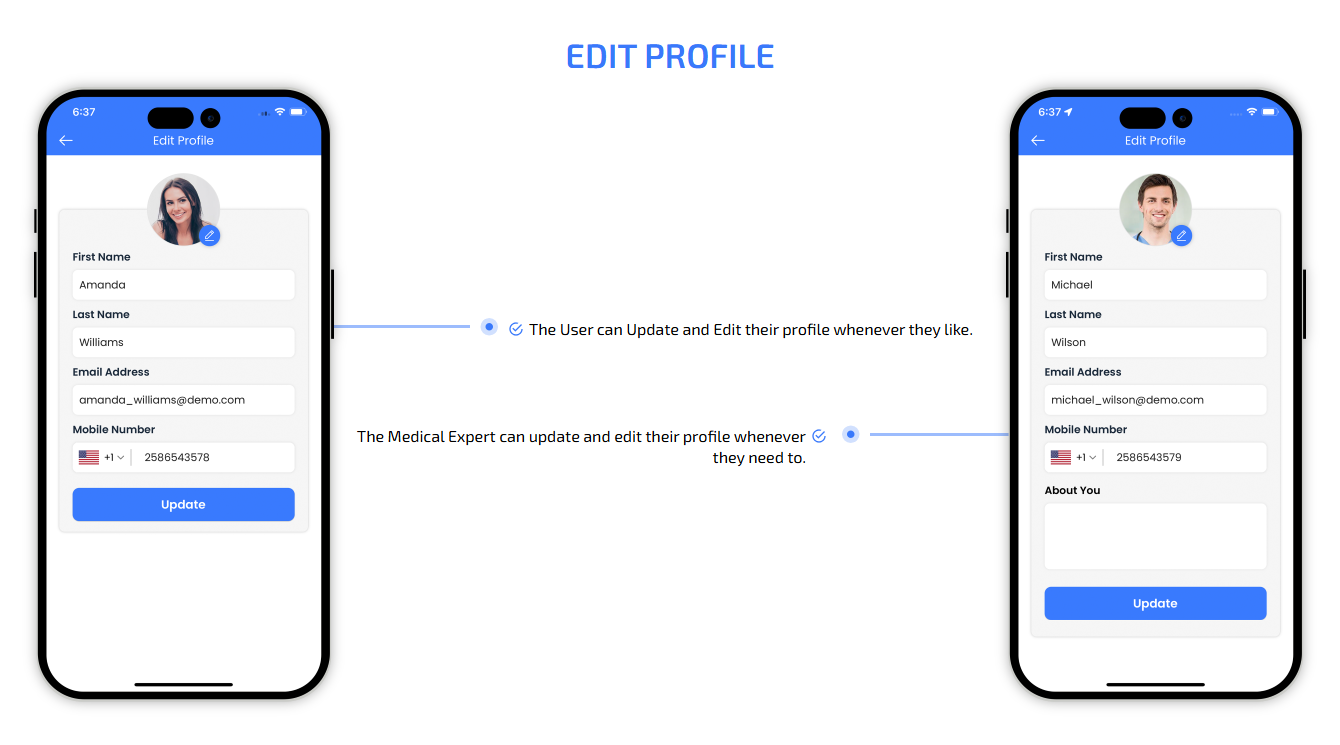
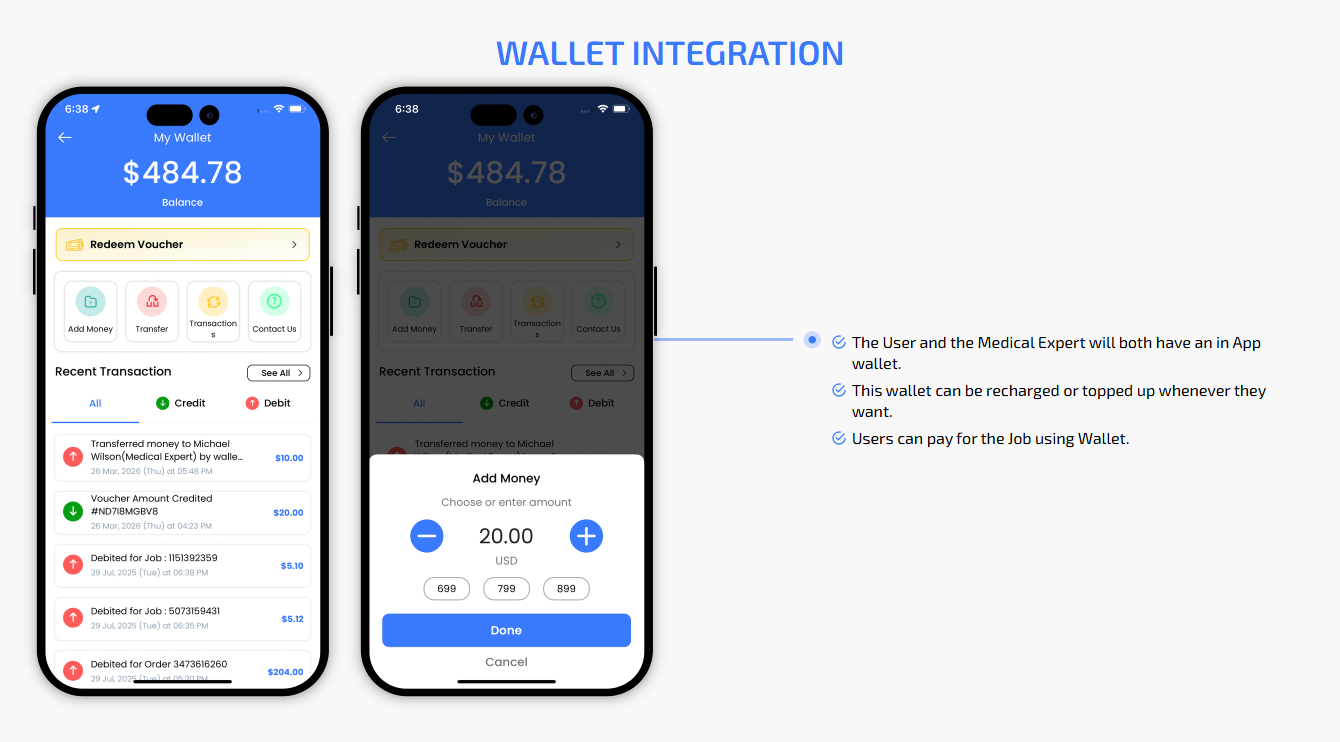
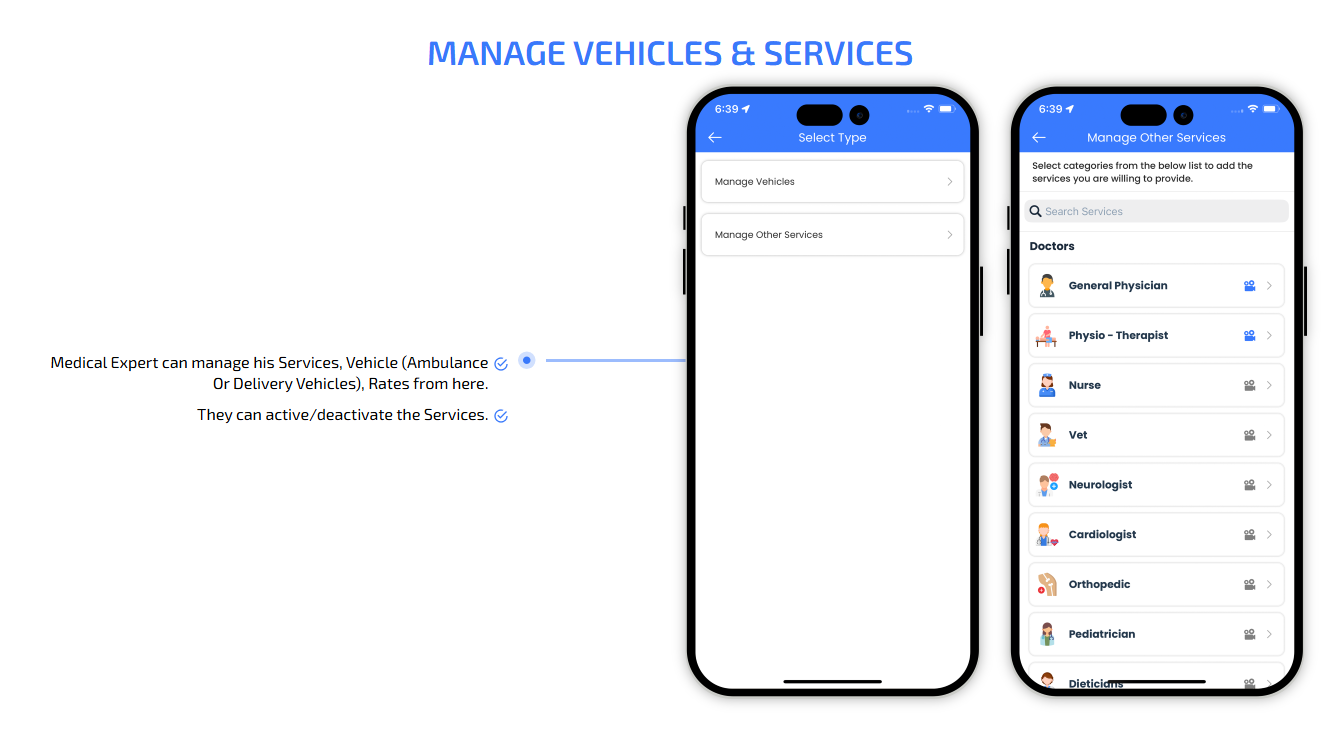
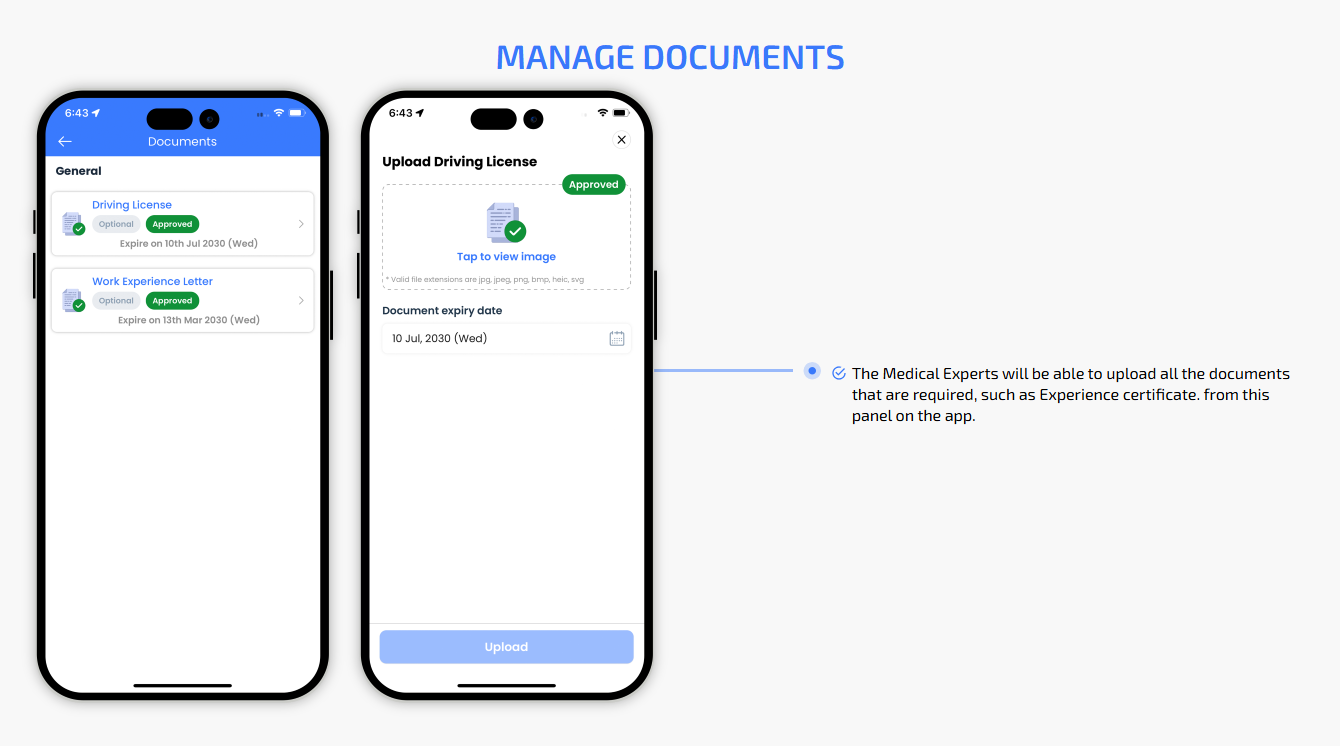
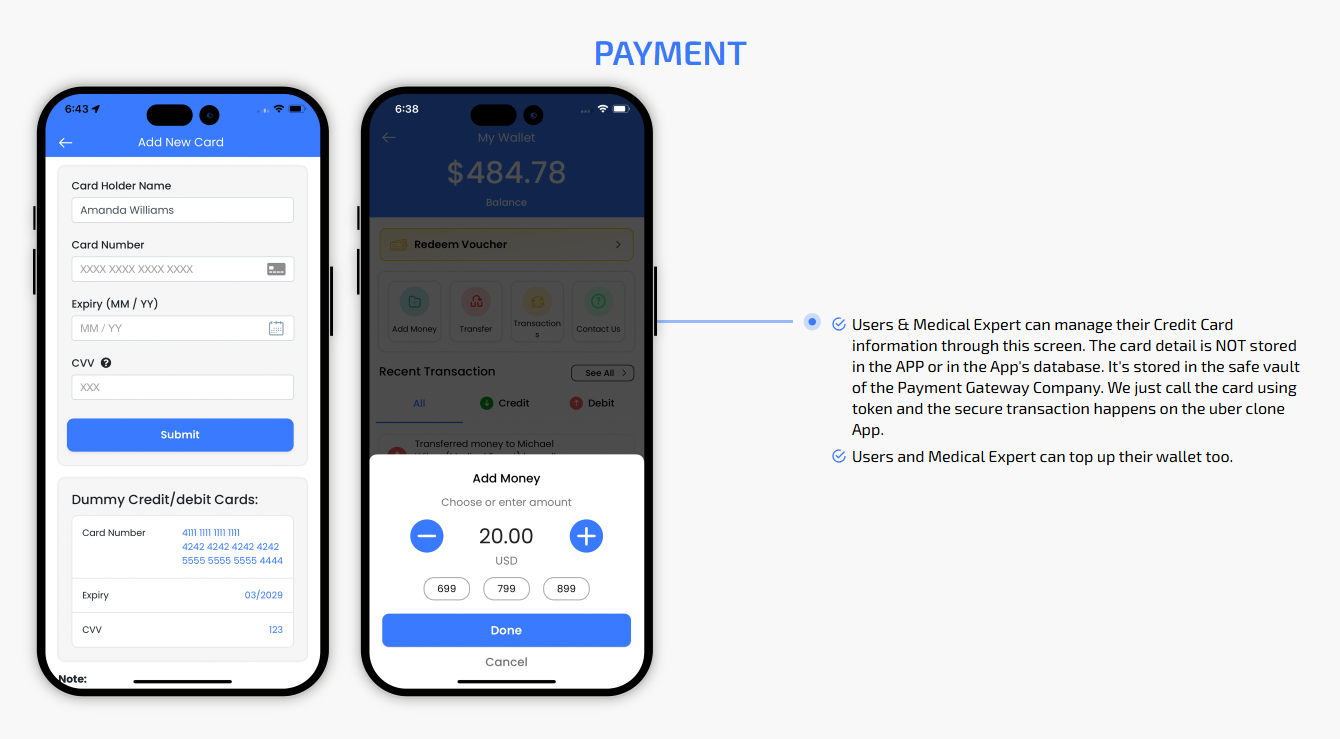
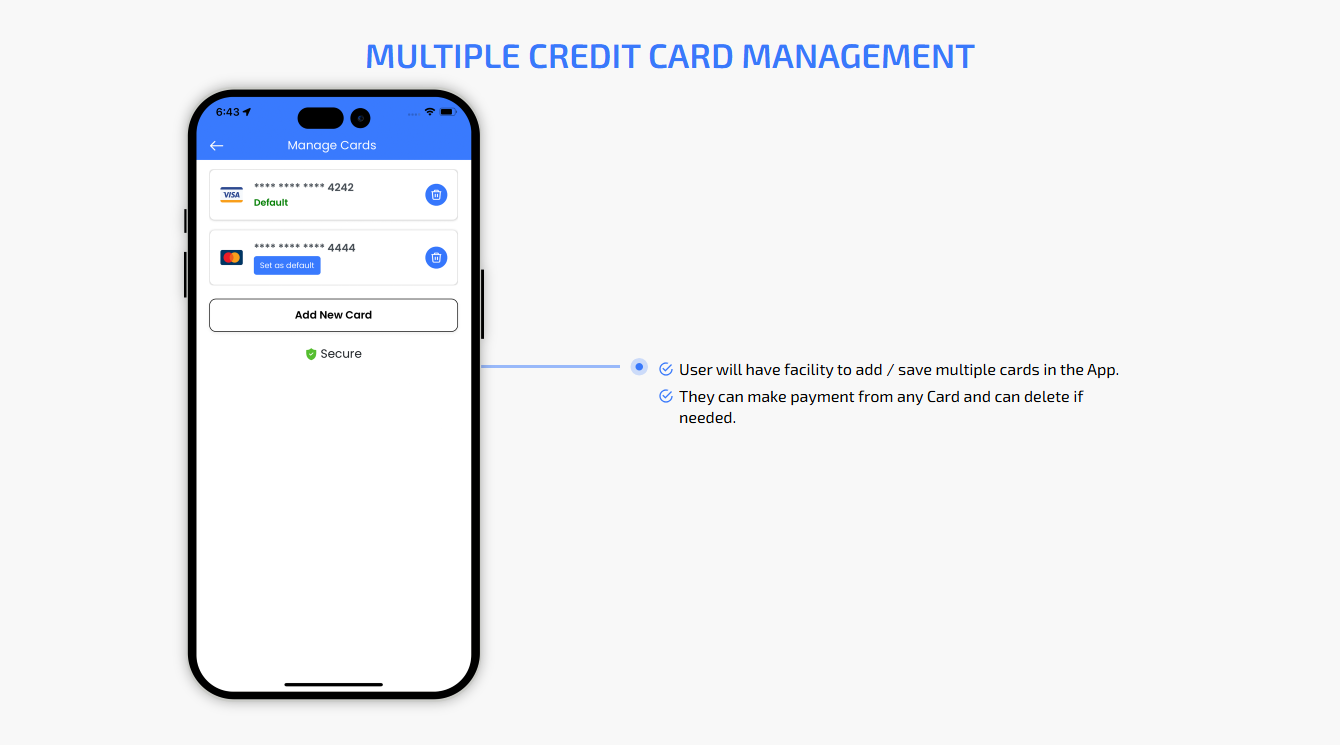
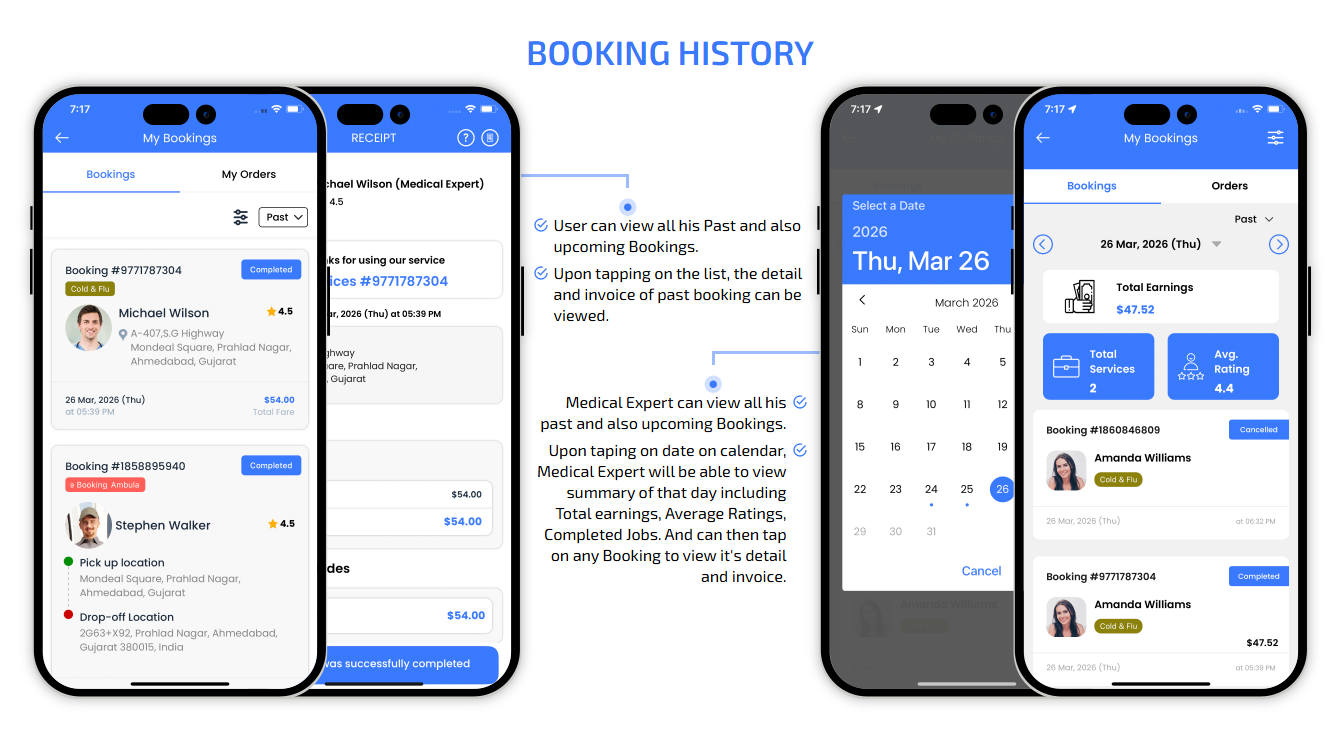
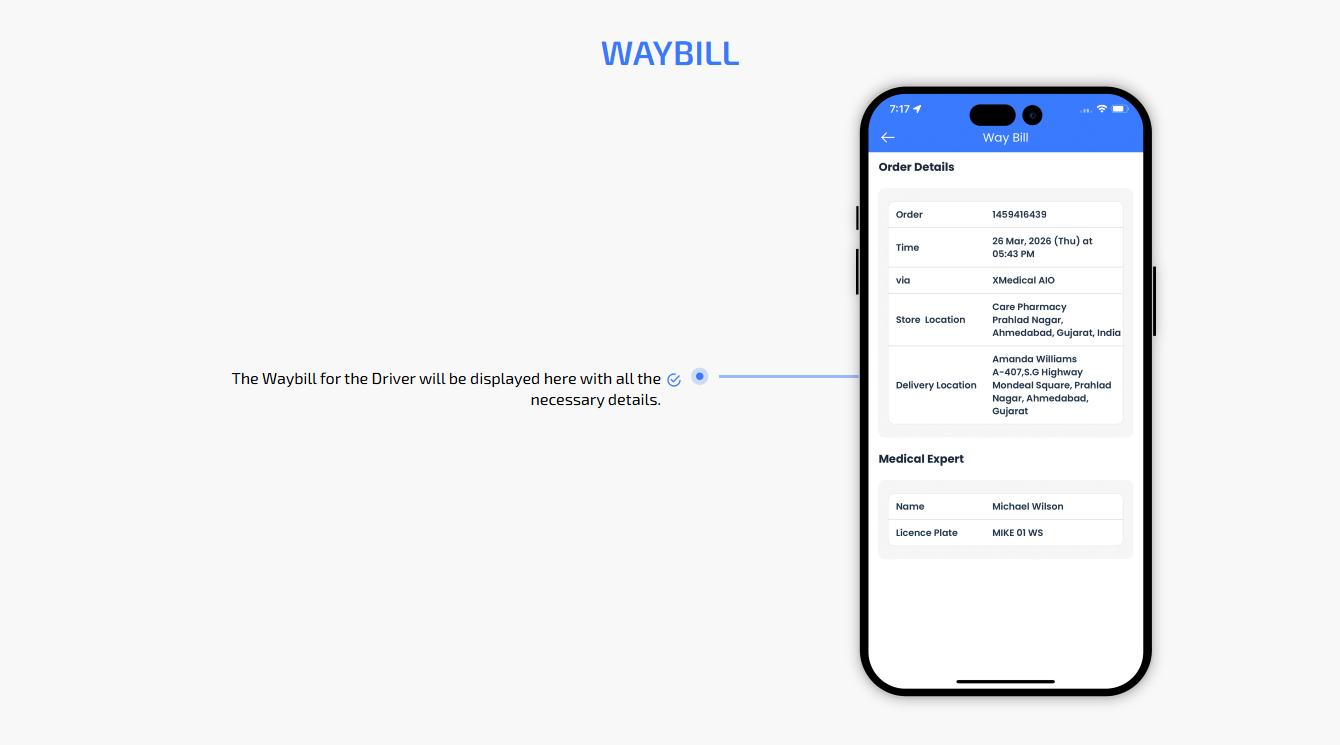
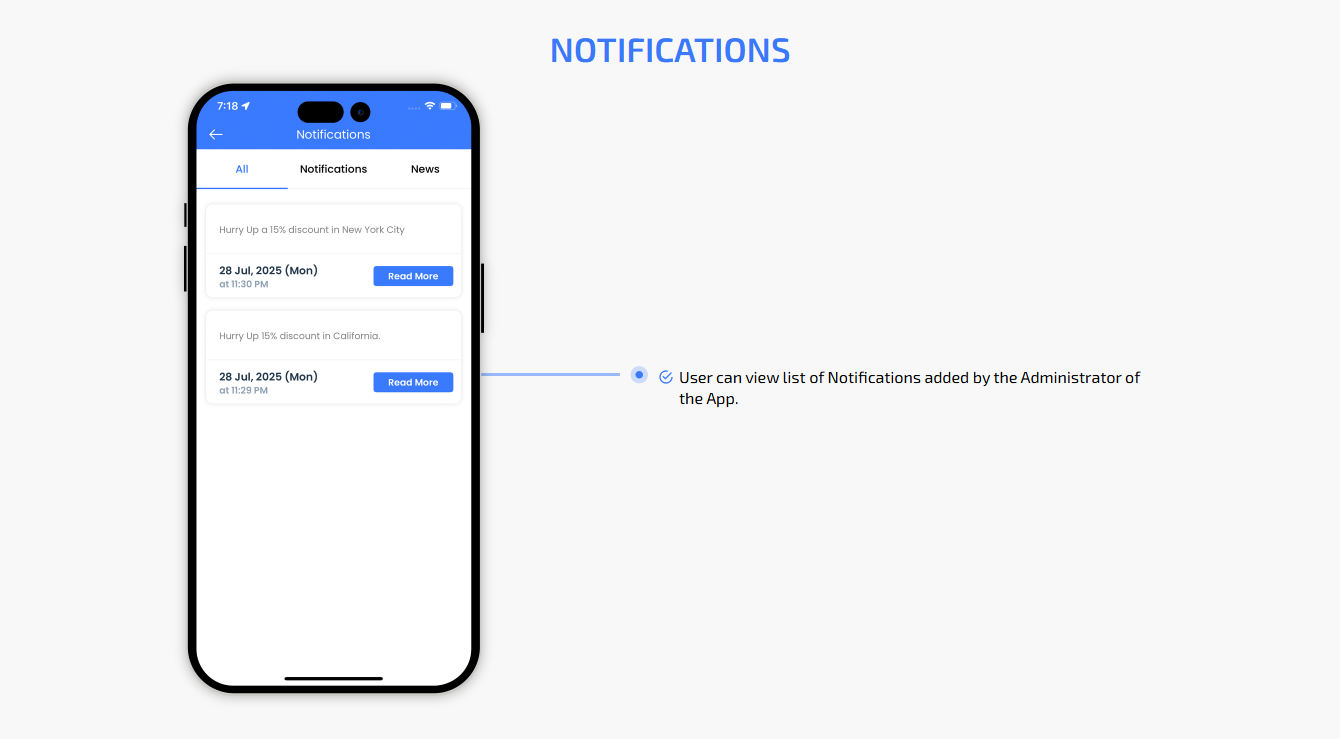
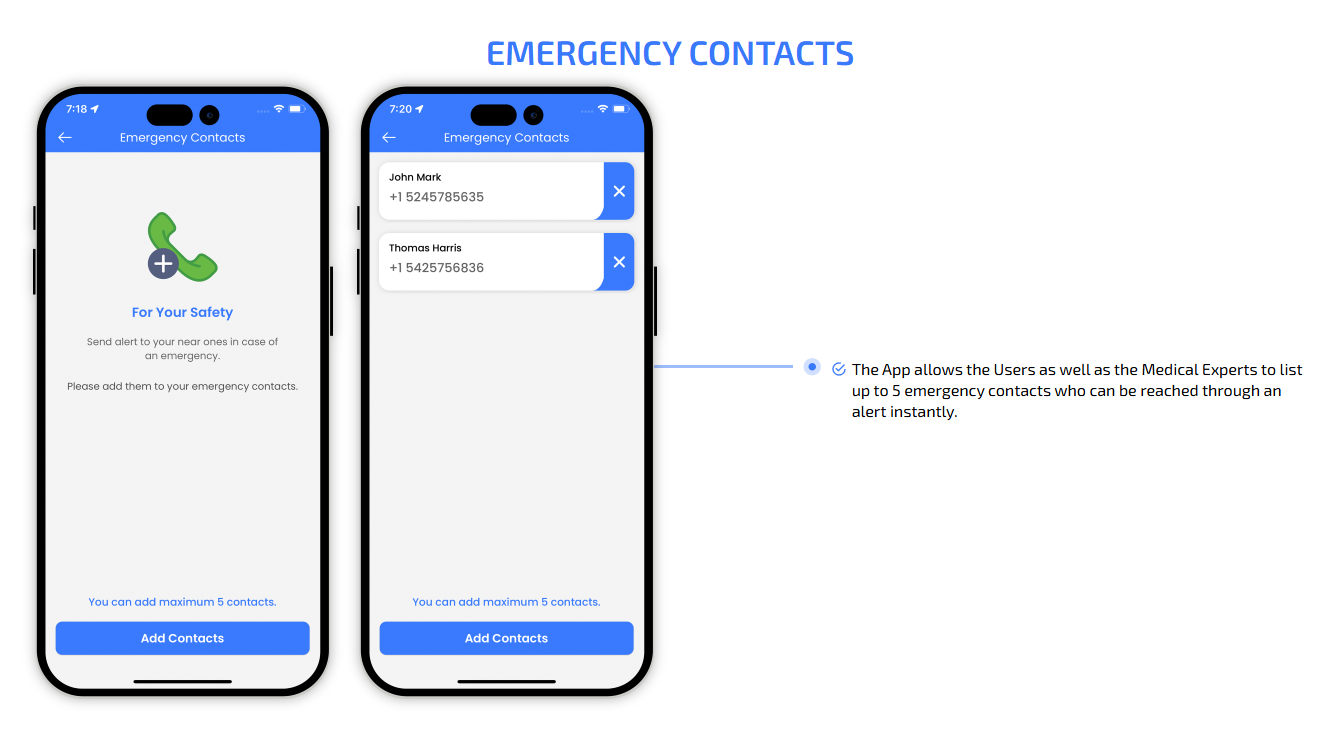
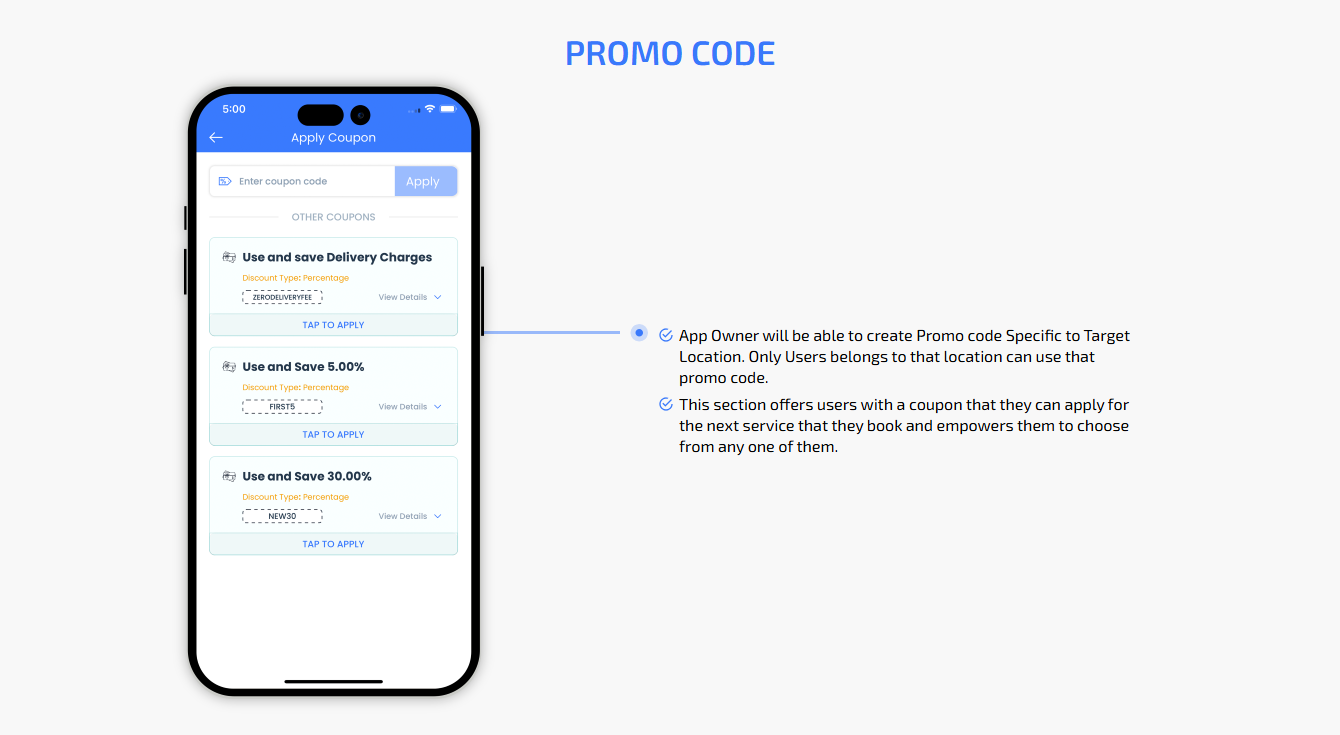
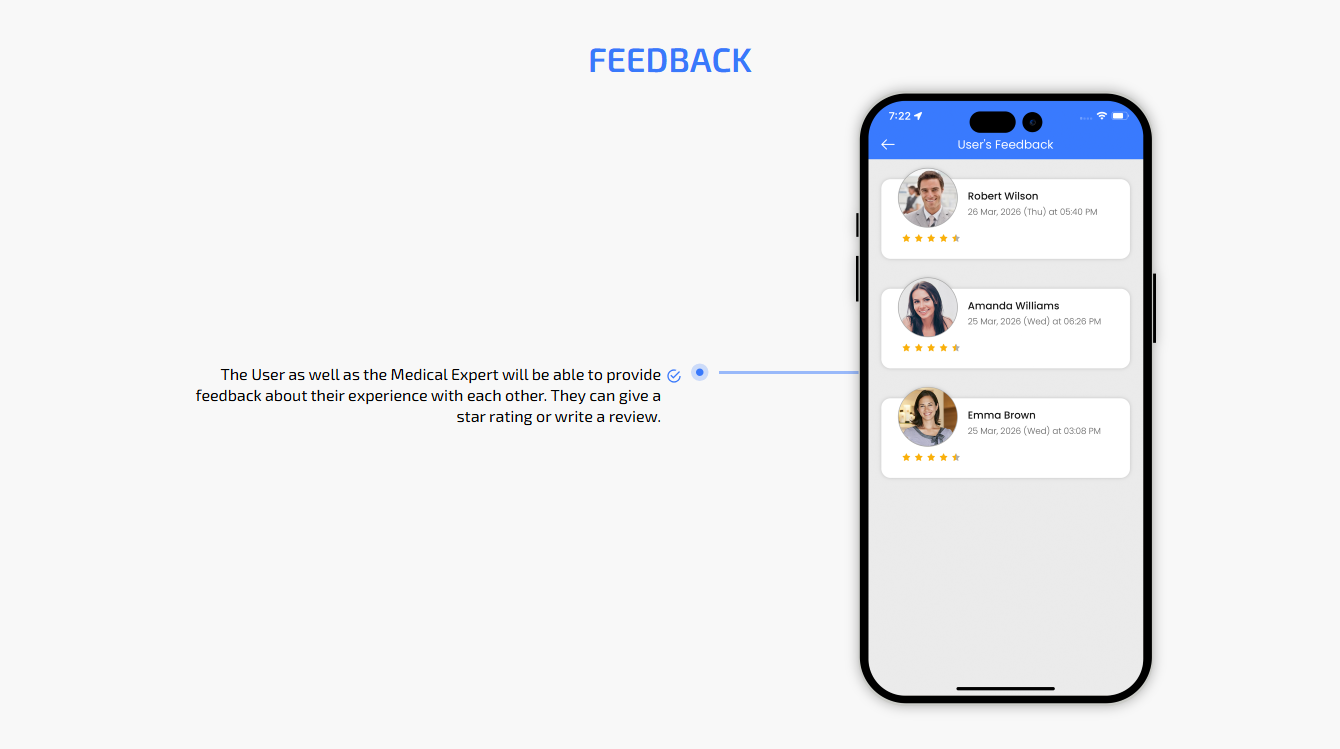
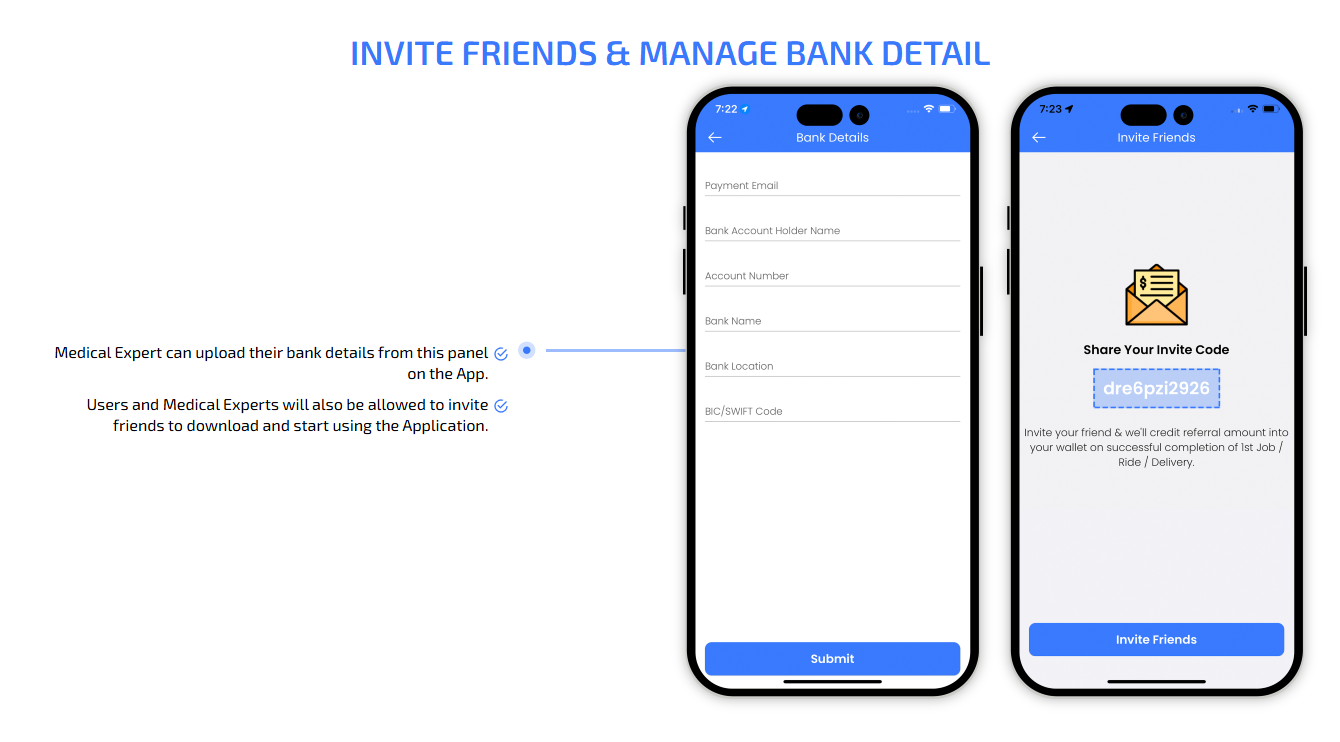
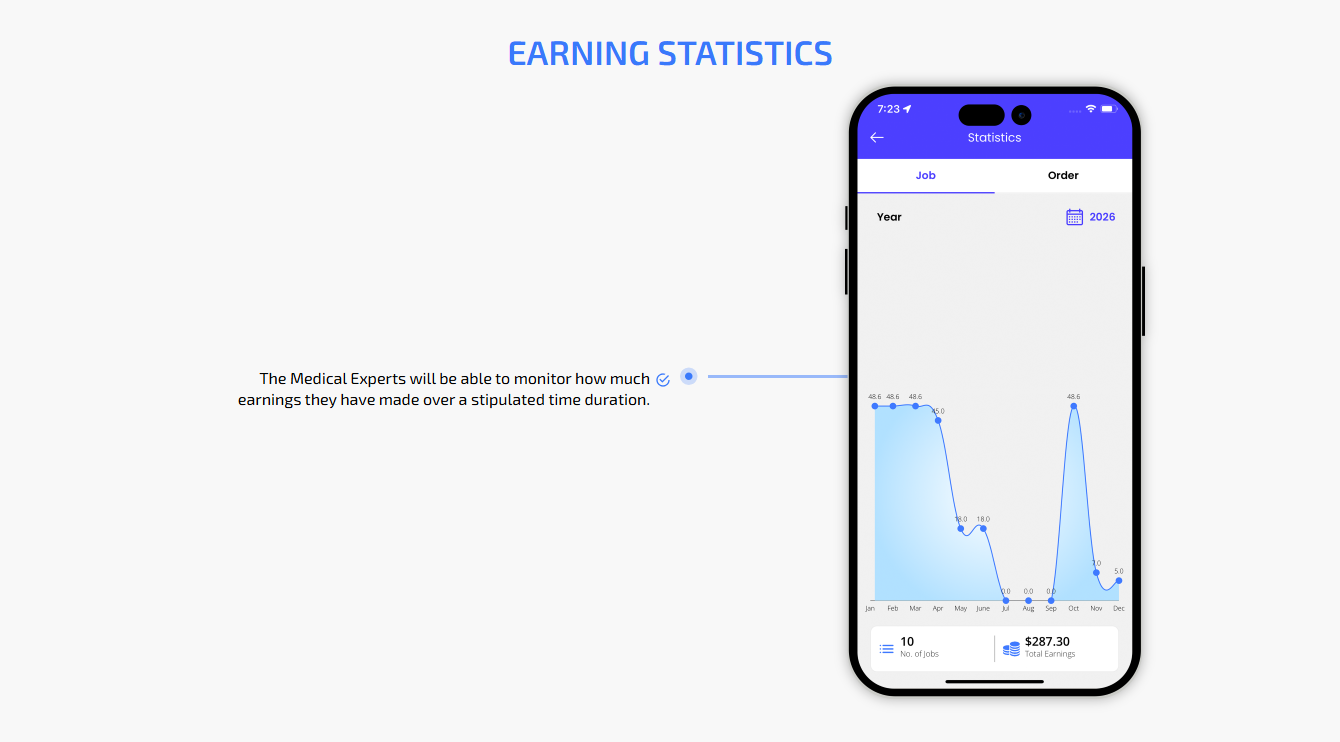
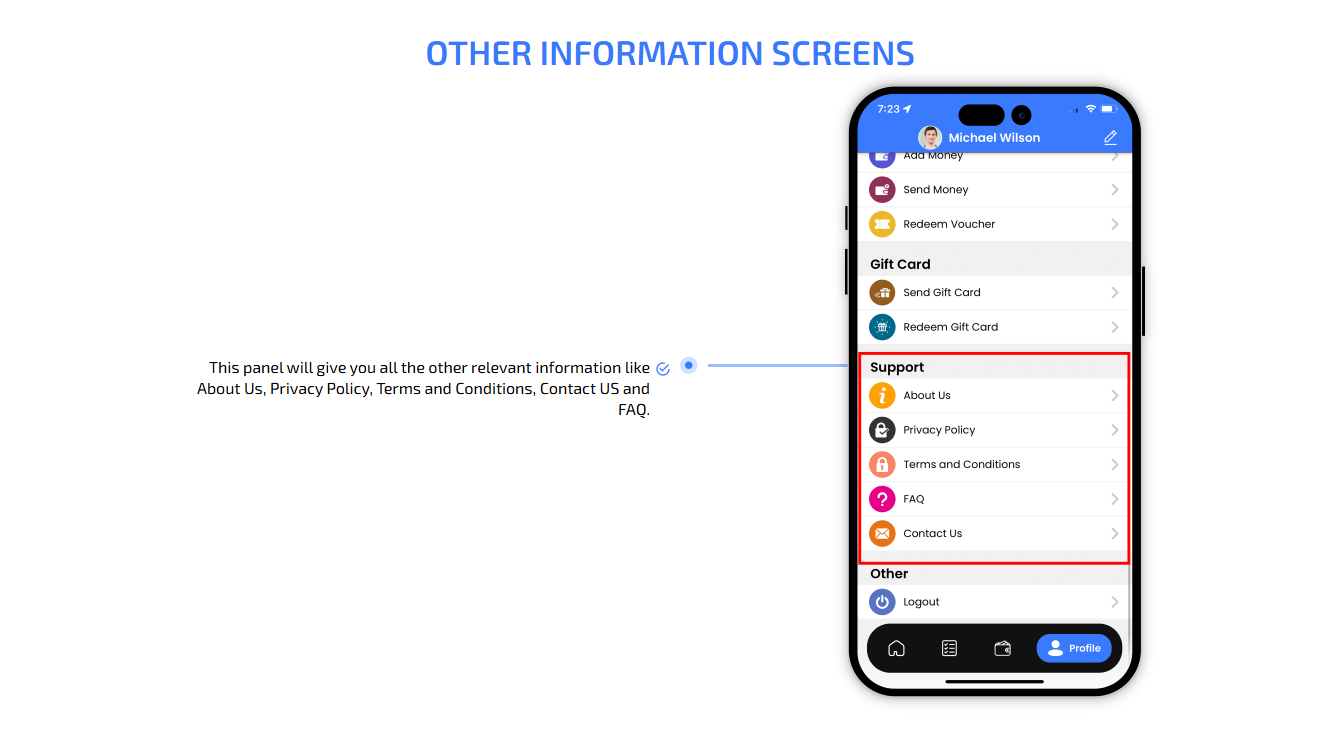
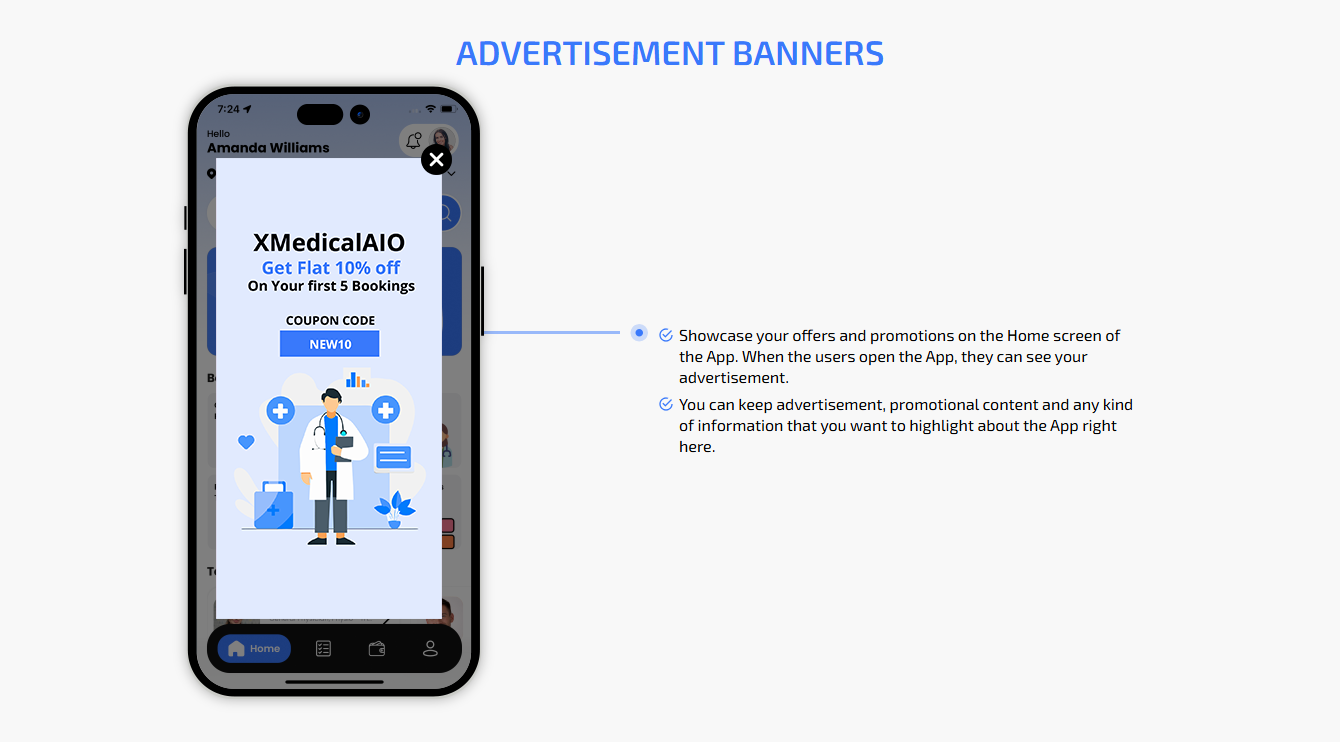
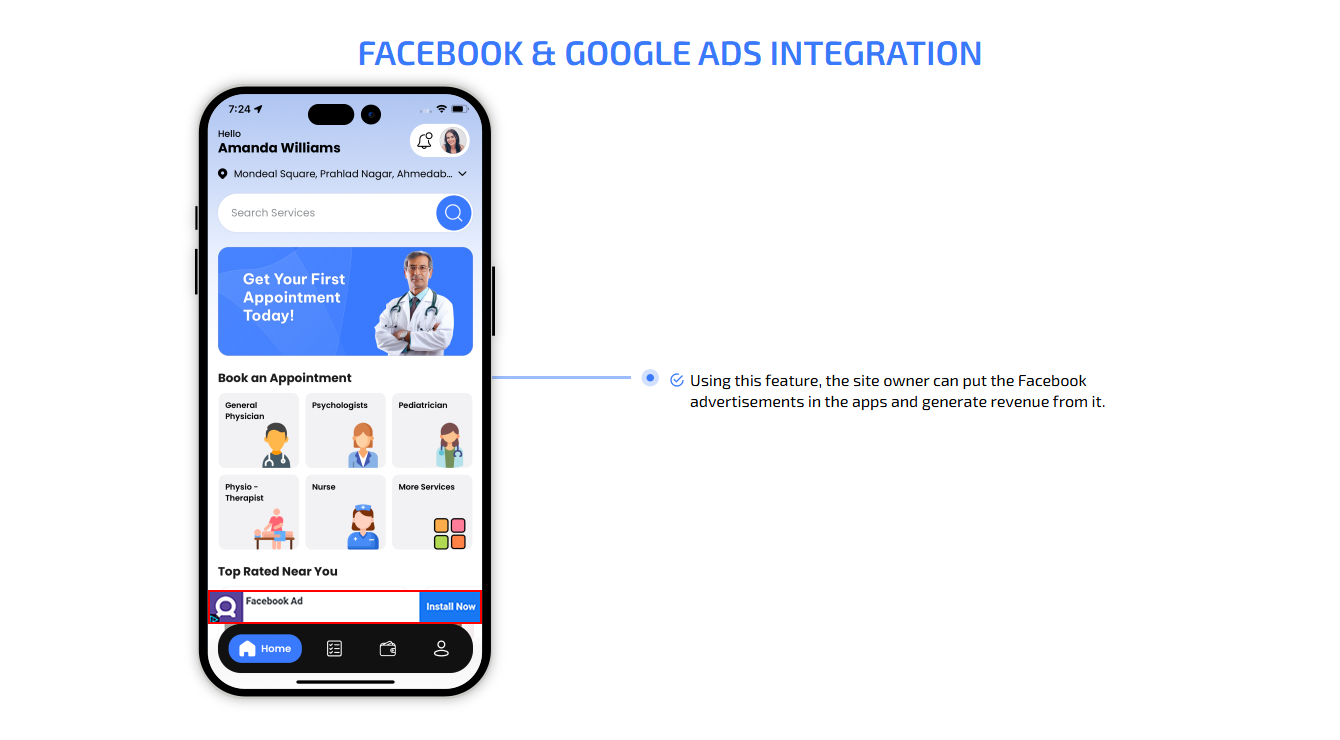
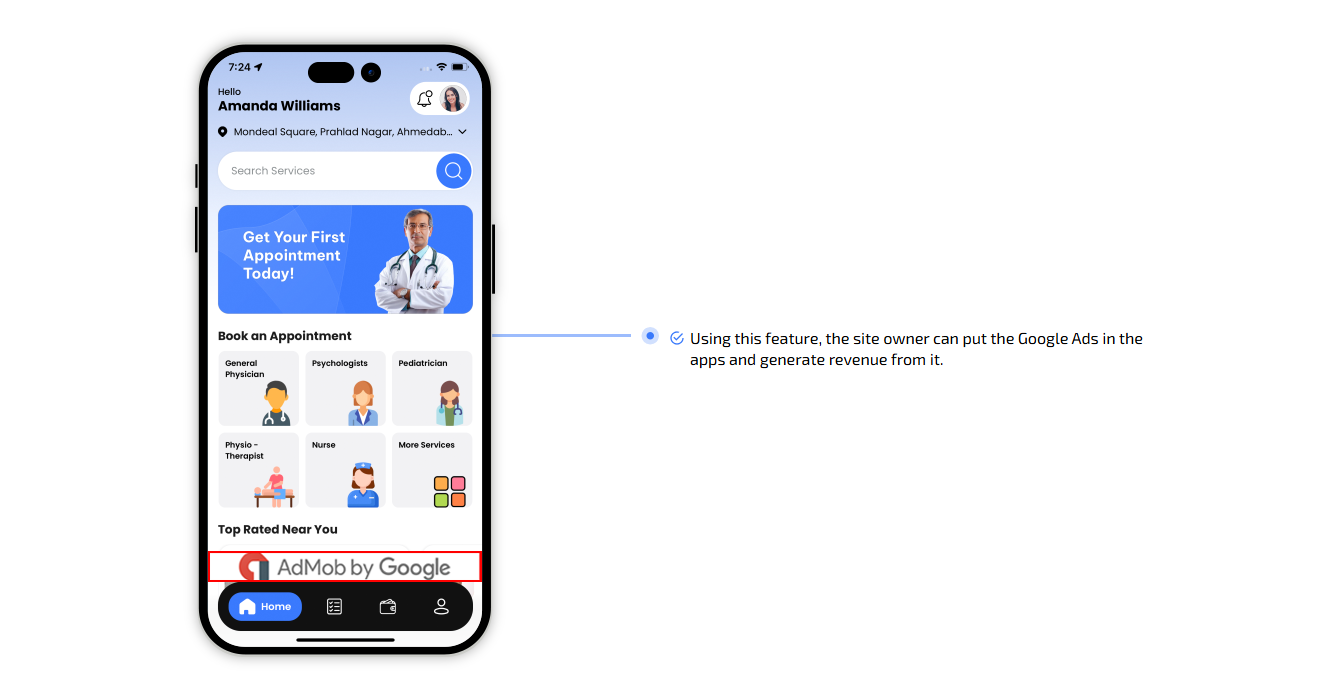
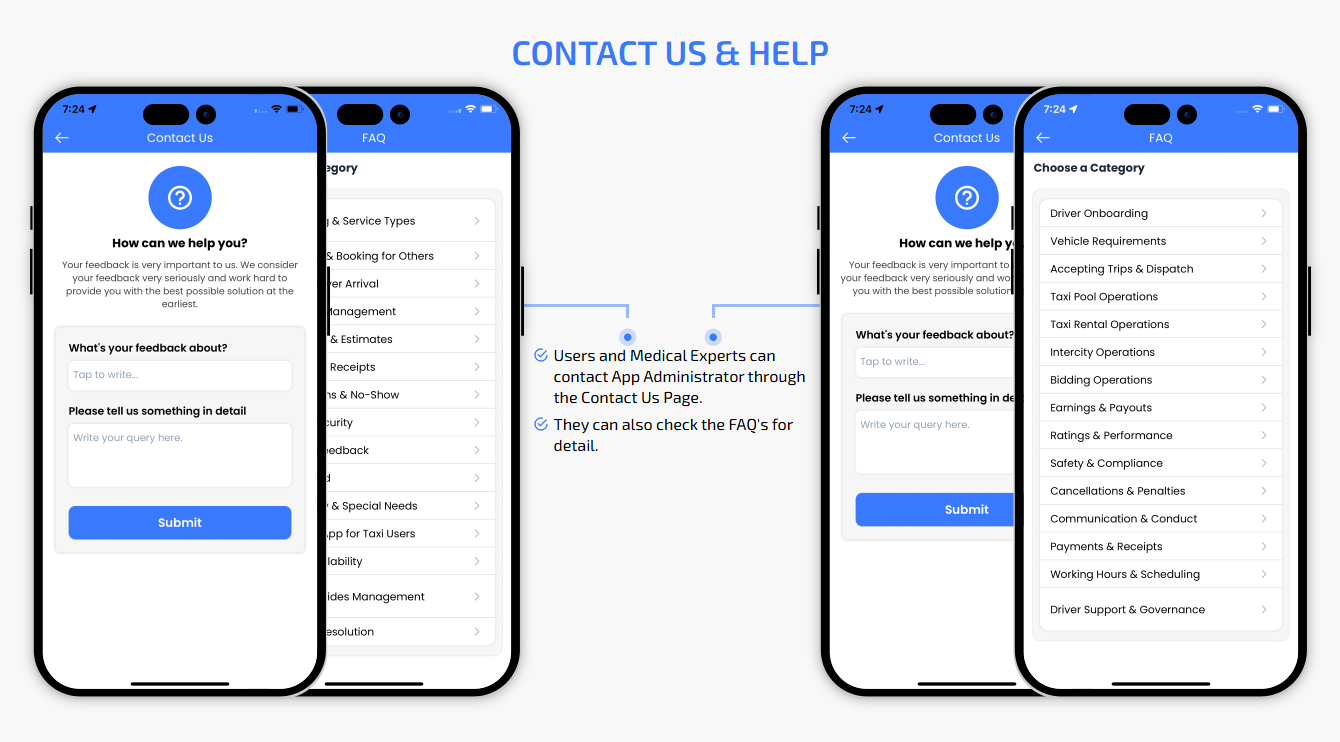
Healthcare Mobile Apps Flow - Cubetaxi

Step by Step Graphical Flow Of All In One Medical App

Loading Screen

app login
  • User Application's Splash Screen with App's Logo will be displayed for 2-3 Seconds. Your logo with your App name will show here.
  • Medical Expert Application's Splash Screen with App's Logo will be displayed for 2-3 Seconds. Your logo with your App name will show here.
app signup

App Introduction Screen

  • User can see the information related to the Application on the Screen.
  • With this Screen, the User can flexibly choose the Language as well as currency of their choice. They can proceed for login or register through this Screen.
  • Medical Expert can see the information related to the Application on the Screen.
  • With this Screen, the Service Medical Expert can choose the Language and Currency of their choice flexibly. They can proceed for login or register through this Screen.

Application Login

  • app login

    The User can login into the App by using their Mobile number.

  • app login

    The User can also login into the App by using Face ID / Touch ID / Social Media Accounts (Google & Facebook) / Apple Account.

  • app login

    After entering the Phone number, user can either enter the OTP or the alphanumeric password. App Owner will decide and set in Admin Panel Settings of what he wants in his App >> OTP or Password. OTP can be send either using Twilio or Firebase method.

  • app login

    User can enter alphanumeric Password. (If this is set by the Admin).

Touch Id / Face ID Login (For Android Phone Users)

Select booking location
  • To activate Smart Login (Finger Print / Face Id), User first need to login/sign up either by mobile number or social media.
  • After login, user can enable smart login option from his profile section of application.
  • After enabling this option, user will see the Smart Login option in the login screen on his Device. Next time Users will be able to login using Finder ID / Face ID.
Select booking location Select booking location
  • Android Users can login using the Touch ID from their Mobile Phone.
  • User will be ask to put finger on sensor.
  • Its hassle free and help you to login using Touch Id.
  • Note: To activate Smart Login ( Finger Print or Face ID ), User first need to login/sign up either by Mobile Number or Social Media.

Face Id Detection (For iPhone Users)

Select booking location Select booking location
  • In case of iPhone device, user will be ask for Face Detection.
  • After successful authorization, user will be taken to main/landing screen.
  • Note: To activate Smart Login ( Finger Print or Face ID ), User first need to login/sign up either by Mobile Number or Social Media.

Registration

  • app registration

    Users can login to the App using Mobile number & Social Media credentials (Facebook or Gmail). There will be multiple steps for registarion.

  • app login

    After entering the Phone number, User will be asked to enter the OTP or password (as set by the App owner).

  • app login

    User can enter his full name in order to register on the App.

  • app login

    User can enter his email address and proceeed ahead. Once User is successfully registered on the App, he can login and use the Apps.

Application Menu

user app menu
  • Here the User is introduced to all the important features present in the App that include My Bookings, Favorite Medical Expert, Wallet, Notifications, etc. to name a few.
  • Here the Driver / Delivery Driver / Medical Expert is introduced to some very important features that can help them operate seamlessly as well as smoothly. This includes My Booking, Wallet, My Profile, etc. to name a few.
Medical Expert app menu

Medical Services

choose service categories choose service categories
    Book A Medical Service
  • Using this section of the App, a User can book Medical Services like General Physicain, Physiotherapist, Nurse, Psychologists, Cardiologist etc
  • User can also opt for Video Consultation option and can book Video Consultation of Orthopedic, General Physician, Neurologist, Dietician etc.
  • The Major Services that User can book from this section are Pharmacy Delivery, Ambulance, Vet etc..

Component 1 - Book An Appointment

choose service categories
  • To book an Appointment, User can select the Services from Book An Appointment/Service like General Physican, Physiotherapist, Nurse, Psychologists etc.
  • Here, lets take the example of Doctor on Demand Service.
  • All other Services in this Category will work same as Doctor on Demand.
choose service categories choose service categories
  • User can view the list of nearby available Medical Experts / Nurse / Vet / Physiotherapist etc
  • They can also navigate their location in the google Map

Manage Services

choose service categories choose sub categories
  • Utilizing this feature, Doctors can update the information in relation to the Services offered by them, including its subcategory.
choose service categories choose sub categories
    Profile and Booking Summary
  • Here in this section, Patients would get a glimpse of the profile of the Doctor they have selected.
  • The section also presents Patients with the list of Services provided by that Doctor and thereafter book the service and pay.
choose sub categories choose service categories
    View Gallery and Reviews
  • The section presents Patient with all the past work of the Doctor in the form of a Gallery and Reviews as well so that they can choose the correct Doctor.
choose service categories choose sub categories
    View Booking Summary and Pay
  • As soon as Patient books the Service and chooses the mode of payment, they get presented with a Booking Summary containing the details of the Service, the mode of payment selected and the location where service would be delivered.
Select booking location
  • Patient needs to choose location where they would require service. They can select from the two options - Location of Patient or Location of Doctor.
  • Doctor can choose the location where he would be providing the Services.
  • Doctor can opt to provide service at Patient's location or his own location.
Medical Expert manage work location
Select booking location
  • As soon as the Patient has completed these steps, the Job request gets sent thereafter to the Doctor.
  • The Doctor now receives the request where they need to offer their services along with the location and thereafter can accept or decline the same as per their choice.
Medical Expert manage work location

Job Request Accepted

Select booking location
  • As soon as Doctor accepts job request, the user gets notified of the same with the message ‘Doctor Has Accepted Request’.
  • The Doctor gets presented with the details of the location where they need to provide the services, along with the subcategory of services that need to be provided.
Medical Expert manage work location

Doctor Arrives at Job Location

Select booking location
  • Patient gets notified as soon as Doctor arrives at job location with the message ‘Doctor has arrived at your location’.
  • Doctor needs to tap on ‘Arrived at Job Location’as soon as they arrive at the location of the Patient.
Medical Expert manage work location

Job started

Select booking location
  • With the arrival of Doctor, the service begins thereafter and the user gets notified of the same with the message reading ‘Doctor has Started Job’.
  • The Doctor starts the service now and taps on ‘Job Started’.
Medical Expert manage work location

Job completed

Select booking location
  • As soon as the Doctor is done with their services, the Patient gets notified of the same with the message reading ‘Doctor has Completed Job’.
  • As soon as Doctor is done with their services, they tap on ‘Job Completed’ to notify the app and the Patient thereafter of job completion.
Medical Expert manage work location

Invoice Summary

Select booking location
  • As soon as the Doctor taps on ‘Job Completed’, thereafter an invoice summary gets presented on the Patient app containing the details of the service and the payment related to the same.
  • As soon as the Doctor taps on ‘Job Completed’ thereafter an invoice summary gets generated on their screen containing the payment details, services and the mode of payment chosen by Patient.
Medical Expert manage work location

Reviews and Ratings

The Review and Rating section present on the app of the Patient and Doctor both help both provide reviews to each other as well as provide rating to each other based on the experience of services.

Select booking location
  • This helps the Patient provide unique reviews and rate the Doctor based on the nature of services provided by them.
  • Utilizing this feature, the Doctor on completion of their job can provide review and provide rating as well to the user.
Medical Experts manage work location

Component 2 - Video Consultation

choose service categories choose sub categories
    Online Video Consultation
  • Users can connect with experts through audio/video calls along with chats to get consultation on various topics like Legal, Telemedicine, Astrology, Teaching and Fitness.
  • Here we are taking example of Doctor Video consultation. User can select the Category as Doctor and then the Subcategy as General Physician.

Medical Experts List

choose service categories choose sub categories
  • Based on the selected Categories, list of nearby Medical Expert will be displayed.
  • User can also see the location of all the Medical Experts in Map view.
choose service categories choose sub categories
    Medical Expert Profile details
  • User can tap on any Medical Expert from the list and can see his Profile details like the Service he provides, Gallery and Reviews.
  • User can provide special instructions (if any) and can book the Medical Expert.
choose service categories choose sub categories
    Booking and Payment
  • User can proceed to book the Services by choosing the Payment options (Cash / Card or Wallet)
  • User can also make payment using the previously saved Card.
Select booking location
  • As soon as the user has completed these steps, the Job request gets sent thereafter to the Medical Expert.
  • The Medical Expert now receives the request where they need to offer their services along with the location and thereafter can accept or decline the same as per their choice.
Medical Expert manage work location

Job Request Accepted

  • As soon as Medical Expert accepts job request, the user gets notified of the same with the message Medical Expert Has Accepted Request’.

Start Service

Select booking location
  • User can see that Medical Expert has accepted the request.
  • Medical Expert can start the Services by tapping on the "Start Video Consulting".
Medical Expert manage work location
choose service categories
  • Medical Expert will get options for the call as "Audio Call" or "Video Call".
  • Tapping on Video Call, Medical Expert can start the Video call.

Video Call

User and Service Medical Expert can connect to each other via Video call.

Invoice Summary

Select booking location
  • After the Video Consultation is over, User can see the Invoice Summary and can make the Payment using Cash, Card or wallet.
  • After the Video consultation, Medical Expert can view the Invoice summary and can collect the payment.
Medical Expert manage work location

COMPONENT 3 - Other Services

Pharmacy Delivery

choose service categories choose service categories
    Ordering Medicines
  • User can see all the nearby available Stores. They can choose any store and can see the available Items.
  • User can add the Items / product in the Cart and can buy.
  • User can track the entire order from their Application.

Placing Order for Medicines

  • user order dashboard User App

    This is the section that will enable the User to place an order from the Pharmacy Store of their choice. They will be able to see all the Pharmacy Stores that appear online on the App.

  • restaurant sliding onine availability Store App

    This page will allow the Pharmacy Store owners to make themselves available by sliding the Online or Offline option. When online, they can receive orders when Offline they will not be shown to the customers and thereby will not receive any orders.

  • Driver set his availability Delivery Driver App

    The Driver can set his availability to pick and drop the order on this page. The Driver can make himself available by sliding the radio button to Online. if turned to Offline, the driver will not receive any request for delivery.

User Flow of Ordering the Medicine

  • user Search Medicines items Search Medicines

    This screen allows the User to search for the Pharmacy items that they are looking for.

  • user add food item to basket Add to Cart

    After the User makes selection, they can add their favorite Items to the basket.

  • user edite food item View/Edit Cart

    This screen is where the user can modify or edit the Pharmacy Items placed in the cart.

  • user confirm order to check out Attach Prescription

    There are some Medicines that require Prescription. Once those Medicines will be added in the Cart, User will have to upload the Prescription for the same.

  • user confirm order to check out Upload Prescription

    User can upload multiple Prescriptions. User can also skip uploading prescription and can directly contact the Pharmacy Store.

  • use choose payment method Edit Prescription

    User can edit/change the prescription once it is uploaded.

  • user confirm order to check out Checkout Screen

    This screen will allow Customer to checkout and confirm the purchase. Here they can choss the option for "Delivery to your Doors" or "Take away".

  • user confirm order to check out Delivery Options

    Once User choose the "Deliver to your Doors", he can opt for Contactless Delivery.

  • use choose payment method Choose Payment Method (Cash/Card/Wallet)

    The final step in the checkout screen will allow you to choose the payment method for the order.

After User Places Order

  • order place notification

    The User is notified that his order has been placed. It also states that the order will be delivered shortly, shows the options of Call, so that he can call the Pharmacy Store and Navigate to help reach the Pharmacy Store using the Map

  • restaurant app displays order details

    Once the order is placed the Pharmacy Store app immediately shows a screen where the order details are shown. The Order is presented in the NEW ORDERS section.

  • new order details

Tracking the Order

  • user track the order

    The User can now track their order over a Map. This page will show a flowchart with all the stages of the order right from the order being placed to it being delivered. The Map will also help locating exactly how far the order is.

  • total bill amount confirm or decline

    Pharmacy Store can view the Order details and can confirm or decline the Order.

Order Assignment to Delivery Driver

  • assign driver
  • restaurant assigns to driver

    Once the Pharmacy Store accepts the placed order, they will be shown a screen with the bill details and a button that says “ASSIGN DRIVER”. On tapping this button, the request for pickup and delivery of the order will be sent out to the Delivery Driver.

  • delivery driver sees request

    The Delivery Driver sees the request as a notification on his screen along with a timer. The Driver must accept the order within the given time or else the request will automatically get canceled and passed on to another driver.
    Note – The driver ought to accept the order within the timeframe set on the timer, failure of which would lead to the request getting sent to the next driver.

Order Processing

  • user see assigned driver for pickup of order

    The User will now be shown that the Driver for pickup of order has been assigned. This will be shown as a progression in the flowchart on the screen of the User.

  • restaurant get notification for driver accept order

    The Pharmacy Store will be notified after the Driver accepts the order. The notification will state that the Delivery executive is on his way to collect the order. This screen will continue to show the particulars of the order as well.

  • delivery driver see order picup address

    The Delivery Driver will be able to see the Current Task on this page. It will show the address of the place that the order has to be collected from and the address of the delivery for the order. This page also shows the options of Call, so that he can call the Pharmacy Store and Navigate to help reach the Pharmacy Store using the Map.

delivery driver pickup order

Status of Delivery Driver

Driver can now reach the Pharmacy Store and pick up the order. The delivery driver will be able to see the particulars of the order so that he can pick it up without any confusion. He will then take a picture of having collected the order and update on the app as "ORDER PICKED UP".

Last Leg of Delivery

  • user see the status of the driver

    The User can now see the status of the Driver along with an estimated time of arrival. The flowchart gets appropriately marked as per the movement of the Driver.

  • restaurant track status of order

    The Pharmacy Store too will now be able to track the exact status of the order. The Pharmacy Store will be able to see whether the order has reached the recipient or not.

  • driver see the address of the recipient

    After the order is picked up by him, the will now be able to see the address of the Recipient. They will also have the option of Calling the Customer for instructions and tracing the location on a map so that they can drive and reach them easily.

order delivered successful

Order Delivered Successfully

Once the order gets successfully delivered to the Customer's place, it is appropriately updated on the app. the order delivered icon turns green along with a time stamp for the same. The page also mentions that the order has been delivered.

Apart from that the page has 2 buttons in the bottom:

  • Not Delivered

    In case the driver marks the order as delivered, however, the customer hasn't received it, the User can click on this button and the admin will be notified. The ustomer can also call the Delivery driver directly by clicking this button
    Note - The customer can place a call directly to the delivery driver also when they tap on this toggle.

  • Ok, Got It

    This button is to be clicked when the customer confirms that the Pharmacy has been delivered successfully.

    Reviews and Ratings

    • user see the status of the driver
      • The User can Review the Pharmacy Store based on the quality of the item that they received.
      • The User can also rate the Driver based on their experience of having the item delivered.
    • driver see the address of the recipient
      • The Driver will be able to review and rate the Store based on the readiness and preparedness of the order.
      • The Driver can also rate the Customer based on their experience of delivering the product.

    Book An Ambulance

    choose service categories choose service categories
    • User can book the ambulance from the Application by choosing the type of the Abmulance they want like General Purpose Ambulance, Mobile ICU Ambulance or Basic Life Support Ambulance.
    • They can see the rates according to the selected Ambulance type.
    • User can see the ambulance available on the Google Map also. They can further choose the payment mode and can request the Ambulance driver.
    • For further flow, please check "HOW DOES THE ON DEMAND TAXI SERVICE WORKS section.

    Ambulance driver Gets Online and Start Accepting Request

    Select booking location
      Ambulance driver Sets Availability (Online / Offline) to get Ride Requests.
    • Ambulance driver sets availability online and chooses the Vehicle they wish to use.
    • Request only get sent to the Ambulance drivers that are online and fall within the nearby vicinity of Patient.
    • In case of the Ambulance driver using more than one Ambulance they need to choose the one that they would like to use for offering Request to Patients.

    Sending Ambulance Request

    sending request
    • Once the Patient has put in the PickUp and Drop Location and selected the type of Ambulance & Payment option, the App will send out a request to the Ambulance drivers in the nearest vicinity.
    • There are 3 algorithms of deciding how to allot Requests to a Ambulance driver:
      - Closest First: The Ambulance driver in the closest proximity gets the request first. If they reject, the Request in turn goes to the next and so on and so forth.
      - Competitive: Every Ambulance driver in the given radius is given the request, and whoever chooses first gets it.
      - FIFO: First In First Out method allots the Request to the Ambulance waiting idle for the longest duration in the given radius of an area
    • When a Patient requests for a Ambulance, the App sends out a Request to all the Ambulance driver in the area.
    • The Ambulance driver see a screen with all the details and a timer. They must accept or decline the request within the time frame failure of which leads to the request getting automatically declined.
    Driver accept or decline the request

    Ambulance Driver Arriving

    Patient can see the location of the Driver on a Map
    • Patient here gets a glimpse of the location of the Ambulance driver and thereafter calculate the estimated time of arrival.
    • Patient can Call / Message or Share the Request details.
    • The Ambulance driver receives a glimpse of the location from where they need to pick the Patient and thereafter calculate the estimated time they would take to arrive there.
    • Ambulance driver can Call / Message / Share / Cancel the Request.
    Driver can see the pickup location on a map

    Ambulance driver Arrives at Location

    Patient is notified when Ambulance driver reaches at location
    • As soon as Ambulance driver arrives at location of Patient, they slide the button to mark as Arrive.
    • As soon as Ambulance driver reaches the location, the Patient is notified of the same.
    Driver updates when he arrives at pickup location

    Ambulance service Begins

    trip begin
    • As soon as Ambulance service starts, the Ambulance driver slides the button ‘Begin Trip’ to notify the Patient of the Ambulance service getting started.
    • The Patient gets notified with the message 'Your Trip Has Started' as soon as their Trip begins.
    rider get notification for trip started

    Ongoing Ambulance service

    Ongoing Trip
    • The location of the Ambulance will be visible on the Map. There will be SOS button on the App for emergency purpose and change the destination.
    • They can also share the location with Family and friends if needed.

    Ambulance service Completed

    Ambulance service completed
    • As soon as Ambulance driver reaches the location, they slides the button 'End Trip’ to notify the end of Trip and Patient gets notified of same.
    • Patient gets notified on Trip completion with the message ‘Your Trip has Completed'.
    Ambulance driver slide to end trip and Patient get notification for Trip completed

    Summary of the Invoice

    invoice summary
    • Upon completion of the Ambulance service, the App generates an invoice whose summary gets flashed on the screen of the Patient and Ambulance driver both.
    • The summary mentions the details of the Ambulance service like fare, discount applied, etc. to name a few.
    Trip fare

    Other Features

    Free Delivery Promo Codes for Specific Delivery Stores

    Manage Vehicles choose sub categories
    • App Owner can set the Promo Code for Specific Stores or for all Stores. Free Delivery Promo code can be ON/OFF.
    • Having this, the Customer will see that Delivery is Free but in real the Store Pays for it as part of promotion.

    Location Wise Banners throughout the System

    Cost Manually
    • App Owner will be able to create Application’s Home Page Banner’s Specific to Target Location. User will see Banner according to the Location Address in User Application Home Page Screen.

    Location Wise Push Notifications throughout the System

    • App Owner will be able to send Push Notification to all Users of selected Location.

    Advanced and detailed Service Search

    • With this new Search Services, a User can Search Services based on keywords and wont have to scroll till end of screen while looking for all Services.

    USING FIREBASE FOR MOBILE NUMBER VERIFICATION

    • Firebase Authentication provides backend Services to authenticate users by verifying their phone number. Using this technology, you can avoid verification of User's Phone Number that uses expensive 3rd party SMS.
    • User can enter his phone number and verify.
    • An OTP will be sent to user on his number for verification.

    Day Wise Separate Timeslots for Stores

    • User can see the day wise timeslots for any Store they have selected.
    • Stores can manage the day wise timeslots from their Application. Stores can select Weekdays and Weekend for Stores as per your region's culture.

    Order Cancellation by Driver

    Order Cancellation Order Cancellation
    • This feature in application in Store Delivery services.
    • A Driver can also cancel the order for any specific reason.
    Order Cancellation
    • Driver can choose the reason of the cancellation of Order and then cancel the Order.

    Order cancellation by Store

    Order cancellation by Store Order cancellation by Store
    • A Store can view the order placed by the user.
    • They can confirm or decline the order as per availability of Items.
    • Stores can Decline the order by choosing the appropriate reason like Driver not available, Items out of Stock or any other reason.

    OTP Verification to Start the Job

    OTP Verification to Start the Job
    • User need to provide the OTP to the Medical Expert in order to start the Service.
    • Medical Expert will then enter the OTP in his Application and start the Service.
    OTP Verification to Start the Job

    Voice Instruction for Delivery Driver

    Voice Instruction for Delivery Driver Voice Instruction for Delivery Driver
    • User can send the Voice instruction for Delivery Driver while placing the order.
    • Feature is available in Medicine Delivery App. Customer can leave voice messages instructions for Delivery Drivers.
    Delivery Driver
    • Delivery Drivers can then listen to the voice instruction and can follow the delivery process accordingly.

    Wallet to Wallet Money Transfer

    • Looking for a seamless way to make payments easy for your customers and assist the Medical Experts to receive the money directly in their wallet. Then, the wallet-to-wallet money transfer feature will turn out to be a blessing in disguise for your customers and Medical Experts.
    • Through the pre-integrated wallet present, your customers can smoothly make payment through their wallet and have it sent to the Medical Expert wallet especially if they do not have the change for the services that they have booked.
    • All that they would need to do is select from the two options present in the wallet to whom they wish to send, the user or Medical Expert and then choose their respective mobile number or email address and then they need to transfer the money from their wallet to the wallet of the Medical Expert.
    • This feature will surely be a blessing in disguise for your customers and Medical Experts who may be wary of sharing their card details.

    Membership Subscription Plan

    • Admin can define the Membership plan for Medical Expert / Drivers / Delivery Drivers like 2 months subscription and 1-week subscription plan.
    • Medical Expert / Drivers / Delivery Drivers can subscribe for the Plans and can provide the Services.
    • The unique feature that will ensure that no Medical Expert is able to provide their services until they have subscribed to the subscription plans present on the Membership Subscription Plan.
    • All that the Medical Expert needs to do is enter their application and then tap on My Subscriptions.

    Manage Notification Sounds and Ringtones

    Using this unique feature, you the owner of this expansive Medical Expert app can manage the notification sounds and respective ringtones of the store, the Medical Expert and the customers respectively.

    The notification sounds may include the request sound for the driver and rider, notification sound for the Medical Expert including the message and notifications, notification sound for the user including the message and notification, for the store including the message and notification and finally, the VOIP based (voice over internet protocol) call.

    All these sounds are already present in the solution itself. However, other sounds may be downloaded from the admin panel.

    Favorite Driver / Medical Expert

    • The User can mark the Driver / Medical Expert as favorite from his App. Also, he can remove the Driver / Medical Expert from the favorite list anytime.
    • In the case when you do the Trip /Job with any Medical Expert and you want that Medical Expert again, then mark the Driver / Medical Expert as Favorite.
    • This feature allows the system to set the Priority in sending the request to all favorite Drivers / Medical Experts first whoever is marked as favorite by the User.
    • This way User gets the chance to book the Trip with any specific Driver.
    • Once the Trip is completed the User will be prompted to rate the Trip and provide the feedback.
    • Apart from this, the User will get the option to mark the Driver as a favorite so that next time they got the chance to do the Trip again with them.

    Mark Store as Favourite

    • So, your customer wants delivery from their favourite store? Don’t worry! With the Mark Store as Favourite feature present on the app of your customer, they can order the items from the stores they feel is the best by simply marking it as a favourite.
    • This feature will make sure that your customers are always happy when they wish to enjoy items from the store whose delivery they may have liked in the past.

    Toll Calculation for USA (Using 3rd party Toll API)

    • The app will automatically calculate the Toll that may be charged on the Route. This amount is added to the total bill in the Invoice. This feature is exclusive for specific countries only.

    Set Destination Later Feature

    • When the User wants to make a booking for a later time, they can Click on the "Enter Destination Later option".
    • Using this feature your Rider can put in the destination of their trip even after the trip has begun.

    Edit Profile

    User can edit their profile
    • The User can Update and Edit their profile whenever they like.
    • The Medical Expert can update and edit their profile whenever they need to.
    Medical Expert can update their profile

    Wallet integration

    user and Medical Expert manage their wallet user and Medical Expert manage their wallet
    • The User and the Medical Expert will both have an in App wallet.
    • This wallet can be recharged or topped up whenever they want.
    • Users can pay for the Job using Wallet.

    manage Vehicles & services

    Manage Vehicles choose sub categories
    • Medical Expert can manage his Services, Vehicle, Rates from here.
    • They can active/deactivate the Services.

    Manage Documents

    Medical Experts upload ID documents from panel
    • The Medical Experts will be able to upload all the documents that are required, such as Experience certificate. from this panel on the app.

    Manage Gallery

    choose sub categories
    • Medical Expert can manage his Image gallery and can upload the images to showcase to the customers.

    Payment

    • Users & Medical Expert can manage their Credit Card information through this screen. The card detail is NOT stored in the APP or in the App's database. It's stored in the safe vault of the Payment Gateway Company. We just call the card using token and the secure transaction happens on the uber clone App.
    • Users and Medical Expert can top up their wallet too.

    Multiple credit card management

    choose service categories
    • User will have facility to add / save multiple cards in the App.
    • They can make payment from any Card and can delete if needed.

    Booking History

    user app login and registration screen
    • User can view all his Past and also upcoming Bookings.
    • Upon tapping on the list, the detail and invoice of past booking can be viewed.
    • Medical Expert can view all his past and also upcoming Bookings.
    • Upon taping on date on calendar, Medical Expert will be able to view summary of that day including Total earnings, Average Ratings, Completed Jobs. And can then tap on any Booking to view it's detail and invoice.
    Driver login and registration screen

    Waybill

    Waybill for the Ride
    • The Waybill for the Driver will be displayed here with all the necessary details.

    Heat View Of the Driver / Delivery Driver / Medical Expert App

    heat view for taxi and delivery
    • Medical Experts will be able to view the Heat Map and identify the areas that are generating maximum requests. This can be helpful so that they too can reach that area in order to pick up more rides or Deliveries.

    Notifications

    choose service categories
    • User can view list of Notifications added by the Administrator of the App.

    Emergency Contacts

    List of emergency contacts
    • The App allows the Users as well as the Medical Experts to list up to 5 emergency contacts who can be reached through an alert instantly.

    Promo code

    choose service categories
    • App Owner will be able to create Promo code Specific to Target Location. Only Users belongs to that location can use that promo code.
    • This section offers users with a coupon that they can apply for the next service that they book and empowers them to choose from any one of them.

    Feedback

    user and Medical Expert fives feedback to eachother
    • The User as well as the Medical Expert will be able to provide feedback about their experience with each other. They can give a star rating or write a review.

    Invite Friends & Manage Bank Detail

    user and Medical Experts upload their bank details and invite friends to download app
    • Medical Expert can upload their bank details from this panel on the App.
    • Users and Medical Experts will also be allowed to invite friends to download and start using the Application.

    Earning Statistics

    Medical Expert monitor earning they have made
    • The Medical Experts will be able to monitor how much earnings they have made over a stipulated time duration.

    Other Information Screens

    Information like About Us, Privacy Policy, Terms and Conditions, Contact US and FAQ.
    • This panel will give you all the other relevant information like About Us, Privacy Policy, Live Chat, Terms and Conditions, Contact US and FAQ.

    Advertisement Banners

    • Showcase your offers and promotions on the Home screen of the App. When the users open the App, they can see your advertisement.
    • You can keep advertisement, promotional content and any kind of information that you want to highlight about the App right here.

    Facebook & Google Ads integration

    User can edit their profile
    • Using this feature, the site owner can put the Facebook advertisements in the apps and generate revenue from it.
    User can edit their profile
    • Using this feature, the site owner can put the Google Ads in the apps and generate revenue from it.

    Contact Us & Help

    user app login and registration screen
    • Users and Drivers can contact App Administrator through the Contact Us Page.
    • They can also check the FAQ's for detail.
    Driver login and registration screen